Want to install QuickBooks Desktop enterprise on Workstation? In this article all the related stuff is available, just read it fully. QuickBooks Desktop Enterprise installation complete guide is for those users who are installing it for the first time or converting from any other accounting software or upgrading from otherQuickBooks versions. QuickBooks Desktop Enterprise is one of the most robust accounting software designed and developed by Inuit for medium-sized businesses. For More info contact our QuickBooks ProAdvisor toll-free +1-844-405-0904 to get the best QuickBooks Enterprise support.
Therefore, it is important to set up the software right on the first attempt. In this article, we’ll show you how to install QuickBooks Desktop Enterprise on workstations as well as on a server. This guide will let you through the entire procedure of QuickBooks Enterprise Hosting and configuration.
Things You Need to Do Before Installing QuickBooks Enterprise
- While installing and configuring the QuickBooks Enterprise accounting software you need to have the system’s administrator authority. It is important so that file sharing and network can be set up properly.
- The user should have possessed a good knowledge of company financials. The person should know how to set up the company files and which users should have access to the company files. (NOTE: If you don’t have any financial understanding then you can hire an accounting professional who will easily perform these tasks for you.)
- You also need to back up all financial and bookkeeping data from the previous accounting software. According to the IRS guidelines, you need to hold this data for 10 years.
- Before installing, you should know which option you’re going to choose for setting up a network. There are 3 networks set up options available from which you can choose. (NOTE: But, if you don’t have knowledge of networking or file-sharing, then you a QuickBooks ProAdvisor who’ll assist you in setting up the software.)
- Central Server Option: In the central server, the QuickBooks database server manager is installed. The database manager also stores the company files. The QB enterprise is installed on all the workstations. The workstations can access company files over the network.
- Peer-to-Peer Option: QuickBooks Enterprise is installed on every workstation. In Peer to Peer Option, one station stores the company file, and others access the files on the network.
- Remote Desktop Services Option: In the remote desktop service option, the enterprise is installed on a central server. It is different from others, here the QB enterprise is not installed in workstations. QuickBooks Desktop Remote access the application and the company file.
- If you are going to use QuickBooks Enterprise in the Multi-user mode then you also need to test the network bandwidth. But, If you are not going to use the file-sharing option then you can skip this step. You need to confirm that the network connection is fast enough for using the Enterprise on every workstation.
- First, select a large-sized file for selecting.
- Then, note the size of the file (in MB).
- Now, share the file over the network. Note the time taken in seconds.
- Use the below-mentioned formula to test the bandwidth.
- File size(in MB) × 8 ÷ copy time (NOTE: If the outcome is more than 40 Mbps then the connection is perfect otherwise you need to improve the network connection.
- You need to configure the Firewall for QuickBooks Enterprise installation. Especially, when you are going to set up in multi-user mode.
- Then, check the system requirements for running the QuickBooks Enterprise properly.
Steps to Install and Set Up QuickBooks Enterprise on a WorkStation & Remote Server
The entire process of QuickBooks Enterprise installation can be divided into six major steps. Below, we have explained every procedure in detail and in a simple manner.
1. Install QuickBooks Enterprise on Server
The most important thing is that install the same version of the enterprise on all the workstations.
- Firstly close all running(including anti-virus) program.
- Then, open the downloaded QB Enterprise file. Although, you can also use the backup CD to install the software. But, we recommend you to use the downloaded file instead so the latest version can be installed.
- After this, follow the screen instructions until you need to choose the installation type window.
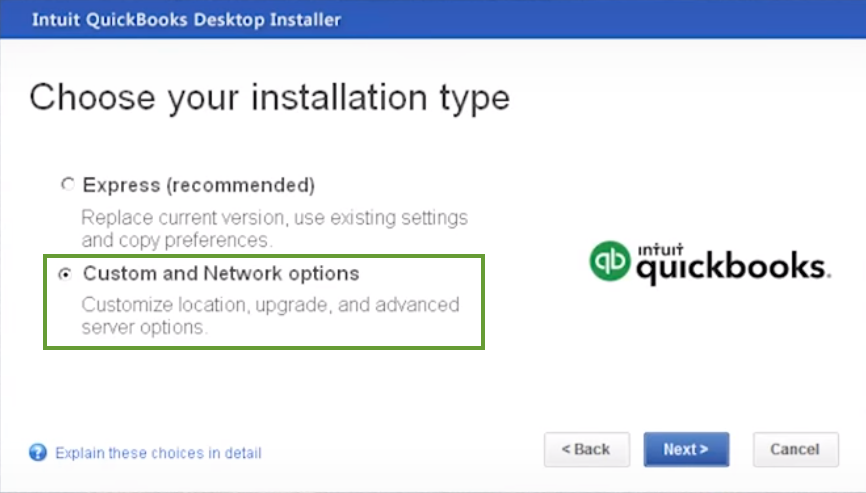
- Select the Express option, if you want to let the installer decide what options are best for you or select the Custom and Network option if you want to customize the installation according to you.
- Then, you will see the below-mentioned three options to choose from. The option available here will depend upon whether you are installing on a server, terminal, or workstation.

- I’ll be using QuickBooks on this computer, but the company files will be located on a different computer.
- I’ll be using QuickBooks on this computer and storing our company files here so it can be shared over our network. You need to choose this option if you want to use the server as a workstation also. If you are choosing this feature in peer-to-peer networking, then make sure you install on the fastest system.
- I’ll not be using QuickBooks on this computer, but I’ll store our company files on it so the files can be shared over a network. Select this option, if you want to install the QuickBooks Database Server Manager only. Then, this computer will act as a server only.
- Just follow the screen prompts until the installation is complete.
- After installation, you need to open and configure the QB Database Server Manager.
2. Setup QuickBooks Database Server Manger
2.1 Configure QuickBooks Database Server Manager
When the QuickBooks Enterprise installation is completed, you need to configure the QB Database Server Manager so that other users can also access company files over a network. You can also check which user is accessing the company files in real-time and check for the latest QB Database Server Manager updates.
You only need to implement the below-mentioned steps on the host computer i.e. computer on which you are going to store the company files.
Although, Database Manager will open automatically as soon as installation is finished, in case it’s not then go to the Windows Start button then Programs>QuickBooks>QuickBooks Database Server Manager.
2.2 Scan QuickBooks Enterprise Company Files
In order to let other users to access the company files that are stored on the server, you need to scan all the company files once.
- In the Configure QuickBooks Database Server Manager window, open the Scan Folder tab.
- After that, select the Add Folder option and then go to the location on a computer or server where company files have been stored. Select the folder and it will be visible in the Folder that contains the company files section.
NOTE: You can also scan the entire drive for the company files if you are not aware of where it has been located.
- To start the scan, click on the Scan button. It might take a while depending upon the size of the files. Once the scan is completed, you’ll be able to see the QuickBooks Company Files Found dialogue box.
NOTE: If you created a new QuickBooks company file or even changed its location then you need to scan the drive for the company file again.
- You can also monitor drives in which you added, removed, or renamed company files. By doing that you don’t need to scan the drive again and again. To enable this, go to the Monitor Drive tab and then select all the drives you want to monitor.
3. Install QuickBooks Enterprise on Workstations
In order to allow users to access the company files stored over a network, you need to make sure that the users have read/write access and delete/create rights to the drive where company files are stored. You will be needing administrative authority for providing this access.
3.1 Install QB Enterprise on all Workstations
- The installation process of QuickBooks Enterprise on the workstation is the same as the server. But here you need to choose the option stating I’ll be using QuickBooks on this computer, but the company files will be located on a different computer.
- Then, follow the on-screen instructions until the installation is finished. If you ever encountered an error during the installation process then you can have assistance from our QuickBooks support team via toll-free number +1-844-405-0904.
3.2 Set Up Multi-User Hosting
In multi-user hosting, only one PC can host multi-user access. That computer should have stored the company file in it.
There is no need to enable multi-user hosting on the server if you have just installed the QB Database Server Manager. Although, you should check that multi-user hosting is disabled on all the workstations.
- In Peer to Peer option, multi-user hosting is ON in server and OFF in workstation.
- Remote desktop server, multi-user hosting is On in server and not applicable to the workstation.
- The Central server, multi-user hosting is ON in server and OFF in workstation.
Check that multi-user hosting is enabled on the server :
- Open QB desktop enterprise on the server.
- Go to File and click Utilities.
- Check that Stop Hosting Multi-Access displayed in the Utilities.
If it’s displays you will need to follow the steps below
- Click on Host Multi-Access.
- Then, click on Yes when asked to confirm starting multi-user access.
- When asked to close and reopen the company file, click Yes.
4. Register QuickBooks Desktop Enterprise and Create Company Files
4.1 Register QuickBooks Desktop Enterprise
To register QuickBooks Enterprise, you need to perform the following steps on the server which is also acting as a workstation i.e. the full QuickBooks Enterprise version should install on the computer.
If only QuickBooks Database Server Manager is installed on the server then you can use any workstation to register QB Enterprise instead.
You’ll be requiring administrative credentials for registering QuickBooks Desktop Enterprise. It will be suitable to have assistance from a professional who possesses the financial details of your company and knows which users should get access to the company files.
NOTE: After installing QuickBooks Enterprise, you’ll get a free 30 days trial in which you can make sure that software is perfect for your business. After 30 days, you have to register QB Enterprise on every computer on which it is installed.
To register QB Enterprise, follow the below steps.
- First, open QuickBooks Desktop Enterprise software.
- Then, go to the Help menu, and here click on the Register QuickBooks option.
- After that, click on Begin Registration option and then follow the instructions.
- If you do not succeed in registration via QuickBooks software then you can also register Enterprise via phone.
4.2 Create and Import QuickBooks Company Files
After you finished registering QuickBooks Enterprise, you can create a new company files or you can also export financial data from the older accounting software.
To Create New Company File
- First, open QuickBooks Desktop Enterprise software.
- Then, open the File menu and then click on the New Company option.
- After that, follow the onscreen instructions.
Recommended Article: Click on the link, if you want to learn how to create company files from scratch in QuickBooks.
To import data from other software
You can use QuickBooks Conversion Tool to convert data files from other accounting software like Quicken, Peachtree, Microsoft Small Business Accounting Tool to QuickBooks.
- First, open QuickBooks Enterprise software.
- After that, go to the File menu and click on the Utilities option.
- Then, click on convert and select the software from which you want to export company files.
- Click Yes, when asked to download QuickBooks Conversion Tool.
- After filling a short form, you can download the conversion tool.
- Then, open the downloaded file and install the conversion tool.
- After that, open the QuickBooks Conversion Tool from the Windows Start menu.
- Follow the on-screen instructions to start conversion.
5. Configure QuickBooks Enterprise for Business
Setting up QuickBooks for business is very easy, just follow the onscreen command and click on Start Working button.
Quick Start Center- It is used to creating invoices, bills and checks, sales receipts, etc. With the help of this, you can also view customer and vendor account balance.
Review your Chart of Accounts- QuickBooks created a chart of accounts based on your business during the setup process. Now, you should review it and check it whether has all the accounts that you need to run the business. You can easily edit, change, delete, or add an account later if you want.
Enter Historical Transactions
Entering historical transactions in QuickBooks will help you in tracking and collecting late payment transactions from customers. It is important to enter transactions otherwise QuickBooks won’t able to know how to apply payments to customers.
We recommend you to follow the below order while entering transactions.
- Enter invoices that you’ve sent since the start date.
- Purchase order that you’ve sent since the start date.
- Cash or cheques you’ve received since the start date.
- The deposit you’ve made before the start date but does not appear on the statement before the start date.
- Bills you’ve paid or received since the start date.
- Checks or payments you’ve made other than bills since the start date.
- Uncleared charges or checks i.e. charges that do not appear on the statement before your start date.
- Bank charges, fees, and interests.
- Employee year-to-date information.
- Payroll liabilities you owed at the date you start using QuickBooks.
Enter Optional Adjustments
These are a few adjustments that you might need to make after you created your company files. Based on your company, you may need to
- Enter Sales Tax Liabilities.
- Adjust the Uncategorized Income and Uncategorized expense account (Accrual Basis only).
- Adjust current income and expense account, if your starting date of QuickBooks is not the same as the beginning of the fiscal year date.
Payroll- If you subscribe to this service, you have to add year-to-date payroll information. If you have not, then your payroll tax information may not accurate.
Backup your company file- The best service is an online backup service that comes with the QuickBooks Enterprise subscription. You can also manually back up your company files by going to Files<Create Backup option, in that way you can save the backup files in your desired location like an external hard drive or server.
6. Create User and Set up Roles
While QuickBooks Enterprise installation and set up process, you can apply user permissions to different activities by assigning distinct user access levels like view-only, edit, create, modify, print, and delete.
There are a few predefined roles with access to certain activities that are available in QB Desktop Enterprise. For example Account Receivable, Account Payable, Banking, Sales, and Payroll Manager. You can customize these predefined roles or create a new one if you want.
NOTE: Make sure that all users should have assigned roles.
6.1 Create a User
- First, open QuickBooks Enterprise.
- Then, select the Company option from the top menu bar and go to Users<Set up users and Roles.
- Here, open the User List tab and then select the New option.
- After that, you need to enter the password and confirm it.
- Now, you can assign roles to this user and click OK.
6.2 Set Up a Role
- First, open QuickBooks Desktop Enterprise.
- From the top menu bar select the Company menu and then go to Users<Set up users and Roles option.
- Now, open the Role List tab and then select the New option.
- In the Role Name field, you can either create a new role or select from one of the predefined roles.
- Then, set access levels to the activities and OK.
The Bottom Line
In this article, we’ve provided complete information on how to install QuickBooks Desktop Enterprise and set up QuickBooks Enterprise hosting service in very simple steps. During the installation process if you encounter any errors then you can call our QuickBooks Support team via a 24/7 toll-free number +1-844-405-0904.
You can find additional details here.