Wanna learn how To Install & Configure QuickBooks Enterprise ODBC Driver? In this article, we are providing all the details to perform this task. Today we will discuss qodbc driver for QuickBooks Enterprise solutions, what it is & how to download, install and configure it. Read the complete article to understand the ODBC driver, the process to download & configure it. Still, having an issue contact our QuickBooks Proadvisor toll-free: +1-844-405-0904
QuickBooks Enterprise makes it possible and convenient for QB users to export the data or other information to Enterprise applications. It is Enterprise in such a way that it can work flawlessly with ODBC perfectly.
QuickBooks Enterprise is merely confined to generating invoices, deposits, and financial transactions. This Enterprise software can also help you create an accurate report and take the Microsoft Office application. It generates an additional report on the financial transactions in your business.
What is QuickBooks Enterprise ODBC Driver?
Open Database Connectivity (ODBC) Driver allows you to export data from your company file to programs like Microsoft Excel, Microsoft Access, Crystal Report, File maker, Alpha, or .net to create the custom report of QuickBooks Enterprise ODBC Driver. It also allows the admin to access the QuickBooks company files from third-party Software like Microsoft Excel, Access, and Crystal reports. Using this driver you can communicate and exchange data between QuickBooks Enterprise and other Software easily.
In addition to this, you can also create spreadsheets in Excel, tables in MS Access, and reports in the Crystal with real-time QB company files data. Some other features of QB Enterprise OBDC are that you can design your own reports, combine many company files into one, personalize invoices, create merge mails, and many more.
Export your data files
QB Enterprise integrated with the ODBC mechanism, you can easily take your data computer file across the data Microsoft file application. Enterprise Accounting suite allowed Microsoft Excel, Microsoft Access, Alpha, QlikView, Python or.Net, etc.
QuickBooks Enterprise cancreate a custom report on financial transactions using the tools without any technology.
Technical terms that you don’t know:
QuickBooks Enterprise accounting software users no need to worried if they are not aware of the technical terms. If you have the QB software application information than they can apply only those measures that can help them to get the ODBC Driver.
Download and Install ODBC Driver for QuickBooks Enterprise
Before installing the QOBDC make sure that you update the QuickBooks software to the latest version available to perform the installation. Also, uninstall any previous version of QB OBDC installed on the system.
- First if you had not downloaded any OBDC driver yet then download it from the official website.
- If you want then you can also read the Read me file before you begin the installation for the additional information about the driver like new features, troubleshooting tips, etc.
- Then, save the driver file with the name “QODBC.exe”. It is a self-extracting type of file. You should save it at a location where you can easily find it like Desktop or My Documents.
- After that close every running program that could harm the installation process. You can use the Windows Task Manager for this purpose.
- Next, double-click on the downloaded driver file to open the installer program.
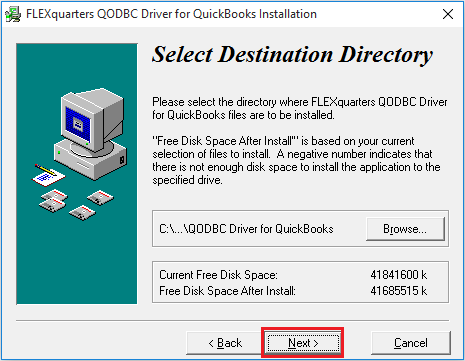
- In the QODBC Driver for QuickBooks Installation window, browse the location where you want to install the QODBC support files. Then, click on the Next button to continue.
- After that QODBC Driver for QuickBooks Enterprise will be installed on your computer.
You can start using the ODBC Driver right away but we recommend you configure with your QuickBooks Enterprise before using it.
Configure QuickBooks ODBC Driver
- To configure Driver, first, go to the Windows Start menu and then open the QODBC Setup Screen option.
- After that, QODBC Driver for QuickBooks Setup window will open.
- In the General tab,
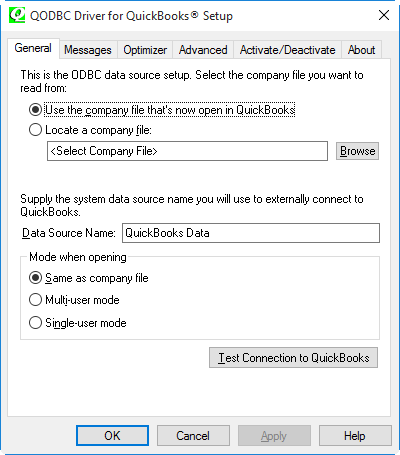
- Use the company file that’s now open in QuickBooks: Choose this option if you want to allow the QODBC to use the company file that has been open right now and also allow you to switch between other QB company files with creating DNS for each file.
- Locate a Company File: If you want to use another company file then choose this option and browse the location of the company file.
- Data Source Name: This is a display name for QuickBooks Data, for example, QuickBooks Data, QB PRO Data, or My QB Data.
- Mode when opening: This setting will allow you to choose how QBODBC opens the QuickBooks company files. There are three options available from which you can choose.
- Same as company file: If you choose this option then QBODBC will open the company files in the same mode as it is.
- Multi-user mode: In the Multi-user mode, multiple users will be able to work simultaneously on the company files.
- Single-user mode: If you want that only you can exclusively access the company files then select the Single-user mode option.
- After that click on the Test Connection to QuickBooks, this will determine whether you have a proper connection for installation and settings with QuickBooks and its company files.
- In the Message tab,

- This option will allow you to review QODBC messages, clear ODBC messages, and review SDK (Software Development Kit) messages. The messages could be related to the errors and issues related to communication with QuickBooks.
- Detail Tracing: It is a support tool that creates trace logs of what QBODBC is doing in the background. You can review this by clicking on the Review Trace Log. We recommend you to turn off this feature when not in use because it can use large disk space.
- Display Optimizer Status Panel: By choosing this option, you can see the optimization of the data. This feature can be proven useful when working with large data files.
- Display Driver Status: When you choose this option, you’ll be able to see what QODBC is doing while accessing the QuickBooks data.
- Verbose Optimizer Status Panel: In this whenever, any kind of optimization happens a optimizer panel pops up. While the normal optimizer panel only comes up when there is any full update or reload all.
- In the Optimizer tab,
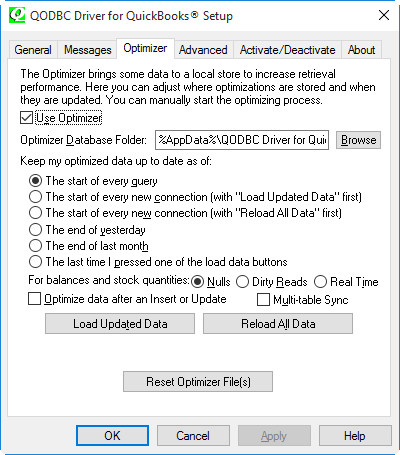
- Use Optimizer: By using the optimizer you can bring some data to the local store and help to increase the performance also. You can also adjust where optimization is stored and when they are stored. Checkmark the box stating Use Optimizer to activate it.
- Optimizer Database Folder: Here you can select the location on the disk where the local data should be stored. The default location of the folder is at the location where you installed the QODBC. The file stored in this folder will be named as same as the QuickBooks company file. If you want to change the default location for saving the file then click on the browse button and then select the desired location.
- Keep my optimized data up to date as of When you allow the optimizer to synchronize the data itself with your company data. Then you need to select a time period of the synchronization. There are a few options available from which you can choose.
- The start of every query: This is the default setting of the driver. If you require data with the latest and every minute update and speed is not a concern then you can choose the default setting.
- The end of yesterday: This option provides the best balance between the data update and speed, and also suitable for most users. In this the data synchronize once per day.
- The end of last month: This option is good when you need to access the previous month or last year’s report. The speed will also be more because there is no need to synchronize the data again.
- The last time I pressed one of the load data buttons: In this the synchronize only occurs when you manually press the Load Update Data button.
- For Balances and Stock Quantities: Here are three options, the first Nulls option will return all the fields that cannot be kept for sync, the second option is Dirty Reads this option will return the most current value that was loaded into the optimizer cache, and the third option is Real-Time this method uses the slow process to get data from QuickBooks but making sure that you get the most current value for the requested fields.
- Optimize data after an insert or update: With option is enabled QOBDC only sync data when you use insert or update command in the table. This can be proven useful for those users who want to check whether their data has been perfectly synced or not.
- Multi-Table Sync: By default, this option is unmarked for all the Non-USA QuickBooks Enterprise users. In this feature, the QODBC uses other tables to re-sync tables. Although, it can negatively affect the speed and performance of the program, therefore, it is off by default.
- Load Updated Data: Use this button if you want to sync the optimized data with your QuickBooks company file. This will only load the data that was changed since your last automatic or manual synchronization.
- Reload All data: Use this option if you want to completely rebuild the data newly. It will be useful when you start a new company but you don’t want to synchronize the tables to make sure that your date is 100% accurate.
- In the Activate/Deactivate tab.

- In this tab, you can purchase the CDKEY and then use this key to activate or deactivate the license or you can also find more information about the current version of the driver you are using.
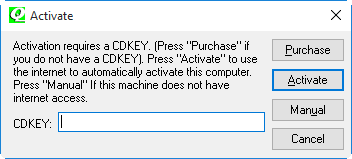
- Activate: Here first you need to buy the CDKEY, you can do that by clicking on the Purchase button, and then you can activate the product from the evaluation version to the fully activated QODBC version. There are three types of fully activated version Read-only, Read/Write, and Web edition you can upgrade to any one of them. From here, you’ll be requiring an internet connection to activate but you can also phone for activating the product.
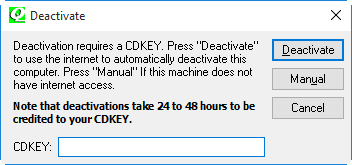
- Deactivate: You can also deactivate the current version of QuickBooks Enterprise ODBC Driver using this online method. Usually, this process takes around 24 to 48 hours before you can have your deactivate license. You can reactivate the license with the CDKEY on the other computer or system. If you do not have an internet connection then you can use your phone to contact your seller and provide them information for deactivating the product CDKEY for you.
- In the About tab,
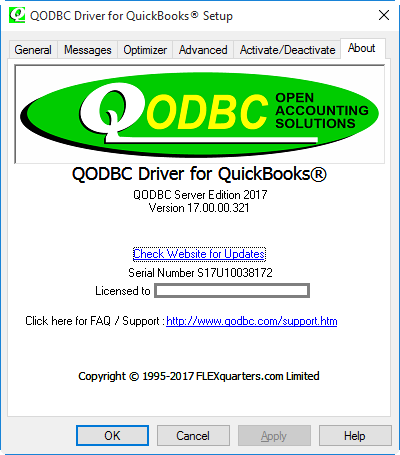
- In the about, you can see which version of QOBDC is installed on your computer whether it is an evaluation version or fully activated version. In addition to this, you can also see the serial number that will be required for the updates, refund offers, technical support, and help desk information.
The Bottom Line
Above we’ve discussed everything you need to know about the QuickBooks Enterprise ODBC Driver like How to install and configure the QODBC? If you still have any queries or facing any ODBC installation error then you should contact our QuickBooks Support team through a 24/7 toll-free number +1-844-405-0904. Our team consists of experienced professionals who can serve QuickBooks Enterprise support for any issue instantly.