Want to manage your Shopify products, stock levels, and sales orders through QuickBooks Commerce? In this article, we will show you, how to integrate Shopify with QuickBooks commerce, and how can you manage multiple works in one place. Meanwhile, you can drop a call to this number+1-844-405-0904 for expert advice.
Procedure To Sync Shopify With QuickBooks
Here is the procedure to integrate Shopify with QuickBooks:
Step 1: Manage work in your Shopify Store
In the first step, you need to prepare everything in the Shopify Store to integrate with QuickBooks. So for that, you have to follow some of the steps, given in below;
Recheck the Product SKUs in Shopify:
QuickBooks Commerce uses SKUs to identify and link inventory between Shopify and QuickBooks Commerce to smooth inventory updates and streamline order management. So reviewing your Shopify account is the priority.
- Visit Shopify Account.
- Check each product and variant have a unique SKUs.
Check your Existing Installed Apps :
One of QuickBooks Commerce’s main benefits is to supply your business with centralized internal control and automation.
So first check whether you have been using another app. If you have the app then, uninstall the existing app or integration before integrating QuickBooks Commerce and Shopify.
Step 2: Install Shopify store in QuickBook Commerce:
You have to complete 2 steps to install the Shopify store in QuickBooks Commerce. Here are they;
1) Process for installation:
Here is the procedure install Shopify in QuickBooks commerce;
- Select the ‘Browse Apps’ on the left sidebar and visit QuickBooks CommerceApp Store.
- And then, select the ‘eCommerce’.
- Click the Shopify title, and select the ‘Install App’ option.
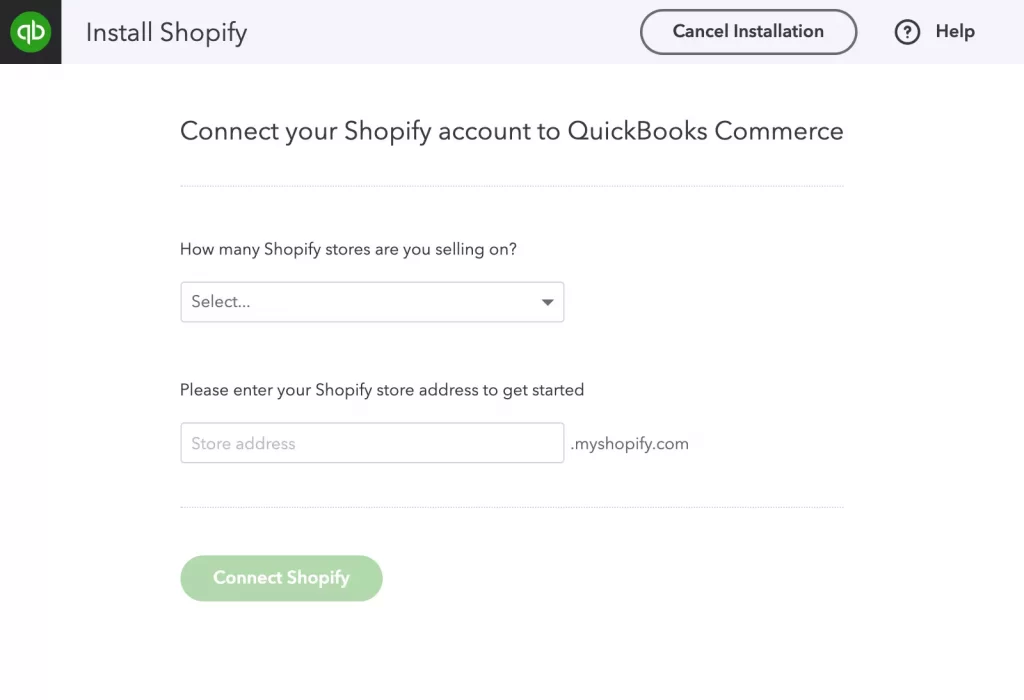
- If you have got one Shopify store, select ‘I’m selling on one Shopify store’ from the dropdown menu.
- Enter the store address.
- Click the ‘Connect Shopify’ button. New tab information you will be redirected to the Shopify account’s admin page.
- After that, allow QuickBooks Commerce access to your Shopify account.
- QuickBooks Commerce has read/write permissions for the following Shopify data now.
NOTE: QuickBooks Commerce will not modify any of these data:
- All product information
- Sales orders
- Customers
- Location
2) Import Order & Initial Order:
Now import your order, and initial order by following the below-given procedure;
Match & Import products:
- In Installation time, QuickBooks Commerce will check and match products in Shopify using the SKU.
- If there is no matching SKU. In this case QB, commerce will import the product from Shopify as a new product into QuickBooks Commerce.
- If you have similar products in QuickBooks Commerce but you try to Shopify with different SKUs, a “duplicate” product will be created.
- If you have already set up products in QuickBooks Commerce during the trial period. It is recommended to settle on that option.
Don’t Import existing products :
- If you have already created your products in QuickBooks Commerce before the installation process.
- If you have got existing products within Shopify you don’t want to bring them over to QuickBooks Commerce.
Import new orders:
- QuickBooks Commerce won’t import any historical orders created before the installation.
- If you had chosen ‘Match & import products’, then QuickBooks Commerce will import the product as a new product.
- When you have to choose ‘Don’t import existing products now’, QuickBooks Commerce will import the product into the system.
- If previous orders are imported into QuickBooks Commerce, it’ll execute inventory to the order and can make it unavailable purchasable until the order is cancelled or fulfilled.
3) Product Sync
To sync a product, you can follow the below-given methods;
Sync all product information:
Once you connect your Shopify list with QuickBooks, your future Shopify will be done within QuickBooks Commerce. That may be stock levels, prices, images, or product information
Sync product values & stock levels only:
QuickBooks should be the only helper to your product prices and stock levels. It only updates your product price and stock levels after connecting once.
Don’t sync any product information:
QuickBooks will not update, modify and publish any products to Shopify. It will only, import, and manage orders in Shopify after it gets connected with QuickBooks. You will find three options to sync. There you have to choose any one of them, according to your need type;
Choose the ‘Sync all product information’ if;
- If you install any app that can change product inventory.
- And if the Shopify settings including inventory and product SKUs.
- If you are ready to go live with QuickBooks Commerce.
Choose the ‘Sync product prices & stock levels’ if;
- If you manage multi-language stores,
- Use specific services to customize product descriptions, images, and titles on Shopify,
- If you’ll only believe QuickBooks Commerce to manage orders, prices, and stock levels,
Choose the ‘Don’t sync any product information‘ if;
- If you don’t review your product SKUs on Shopify,
4) Price List Sync:
If you selected the following sync settings in the above Product Sync to step correctly- ‘All Product Information’ or ‘Product Prices & Stock Levels’
Step 3: Mapping The Location:
Let’s set up your inventory or product list locations in QuickBooks Commerce.
- QuickBooks will automatically detect locations within your Shopify account.
- Then It creates identical locations in QuickBooks Commerce,
- It imports the listed stock levels.
Step 4: Complete The Installation Process:
Now complete the installation procedure by following the given method;
- Review integrating settings in the ‘Summary’ section.
- Click on ‘Confirm’, if you agree with all the settings.
- After doing this process you will receive an email from QuickBooks.
- To check the status of your integration and sync, click on the ‘My Apps’ tab on the left sidebar and select your ‘Shopify store’.
Note: If your store has a large number of products (>10,000 variants), it may take between 3-6 hours for the import process to complete. Do not change any settings in the interim.
Step 5: Recheck your integrations :
Once you install the Shopify store and import all the integrations and products, you can check again all the integrations.
Review Products Details:
- Go to ‘Inventory’.
- Click on ‘Shopify’
- Next click on ‘Product Listing’
- Choose ‘Unliked Only’ from the dropdown menu.
It will show if any products were not imported successfully, matched, or linked.
Check Order Details:
- Visit the ‘My Apps’ tab
- Click on your Shopify store
- Click the ‘Orders Listing’ tab.
To check if any order will not be imported successfully.
Congratulations – you’re done!
If you are done with the installation and reviewing your inventory, then you successfully import all of your products lists.
It’s all about the whole procedure of Shopify integration with QuickBooks Commerce. Hopefully, now you can double your business by integrating both amazing tools. Still, if you need more information regarding this topic then feel free to contact our certified QuickBooks experts through this toll number +1-844-405-0904 for the best consultancy.