QuickBooks offers you a feature to customize the form templates according to your business. Using QuickBooks customize form templates feature, you can customize forms like estimates, invoices, statements, sales receipts, and purchase orders. In this article, we are going to show you how to use and customize form templates in QuickBooks Desktop, Go through the complete article and get your query resolved In case you need help, contact us toll-free:+1-844-405-0904
You can customize the layout and look of these forms as well as you can also decide which information should be visible on the forms. As you know QuickBooks Desktop also has a mailing envelop that you can customize as well. Without delaying further, let’s see how you can customize form templates if you are QuickBooks Desktop accounting software.
For accessing the Form Templates list
- From the top menu bar, click on the QuickBooks List menu and then select the Templates option.
Customize Form Templates in QuickBooks
- First of all, find the template from the list that you want to edit and then double-click on the template to customize it.
- Then, go to the Formatting tab and then select the Manage Templates option.
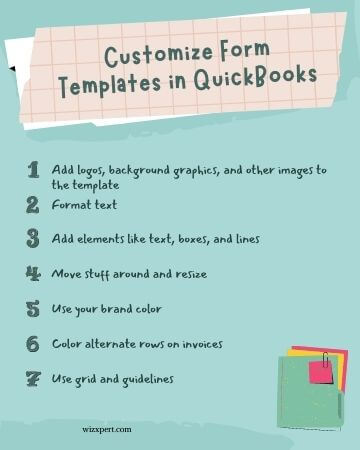
Here is the list if basic customization that you can perform on any template.
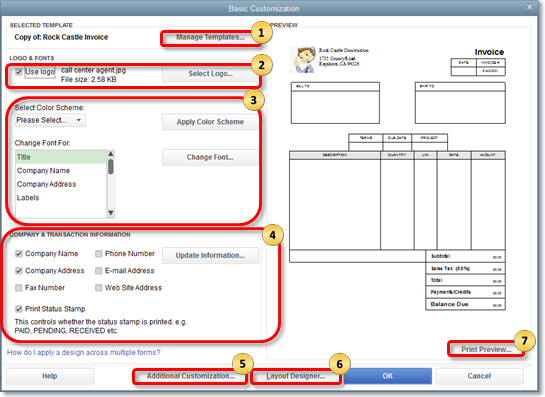
- Manage Templates: When you click on this button, you’ll be able to see the list of different templates for any specific form i.e. invoice, templates, sales orders, etc. From here, you can copy and download templates that you want to use and you can also delete any delete that you do not want anymore. It is also very convenient to differentiate and use the template that you like and also rename it if you want to.
- Add your company logo: Checkmark the box stating Use logo option and then your company’s logo will appear on every invoice and other forms as well. Currently, if you are not using any logo or even in the past, you haven’t used any logo then a new window will open where you need to select your logo. But, if you are already using a logo and wish to change it then click on the Select Logo button and choose the image that you want to use as your company’s logo. If the logo’s image is square then the result will be optimum. You may have to resize your logo image in order to fit in the square box. You should only use the image in the (.jpg) format instead of any other format like (.png, .gif, .tif formats) that have a transparent background. By doing this pixelated logo issue will be easily fixed. Many users face this error after they save the logo in the pdf format, so they can try these troubleshooting methods mentioned above to fix any error.
- Change Fonts and its colors: From here you can change fonts of some details that used in the forms like Company Name, Company Address, Labels, Data, etc. In addition to this, you can also change the color by Select Color Scheme drop-down menu and then click on the Apply Color Scheme option.
- Company and Transaction information: From here you get to choose which company and contact information should appear on the invoices. You just need to check the box in front of the information like Company Name, Company Address, Phone Number and then click on the Update Information button to save the changes you made. You can check the Print Status Stamp option if you want to show paid, pending, or received status on your invoices. Once you finished making changes and update information, you need to select the Layout Designer option so that you can select which information should appear where on an invoice or any other forms.
- Additional Customization: Click on the Additional Customization button at the bottom of the screen to add/remove information. This information usually visible at the header, column, and footer of the form. It appears on the screens as well as on the printed copy. If you put a checkmark on the Select box then you will be able to see this information on the screen while you are preparing the invoice in QuickBooks Desktop and check the Print box if you want this information to appear on the printed forms. If you to the printing tab then you will be able to see the printing options like printing orientation and many more. (NOTE: You can also allocate unique title for every header, column, and footer.)
- Layout Designer: With the layout designer option, you can move the information and items on your template so that it appears perfectly fine on the templates. You have to check the layout design every time you add or remove information from the additional customization menu.
- Print Preview: If you want to see how the changes that you have made look on a template then click on the Print Preview option. The form will exactly look like this preview when you print the form.
How to Duplicate Customize Form Template
With the help of this option, you can duplicate the design and format of the designed template let’s say an invoice to any other form type like Sales Receipt. Follow the steps mentioned below carefully to duplicate the templates.
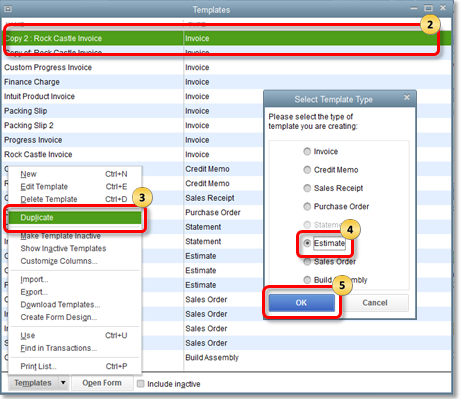
- Open QuickBooks, from the top menu bar, select the List option, and then click on the Templates option.
- From the list, select the template that you want to duplicate. It can be an invoice, estimate, or sales order, etc.
- Then, click on the Template drop-down menu and then select the Duplicate option.
- After that, a new window will appear. Here, you need to select the type of form you want this copy to use for.
- At last, click on OK.
How to import and export templates
If you have two company files then you can export these customized form templates from one company file to another. By doing you will be saving a lot of time in customizing form templates if you use more than one company file or going to start a new QuickBooks Desktop company file from a scratch.
Points to Remember:
- If you have customized the templates form in the newer version of QuickBooks then you won’t be able to export or import these into the older version of QuickBooks.
- These customized templates form cannot be transferred from one regional version to another regional version. Let’s say, you can’t import templates from QuickBooks UK version to QuickBooks US version.
Import Templates
- First, open the QuickBooks company file in which you want to import customized template forms.
- From the top menu bar, click on the File menu and then select the Templates option.
- From the list, select the template that you want to import and then open it.
- Then, click on the Template drop-down menu and then select the Import option.
- Give an appropriate name to the template so that you can find it later when you need it. You can either change its original name or keep it.
- Select OK.
- Imported template form will be available in the templates list.
Export Templates
- From the top menu bar, click on the List menu and then select the Templates option.
- Then, from the list, select the template that you want to export and then open it.
- Here, click on the Templates drop-down menu and then select the Export option.
- Review the file and then select a location on your computer where you want to export the customize form templates.
- Finally, Save it.
The Bottom Line
This is all you need to know on how to use and customize form templates in QuickBooks Desktop. We hope that you find our on customized templates form useful and valuable as well. We have also discussed how you can create a duplicate of the customized templates and also how to import and export template form in QuickBooks.
If you have any more queries or questions related to QuickBooks or accounting and bookkeeping then you can call our Intuit Certified QuickBooks ProAdvisor. They have experience of lots of years and they can instantly solve any errors. Call us at our 24/7 toll-free number for more information +1-844-405-0904.