In this article, we’ll discuss the step-by-step method to re-activate and deactivate the Quicken account for windows and Mac. So, just go through the article and follow the step-by-step instructions. Read the article to know the things to do before re-activation & deactivation, the process, and what to do later on performing the operation. follow the article to reactivate or deactivate your Quicken account. In case, you need any technical help contact us toll-free: +1-844-405-0904
Most of the time deactivating an account’s online banking services permanently removes it from One Step Update. And in certain cases, you need to deactivate an online banking service that uses a specific connection method.
After that, you can reactivate using a different connection method in order to use specific online banking service providers.
Point to remember: At first, you need to deactivate the online services from the investment account, if you have an investment account that is linked to a cash account.
Things to do before you Deactivate and Reactivate Quicken Account
Here are the important points you must need to remember before deactivating the Quicken Account
A. Make sure your Quicken is running with the latest release
- Go to your Quicken
- Now, click on Help and look for the Check for Updates
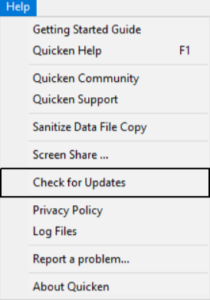
- If the quick up to date is great or not, you will not get the notification to install the latest release on the next screen
- Click Yes to install it
Installing the latest update may take some time or exit, but you don’t have to worry about your work that will be saved.
Note: You can download Quicken updates and release them manually from here.
B. Create a data file backup
- Launch your Quicken
- Click on the Files and later select Backup and Restore and click on Create Back up Quicken File… (Ctrl+B)
- Browse a location to make a backup in a secure place and then click on Back up Now
Deactivate Quicken Account for Windows
- Firstly, select the Tools menu and then click on the Account List. You’ll see the Account List window will appear on the screen.
- Next, select the account for which you want to deactivate online services and then click Edit. You’ll see that the Account Details window will now be displayed.
- After that, you need to click the Online Services tab.
- Now click Deactivate next to the service you want to disable.
- Then click Yes to the message asking if you want to disable this service.
- And, press OK to the confirmation message. You’ll find that the Account Details window is refreshed, and the service is listed as Available.
- Again click on the General tab and delete the information displayed in the Financial Institution field.
- Finally, click the OK button.
Deactivate Quicken Account for Mac
- At first, click on the account name in the bar down the side of Quicken Mac.
- Next, click the settings gear icon in the bottom right corner.
- After that click the Troubleshooting button.
- Now click the Deactivate Downloads button.
- Then click Save.
What happens if Quicken tells to accept downloaded transactions before deactivating online services?
If you have not accepted all downloaded transactions, then Quicken will not deactivate online services. Therefore, you need to verify that you have accepted all transactions.
- At first, open the account register and then select the Downloaded Transactions tab at the bottom of the register. In case, if you find no any transactions are listed then skip to step 3.
- After that, accept all transactions and then follow the steps above to deactivate online services.
- Now select the Online menu and select Online Center.
- You need to select the appropriate financial institution and account.
- Select Transactions.
- In case transactions are listed then click Compare to Register and accept the transactions.
- If you find no transactions are listed or Compare to Register does not allow you to accept the transactions. You’ll find additional information is available on the Quicken support site.
Now, once an account has been successfully deactivated, just follow the next steps to re-activate the account:
Activate a Quicken account for Online Banking
- You need to select the Tools menu and the Account List. The Account List window is displayed. Next, select the account for which you want to deactivate online services and then click Edit. The Account Details window will be displayed.
- After that, you need to click the Online Services tab.
- You need to click the setup now button. Now, the financial institution listing will appear.
- Again you need to type the name of your financial institution so Quicken searches for it.
- Now just follow the rest of the prompts.
- And once all steps are completed the account should be activated for online banking.
What if the Deactivate button is grayed out?
Well, this could be a sign of data integrity issues. Therefore, we would recommend you contact Quicken Support.
Moving further, let’s discuss how to re-activate Accounts in Quicken for Mac
- At first, you need to click the account name in the list displayed down the side of Quicken to open the register.
- After that, click the Settings gear in the lower right corner of the register view.
- Now, you need to click the Setup Transactions Download button.
- Next, just type in the financial institution name and walk through the wizard.
- Then you need to choose a LINK on the screen displayed after Quicken finds the available accounts present at the financial institution for your login credentials. And then carefully link to your existing Quicken accounts.
Issues You May Encounter while Re-activating
Re-activating an account is a simple method, but you may encounter one or more of the situations below, depending on the original deactivate and the reason for the new reactivate.
Duplicate Transactions
If you deactivated the account just to change the Connection Method (like: from Direct Connect to Express Web Connect or Quicken Connect), reactivating for the new connection method may result in a re-download of the most recent 90 days of transactions (depending on the financial institution).
These duplicate transactions should match those already present in the account register, but you need to review the data after reactivation to ensure that you are not seeing duplicates in your account register.
Once a duplicate transaction is already present in your account register, then have the only solution is to delete it.
Online Bill Pay Service Unavailable
If you are using your bank’s online bill payment service and have been asked to deactivate your Direct Connect accounts, Express Web Connect (or Reactivation for Mac in Quick Connect for Mac) bank bills will not offer paid service.
If you were advised by your bank to make this change, as they will no longer offer this service through Quicken, one option is to sign up for Quick Bill Manager.
If you wish to continue using your bank’s bill payment service, you can still make payments on the bank’s website and will continue to download the posted payments via Quick Web Connect or Quick Connect update on Quicken.
Unable to Activate With a Different Bank Name
Sometimes financial institutions change their name, requiring the process of deactivating and reactivating your existing Quicken accounts to be linked to a new name in the bank.
If you are facing a problem with the Reactivate portion of this process, check out the below steps:
- First, open your account which you are having problems reactivating.
- Now, give a right-click on the account name and select Edit Account.
- In open dialog box on your screen, remove the financial institution name and select OK.
- Note: You can only take this action if your account has been completely deactivated. If the account name is greyed out, a service is still active for that account.
- Now, go to the Account Bar, then click on the + (plus sign) button.
- Insert the name of the financial institution you need to set up.
- Insert your credentials. Quicken will connect with your financial institution to set up the account.
- After searching Quicken for your login credentials find the accounts available in the financial institution, select the link on the screen displayed and carefully link to your existing Quicken account (s).
We have discussed above how you can easily activate and re-activate online services in Quicken. Apart from this, if you also have any information related to this then you are most welcome to share your views with us.
For additional information, don’t hesitate to contact our experts on toll-free number +1-844-405-0904.