In this article, we are going to show you how to change User Account Control (UAC) in Windows for QuickBooks. UAC is a very important feature in terms of the security improvement of the user. The main function of the UAC is to make sure that the computer remains safe from any external attack of any kind and minimized the exposed surface of the operating system. So go through the complete article and get all related information You can also contact our team of Intuit-certified ProAdvisor to get direct help. Dial toll-free +1-844-405-0904
With some of the limited privileges and accessibility, an admin will be able to run most of the applications, processes, and components. However, you also will be capable of upgrading the admin privileges to perform some of the tasks and computer applications.
NOTE: Sometimes while troubleshooting the QuickBooks Desktop issues, you may need to turn off the UAC. But as soon the problem is resolved it is important to turn the UAC back on otherwise your computer can be exposed to some security threats.
What is the meaning of Changing User Account Control (UAC) in Windows?
The main perspective of UAC or user account control is to provide safeguards to your system. It improves safety across all users.
Therefore, few points you’ve to keep in mind when changing user account control:
- The steps of changing user account control are mainly for allocating the roles assigned to users under the payment account. Intuit services like time tracker, payroll, etc can’t be considered to setting to the user roles.
- When you link the user to the merchant service account, simultaneously the user has access to other Intuit services, and will not be able to change or delete the role.
- If you want to change the payment role, you’ve to get access to the payment account from the browser.
A common issue with UAC in Quickbooks Desktop
QuickBooks identifies that scheduled reports are blocked due to Windows running high in UAC settings where as the UAC is low. So, to fix this common error you have to ensure that you met the given requirements.
- You have to check that the company file is in single-user mode.
- Check that MS Outlook is open.
- Check that your computer that configured “scheduled report on” is running because it raises an error. So your computer is not in hibernation mode.
- Your company file should not be left open.
- You have to disable the ‘Keep QuickBooks Running for Quick Start-ups’
After learning and understanding these points, you can go to further steps to change the user account control (UAC) in Windows.
Change (UAC) in Windows 10, 8.1, 8, and 7 for QuickBooks
Follow the instructions mentioned below carefully in order to modify the UCA settings.
- First of all, press and hold Windows + R from your keyboard. This will open the Run window on your computer.
- In this window, you need to type the Control Panel and then select OK.
- After that, you need to select the User Accounts option and then select the User Accounts (Classic View) option.
- Then, click on the change (UAC) settings option. (NOTE: Select Yes in the next window. It will depend upon which version of Windows you are using.)
- Move along the slider.
- Choose Never Notify settings and then to switch off the UAC click on OK.
- Choose Always Notify settings and then select OK to switch ON UAC back. (Select Yes to continue if you are prompted by UCA)
- Finally, restart the computer to finalize the changes.
Change User Account Role for QuickBooks Payment
In this section, we are going to show you how you can set different user roles for your QuickBooks Payment Account.
There are 4 types of different user roles that you can assign to a user in QuickBooks Payment.
- Full Admin: A person with this user role will be authorized to the delete user and along with this, you’ll also be able to assign user roles to the existing users.
- Limited Admin: A person with this user role can do all the things that a full admin can do, however, he won’t be able to access the Account Profile and can’t manage the details of the merchant accounts.
- Full User: A person with this user role cannot access the account or user management areas within the online service center.
- No Access: As the name suggests, the user will not be able to access the online center i.e. GoPayment user only.
You will be able to change the user role anytime you want.
Points to remember before you get started
- The steps that we are going to show you below are only for assigning roles to the Payment Account users. You won’t be able to set user roles for other Intuit services like TimeTracker, Payroll, ProSeries/Lacerte, etc.
- Once the user is linked with the Merchant Service Account and the same user also has access to other Intuit services then you won’t be able to delete that role. However, you can restrict the role of the user.
- In order to change or update the user role, you will be required to access the Payment Account from an external browser. If you access the Payment Account simply from an automatic connection within QuickBooks then you won’t be able to update or change the user role.
How to Change a User’s Role
Follow the steps mentioned below to change a user’s role from within QuickBooks Payment.
- First of all, you need to sign in to the QuickBooks Payment with the Full Admin login credentials.
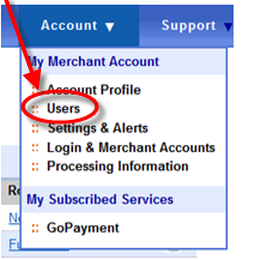
- After that, from the bar at the top, click on the Account drop-down menu, and then select the Users option.
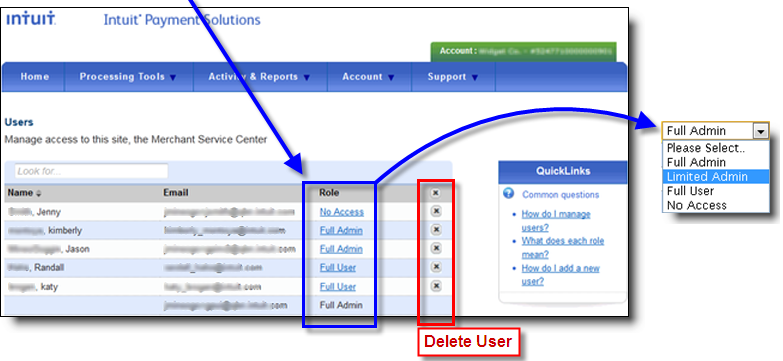
- In the Users window, you can manage who can access the Merchant Service Center. Here, you will see the users that are currently linked to this Merchant Account. At the top right corner of the screen, you can also see the Payment Account number in the green field.
- You can see what role is currently allotted to which user in the Role section. Just click on the role that you want to modify. (NOTE: If you a user is currently logged in to the Payments Account then you won’t be able to modify its user role until he logs out.)
- After that, a drop-down menu will appear on the screen and you need to choose anyone from the four options. The window will update as soon as you change the role of the user. (NOTE: If you are assigning a role to a new user then you will see the Select to assign option.)
- Once you select the appropriate role then for privacy and security reasons Intuit will verify your identity first. For this, you need to select how you want to receive the confirmation code either from a text message or an email.
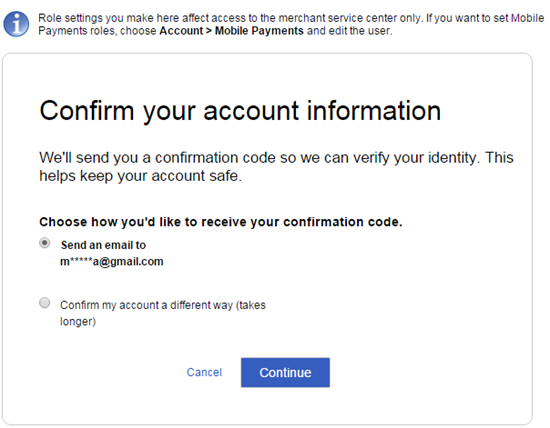
- Click on Continue.
- Then enter your 6-digit code and a window will appear confirming the change in the user role that you selected.
TIP: In order to set or modify the user’s role for the Mobile Payments then you need to select the Account drop-down menu and then choose the Mobile Payments option. From here, you can edit a user.
How to Remove a User
There are some users that once added then you can’t delete them. You can’t delete those users whose email/login is also linked with the other Intuit Products too. In order to restrict such users to access the Merchant Account, you need to set their roles as No Access.
Apart from them, you can remove other users. To do this,
- In the same section, you’ll see an ‘X’ icon in the far right column, click on the icon.
- Confirm the request to delete the user in the pop-up window.
- After that, you need to select an appropriate option, and then click on the Ok, delete this user option.
Add a GoPayment User (No Access)
The users of GoPayment have no access to the Payments Account. Follow the steps given below carefully to assign this role.
- First, you need to set up an additional user as a GoPayment user.
- The user will be visible in the Online service center once the user accepts the email invitation. Go to Account> Users to check out.
- Once the user is available on the list then you can assign them a role and then assign them suitable access.
The Bottom Line
We hope that you found this article helpful, here we have discussed how to change User Account Control (UAC) in Windows for QuickBooks and also mentioned how you can change the user account role for QuickBooks Payment in very simple steps. We have also discussed the different user roles that are available in QuickBooks Payments.
If you face any difficulties while assigning the user roles or UAC for QuickBooks then you can contact our team of Intuit Certified QuickBooks ProAdvisors for an instant solution to all your problems. Call us at our 24/7 toll-free technical support number +1-844-405-0904 for more information.