Made a mistake by entering the same item double but in different file names, and want to merge the duplicate entries for the accurate list? Then this is the source, where you can find your solution. In this article, we will know, how to merge duplicate vendors in QuickBooks Desktop and the other list entries (accounts, customers) in both Windows & Mac versions. Meanwhile, you can save your time, and effort to get the instant solution through this toll-free number+1-844-405-0904.
Let’s start the merging procedure;
Steps Should Take Before Merging List Entries in QuickBooks Desktop
There are some points, you should keep in your mind before merging the list entries, or any duplicate vendor;
- First of all, you should create a backup of the current QuickBooks company file.
- Switch to single-user mode, if you are using the multi-user mode.
- You are NOT using an Accountant’s Copy File (.QBA).
- Multi-Currency should not be enabled.
- The vendors you are merging are NOT:
- Tax Authorities
- Tax-exempt
- Paid through Online Banking
- Direct Deposit Vendors
Procedure Duplicate Vendor & Entries in QuickBooks Desktop & Mac
Here are the procedures to merge entries including the duplicate vendor in QuickBooks Desktop, and QuickBooks Desktop for Mac;
How to Merge Duplicate Vendor in QuickBooks Desktop
We have given the procedure to merge the entries including the chart of accounts, item, customer job, vendor, employee, and name in Windows. Look, how to merge;
- Visit the entries list, and select the entries that you want to merge.
- Now, copy the entry name, that you want to keep, and right-click on the entry that you don’t want to keep.
- Then select the ‘Edit‘ option.
- Paste the copied name, and elect the ‘Save & Close‘ option.
Exception: You may get a message, which says, “You cannot merge an account that has online information associated with it into another account”. This means that you have an active bank feed, here you need to turn off the bank feed.
How to Merge Entries in QuickBooks Desktop for Mac
Follow the procedure to merge entries (chart of accounts, item, customer job, vendor, employee, and name) in the QuickBooks Desktop for Mac.
- First of all, visit the list, that has the entries that you want to merge.
- Now copy the entry.
- After that, choose the entry that, you don’t want to use.
- Click on the ‘Edit‘ icon or the pencil icon to edit the entry.
- Now click the ‘Yes‘ option to merge the entries.
To Merge vendors List Entries in QuickBooks Desktop for Windows 2019, 2018
Here are the procedures for merging vendor list in QuickBooks Desktop for Windows 2019, and 2018. Choose the procedure according to your Windows version.
Steps to Merge List Entries of Vendors for Windows 2019
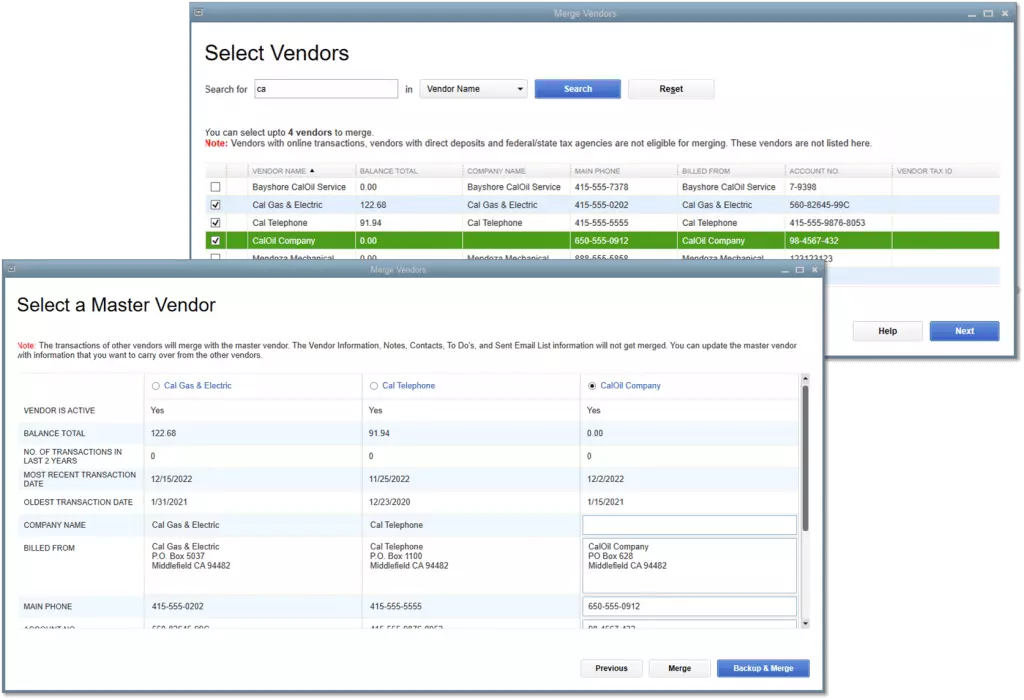
Follow the procedure, if you are a Windows 2019 user, and want to merge the entries list in QuickBooks Desktop. In this process, you can merge multiple vendors at a time;
- Login to the QuickBooks Desktop Accountant Edition.
- There you can find the ‘Accountant‘ menu. Just click on it.
- And select the ‘Merge Vendors‘ option from the ‘Accounting tools‘ section.
- Now you have to choose the vendors, that you want to merge, and click the ‘Next‘ option.
- Click on the ‘Master Vendor‘, and then the ‘Merge‘ option.
- Confirm the merging process, by clicking the ‘Yes‘ option, and then the ‘Ok‘ button.
Steps to Merge List Entries of Vendors for Windows 2018 or the Below
If you are using Windows 2018, or the earlier version then follow the procedure to merge the list entries.
- Go to the ‘Vendor Center‘ through the ‘Vendor‘ menu.
- Copy the vendor name that you want to keep.
- Now right-click on the vendor name, that you don’t want to keep.
- Then selecy the Edit Vendor option
- Paste the copied name, and click ‘Ok‘.
- Now confirm the merging process by clicking the ‘Yes‘ option.
Frequently Asked Questions
Here are some questions mentioned below. Read and fix your issue:
Is it possible to export the vendor list and then reimport it after making changes?
Yes, it is possible. You can reimport the vendor list after exporting. This will result to duplicate vendors and the history of bill pay will be affected. To get rid of this, you need to merge the accounts. Note that the merging of the vendor’s accounts is irreversible. After the process, you can’t access bill pay. So, it is recommended that create a backup copy of the company file and save the local copies of bill pay.
How many vendors can you have in the QuickBooks Desktop?
You can enter a maximum of 10,000 vendors entries in the QuickBooks Desktop. You can merge up to 4 vendor entries at a time.
How to update the vendor’s company name?
Here’s how you can change the vendor’s company name to your QuickBooks:
1. Go to Expenses, and then click Vendors.
2. Select the Vendor’s name to view their profile.
3. Click on the Edit button at the top-right.
4. Enter the Company’s new name. Hit Save.
It was the complete merging process of list entries, and duplicate vendors in QuickBooks Desktop for Windows, and Mac. If you have any queries regarding this topic then you can contact our Intuit certified QuickBooks ProAdvisors for the solution.