Looking for how to create and restore an Accountant’s copy in QuickBooks, then you are on the right page. Now here we will discuss steps to create and restore an Accountant’s copy in QuickBooks; By using this feature of QuickBooks, the accountant can easily make any changes without disturbing the workflow of a client and you can also easily able to share the company file data with other third parties or with your accountant also. In case, you are stuck in between, please give us a call on :+1-844-405-0904.
QuickBooks Accountant Copy supports both accountants and clients to make changes on a QuickBooks company file at the same time. An accountant’s copy of QuickBooks is shared between both accountants and clients without any limitations.
Steps to Create and Restore Accountant’s Copy in QuickBooks
Note: Make sure you have to update the closing date and password of the accountant’s changes. If you want to see those changes later, open the folder containing the company file. Then, you will have a PDF containing all the important updates.
Steps to create an accountant’s copy in QuickBooks
These steps are applicable for QuickBooks Desktop only for windows versions. If your accountant requires you to examine your books then you can create & send them an accountant’s copy. This step allows you to do changes without disturbing your work.
After all, changes have been done by the accountant you can simply import and update the books. Let’s know the steps of creating a QuickBooks Accountant’s copy.
Step 1: Setting up QuickBooks
If you are working on QuickBooks Desktop Enterprise, then we recommend you turn off the Advanced QuickBooks Inventory feature. And after following the steps of creating a QuickBooks Accountant copy. Once the accountant sends the copy to your accountant, it can be turned back on.
Note: You can skip this step if you are using QuickBooks Desktop Premier or QuickBooks Desktop Pro, or also if you are not using the feature of Advanced Inventory in your enterprise version.
Step 2: Create a QuickBooks Accountant’s Copy
There are two methods to create QuickBooks accountant copy. The first method is to make a file to put on an online hosting service and the second method is to easily create a file to put on a USB. Also, by using the Accountant’s copy file transfer service, you can share files over the web.
Method 1: Creating a file you can put on a USB
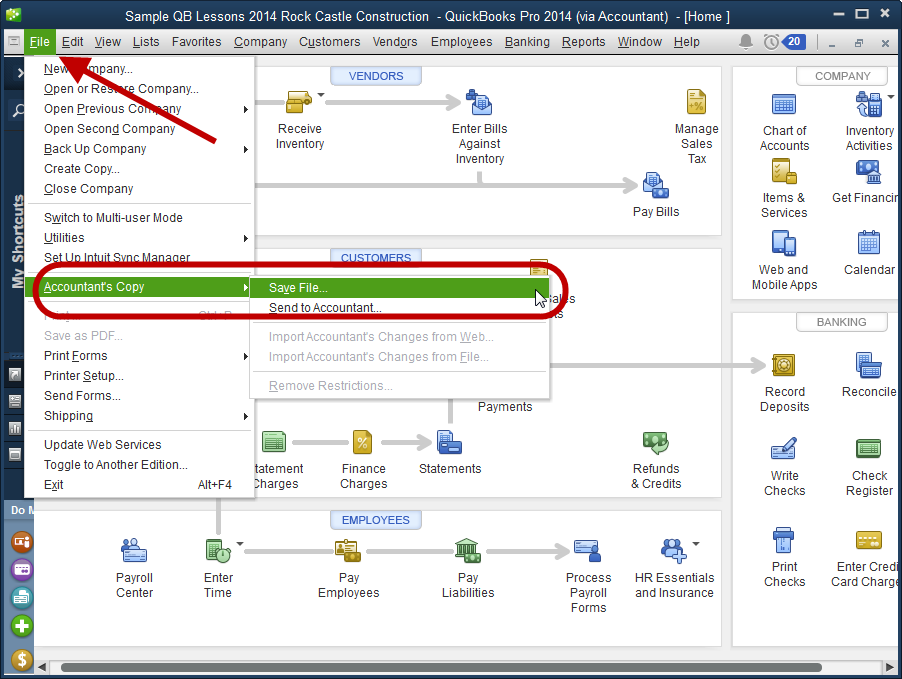
- Go to the File menu, select Send Company File and choose your accountant copy. And click on Client Activities.
- Click on Save File and select Next.
- After that select Accountant’s Copy and select Next.
- At last, you have to enter the dividing date and choose Next.
Now, hope you have your Accountant’s Copy QuickBooks that ends with the .qbx extension. Now you can easily put the file on a USB and transfers it to your accountant by various methods like by attaching it with an email or also sharing it via cloud services.
Method 2: Use the Accountant’s Copy File Service to send a file
- Go to the File menu, select Send Company File and choose your accountant copy. And click on Client Activities.
- Next, click on Send to Accountant and select Next.
- Choose the Accountant’s Copy and choose Next.
- Now here, you need to add the dividing date and select Next.
- Enter all the details of your accountant’s email addresses. And create a new password to protect your account.
- After setting the password, click on Send only when you are ready.
After performing these steps, QuickBooks automatically will shut down all opened windows and sends the file. Keep in mind, the accountant has a limited time of 2 weeks to download the files that are sent by you.
Step 3: Import QuickBooks accountant’s changes
When you sent your QuickBooks Accountant’s Copy, QuickBooks displays the “Accountant Changes Pending” reminder just close to the company file.
After you have sent the QuickBooks Accountant’s Copy, QuickBooks will display the “Accountant’s Changes Pending” reminder just next to the company file. Furthermore, it does not allow us to perform specific activities that may conflict with new changes.
If your accountant uses an accountant’s copy file transfer service, then you need to select the changes of import accountant from the web. Then, follow the steps below to import the changes.
- Firstly, if you did not create a backup of the company file then a savepoint will display on the screen.
- And if you are working on QuickBooks Desktop Enterprise then you have to turn on the Advanced inventory feature.
- Next, go to the File menu, launch QuickBooks Desktop.
- Select, send Company file.
- Select the Accountant’s copy and look for the Client Activities.
- Launch the QuickBooks Desktop and go to the File menu.
- Choose Send Company File.
- After that, you need to choose the Accountant’s Copy.
- Click on the Client Activities.
- If the accountant changes were sent to the accountant’s changes file, then just click on the accountant changes imported from the file.
- Now, look for the file with .qby extension.
Step 4: View the changes
Changes made by your accountant will be added to QuickBooks automatically. You just need to check that the changes will not conflict with any ongoing tasks. Following are the steps to view the accountant’s changes:
- Click on Incorporate Accountant’s Changes (If you are ready to import the changes).
- Click on Close.
- Now, click on OK to confirm all changes and close the windows.
- At last, choose Ok and Close.
Steps to Restore Accountant’s Copy in QuickBooks
There are basically three methods to restore an accountant’s copy in Quickbooks. Let’s discuss these three methods.
Import via Web
- Open QuickBooks and go to the “File” menu.
- Choose “Open or Restore Company,” select “Open a Company File” and then “Next.”
- Click “Browse” and select the company file you want to open. Click “Open” and enter all your login information if required.
- Go to the File menu, look for the “Accountant’s Copy” and select “Import Accountant’s Changes from Web. If you have Enterprise Solutions or Premier Accountant edition, then look for the “Client Activities” instead of clicking the “File” menu and then choose “Import Accountant’s Changes from Web” and after that download the available accountant’s copy.
Import via File
- Open QuickBooks and go to the “File” menu.
- Choose “Open or Restore Company,” select “Open a Company File” and then “Next.”
- Click “Browse” and select the company file you want to open. Click “Open” and enter all your login information if required.
- Go the “File” menu, look for the “Accountant’s Copy” and select “Import Accountant’s Changes from File.” If you have Enterprise Solutions or Premier Accountant edition, then look for the “Client Activities” instead of clicking the “File” menu and choose “Import Accountant’s Changes from File.”
- Find a copy of the modified accountant with .qby file extension. Select the file and click “Open”.
Review and Incorporate the Changes
- Evaluate changes and choose the “+” close to each change to view details and instructions for solving any disputes.
- Choose “Print” or “Save as PDF” to make a copy of the modified accountant’s copy.
- Choose “Incorporate Accountant’s Changes” to restore the accountant’s copy to your original company file.
- To close QuickBooks select “OK” and again click “OK” to back up your file. And select the location where you want to save your backup files and choose “Ok”. and again choose “Ok” when the backup is finished.
- In the Corporate Accountant’s Changes window, review the changes you have included and follow the instructions provided to resolve conflicts or errors. When you are done, click “Close”.
Ending Words
All aspects of QuickBooks accountant copy are described in the above article. Hope, you find this article fruitful and able to create and restore the Accountant’s copy in QuickBooks. In case, if you get stuck in the process to create and restore Accountant’s copy in QuickBooks then just pick your phone and just dial our toll-free number +1-844-405-0904 and get instant help from our intuit certified ProAdvisor.
Thank you for your visit!