Looking for how to create timesheets and time data reports in QuickBooks? Read this article, and follow the steps mentioned so as to create QuickBooks Timesheets & Time Data Report to track employee’s tasks. Apart from this, you’ll also learn how to customize timesheets and time data reports. In this article below we will discuss creating QuickBooks Timesheet and Time Data Report. Go through the detailed article and follow the steps to learn the steps to create QB timesheet & time data reports and implement it. For more info contact us toll-free:+1-844-405-0904
QuickBooks Timesheets are very important for tracking the time spent by each employee on a specific task or job. In QuickBooks, timesheets allow you to enter an employee’s time date and working hours that assist you to create an employee paycheck. For payroll time tracking, payroll plan membership is not required. To calculate the paycheck gross salary, the hours entered are used by QuickBooks.
Timesheets in QuickBooks are used by each worker to track the time spent on their particular job. Organizations around the world use tools such as timesheets to track the amount of work each worker performs. Timesheets specifically help companies in evaluating the amount of time required for the completion of a job as well as an employee gaining proficiency in a particular skill. By timesheets, companies can simply calculate the amount of salary each employee pays. This is usually helpful for organizations when they hire someone on a contract or hourly basis.
QB data report also helps the organization in evaluating the amount of time needed for a specific task as well as the proficiency a worker has a specific skill.
Let’s proceed further and discuss some easy step that helps you to create work report of your employees.
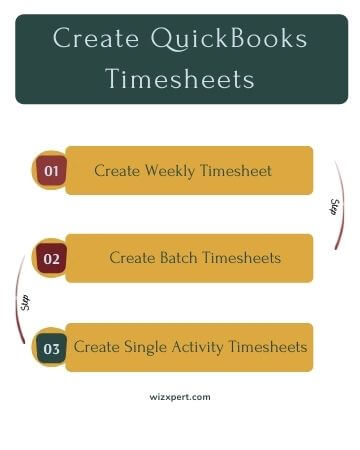
Steps to Create Timesheets and Time Data Report in QuickBooks
Follow these steps in order to create timesheets and time data reports. If you feel stuck at any stage, you can also talk to our Intuit certified ProAdvisor. Dial this QuickBooks support toll-free[quickbooks] to directly contact them. So now, let’s start the procedure.
To Create QuickBooks Timesheets
- First of all, Click Employee and then Enter time.
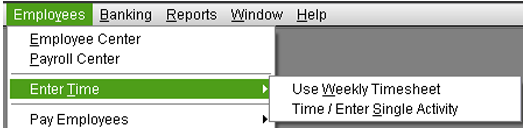
- You have two choices for Timesheets:
- Enter a weekly Timesheets to track hours worked.
- Enter a single activity.
Create Weekly Timesheet
To enter a weekly Timesheet to track hours worked:
- In the first step, choose the employee name next to Name.
- If the hours worked are billable, choose a Customer: Job and Service item and select to click the Billable?
- Select the Payroll Item for time worked.
- Depending on your preferences, you may also add a WC Code and a Class.
- Click in the column for the days in which hour was worked, and type the hours worked in this job and for the payroll item.
- While creating QuickBooks Paychecks, Timesheets, or the Enter Payroll Information window, you can type a time range and QuickBooks calculates the total hours for you.
- Repeat for each time worked until the week is complete.
- When finished, select Save and Close.
Note: Columns size can be adjusted by clicking the right side border of the column header and dragging.
Create Batch Timesheets
- Click Employees > Enter Time > Use Weekly Timesheet.
- Next step, click the Name drop-down and scroll to the very top. Choose Multiple Names.
- Select the Select Employee, vendor, or other name box and then Click Ok
- After that, fill in the Timesheets then click Save and New or Save and Close to record the timesheet for the multiple Employees.
- QuickBooks will have recorded the same timesheet for the multiple names that were selected.
Create Single Activity Timesheets
To enter a single activity(with a start and stop feature to track time worked):
- First, you have to choose the date of the time working from the Date
- If you type a date before today’s date, then you will not be able to use the Start and Stop function of the Single-task. However, you can also manually type the amount of time for the activity in the Duration field.
- After that, choose the employee from the Name drop-down list.
- If the hours worked are billable, then choose a custom job from the Customer: Job drop-down arrow and a service item from the Service Item drop-down arrow and then click to select If not billable then verify the Billable checkbox is not selected.
- After that, Select the payroll item that the time worked affects the paycheck from the Payroll Item drop-down arrow.
- Depending on your preferences, you may also add a WC Code and a Class.
- After that, click Start to start the time tracking for this work or type, the time when the worker started work for this job.
- When the job is done, then click Save and Close.
How To Print Timesheets
To print weekly Timesheets
- Go to the File menu and then choose Print Forms and then Timesheets.
- QuickBooks defaults to the current workweek. To view additional Timesheets, modify the date range by typing different dates in the Dated and thru fields.
- Choice the Timesheets you want to print.
- If you want to print the full text of your activity notes on each Timesheet then choose Print full activity Notes. If you don’t choose this option, then QuickBooks prints only the first line of each note.
- Click OK to print a Timesheet for the individual person selected for every week within the date range.
To print a blank Timesheet
- First of all, click employees and then enter the time.
- After that, on the weekly Timesheet window, choose the Print and then Print Blank Timesheet.
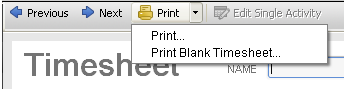
- After that, in the Print Timesheets window, type the number of copies you want to print and then click Print.
Create & Customize Time Data Report
Set up a Report that shows Timesheet data for one or more than one employee:
You can set up a Time by Name report that shows the following
- Workers names
- Customer name associated with the Timesheet.
- The total number of hours worked to date range of your choice.
- Display more columns or data by using the Customize Report feature.
To set up this report, follow the below steps:
- Go to the QuickBooks menu bar and then click Reports and then Jobs, Time and Mileage and then Time by Name.
- After that, click Customize Report.
- In the Display window, add more columns to your report by choosing one more of the display options available. To display more:
- First of all, click the Filters tab.
- After that, click the Names or Items you want to include in the report.
- If you wish to show multiple names or items:
- First of all, click the down arrow for names or items you selected.
- After that, choose the option for multiple.
- After that, click to choose the items from the list provided.
- Click OK to apply your selections.
- Click OK on the next window to save your modification.
We hope, you find this article useful. If you need further help and assistance, you can directly reach us by dialing our toll-free[Quickbooks] and get in touch with our Technical Support Team.