Here we will discuss how to export and convert QuickBooks Online data to a Desktop. Go with the following steps in order to set up Internet Explorer and ready your data to move from QuickBooks Online to QuickBooks Desktop. This step assures you a hassle-free data export. In this article, we have listed the process in steps with real-time operational images for better understanding. Hope the article aid you to export and convert QuickBooks data to QuickBooks Desktop. Contact us for More Info. +1-844-405-0904
After exporting the data you will see things will seem different to QuickBooks Desktop, but you will understand easily. Now let’s proceed further and have a look at the steps on how to export and convert QuickBooks Online data to Desktop.
Steps to export and convert QuickBooks Online data to Desktop
Step 1: Set up security settings in Internet Explorer
First, you have to set the security settings of internet explorer so that you can perform the conversion steps very easily. To do this check out the below steps:
- Go to your Internet Explorer icon and then right-click on it and choose to Run as administrator.
- Click on the Tools ⚙ symbol, and look for Internet Options.
- Now go to Security, and click on Trusted Sites.
- Click on Sites.
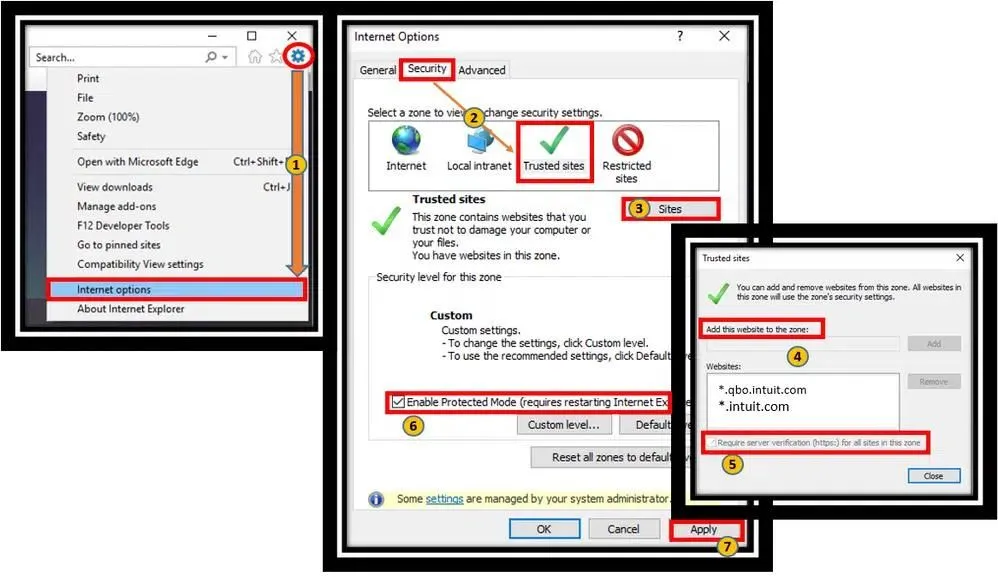
- Add *.intuit.com and *.qbo.intuit.com in the Add this website to the zone field.
- Here you need to make sure that Require server verification (https: ) for all the sites in this field must be unchecked.
- Now quit this Trusted Sites window.
- And, be sure to enable Protected Mode must be unchecked.
- Click on Apply, and later click on Okay.
- Now, do not close the Internet Explorer browser, leave it as it is.
Step 2: Now, set up the QuickBooks Desktop for the export
Go through the below steps to ready QuickBooks desktop to perform the export steps.
- Go to the QuickBooks Desktop icon and give right-click on it now on the given list with several options click on Run as administrator. If your QuickBooks Desktop is not already installed, then you can download QuickBooks Desktop for the trial to use for this process.
- Now, click on the File and choose to Close the Company.
- Here also, do not close your QuickBooks Desktop open until you have completed the rest of the steps.
Step 3: Prepare to export your QuickBooks Online data
Now, follow the steps to ready your QuickBooks Online data to export in QuickBooks Desktop.
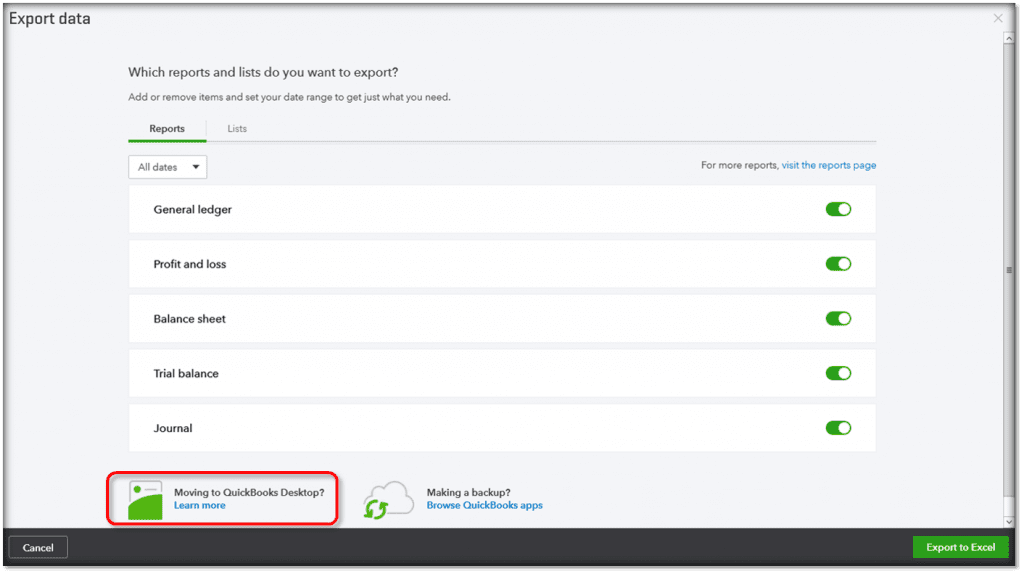
- Open your QuickBooks Online and click on Settings ⚙ and choose Export Data.
- Here you have to mention the reason, why you want to export your and click on Continue.
- Now go to the Moving to QuickBooks Desktop segment, and click on Learn more.
- Later, go to the Download company data section, and click on Learn more.
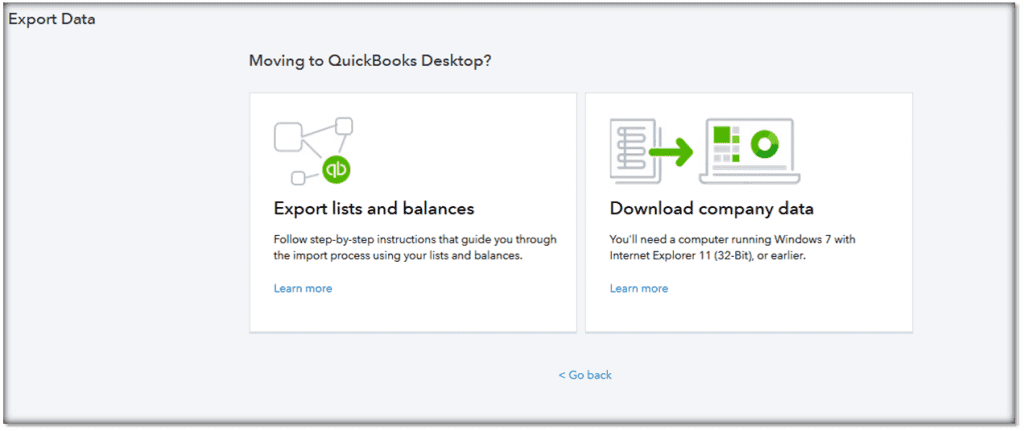
- Click on Get started.
- Now, click on InstallActiveX Control and go with the onscreen instructions to install ActiveX. When the installation is completed, click on Continue.
- Now, you have to choose the data which you need to export and later click on Continue.
- Reverify the limitations and click on Continue.
- Add all your contact information in the open window and later click on Continue.
When your data gets ready for import, then you will receive an email. This may take a few minutes, but sometimes it might take up to 2 hours for the companies that have more transactions.
Step 4: Finish exporting your data
Begin from the QuickBooks Online. You will have to repeat many steps to go back to the export page.
- Open QuickBooks Online, click on Settings ⚙ and go to Export Data.
- Now you need to repeat these steps 2 – 5 in the above discussed “Step 3: Prepare to export your QuickBooks Online data.”
- Click on continue to download on the Exporting from QuickBooks Online page.
Now, it’s time to move to QuickBooks Desktop.
- Make sure you are on the No Company Open screen on your QuickBooks Desktop. If in case you have an open company, then click on the File and choose to Close the company.
- Now, come back to your QuickBooks Online, and click on Download.
- Go to the Save your company file window, and choose a location where you want to save the file. Choose any location rather than your Windows Desktop.
- When your download is completed, then click on Convert Now.
- Now go to the Create a new QuickBooks file window, give any name to your file and choose the location to save the file. Choose only a location on your local computer and not an additional or external drive or any network storage.
- Click on Finished after the export is done.
Important: This might take some time to complete the whole process. If you feel like it got stuck or frozen, it does not mean the export has failed. Have patience here and wait a few times and you will see the progress bar will start again.
If in case, your status bar does not appear to move
Then, you have to check the QuickBooks Desktop for an Application Certificate.
- Go to your Windows Taskbar, look for the QuickBooks desktop icon, and open it. The Application Certificate will be displayed on your screen.
- On the Application Certificate window, click on Yes, prompt each time.
- Click on Continue.
- Click on Done in the confirmation window that follows.
Step 5: Verify your info exported correctly
After exporting to your company, use the Profit and Loss statement report to ensure the matching of your books. Do a run in QuickBooks Online and correlate it to the same report in QuickBooks Desktop.
Note: While comparing reports, it is good to run them on an Accrual basis to match.
If in case they do not match
Reports usually go mismatched due to export limitations and unsupported versions of Internet Explorer.
- In QuickBooks Desktop, click on File and choose to Close the company.
- Now repeat the above-discussed Step 4: ’’ Finish exporting your data” and again try to convert your file. Most of the time on a second try converting can fix this problem.
- When It is completed, review the Profit and Loss reports again. If they yet do not match, then you need to contact our technical, furthermore, we will help you with this.
Step 6: Cancel QuickBooks Online (Optional)
If you feel like you do not need QuickBooks Online in the future, then you can cancel your QuickBooks Online Plan.
Hope, these steps will work for you and that you will easily export and convert QuickBooks Online data to a Desktop. But while performing the above steps if you need any technical help then feel free to contact us by dialing our toll-free+1-844-405-0904 and get instant help for your Queries and issue with just a phone call from our Intuit-certified ProAdvisors.
Points to remember before converting QuickBooks Online data to QuickBooks Desktop
If you are going to convert QuickBooks online data to Quickbooks desktop then you should consider some points that may help in converting your data easily.
- The first thing you should keep in mind is that you are using Internet Explorer 10 or higher version.
- Converting is possible if you are using a desktop software version 2004 edition or above.
- You have to use Internet Explorer has a 32-bit that is compatible with QuickBooks desktop because the 64-bit version may create errors.
- If you are using the Non-Us edition then you are restricted to convert some items like vendors, customers, services and products.
- If you are using the Mac version of the QuickBooks Desktop then you are not allowed to convert directly it makes takes a different procedure.
- If you are already a master or a company administrator, you should have access to at least an invited accountant account.
Wrap Up
We hope that these steps are enough to export and convert QuickBooks Online data to QuickBooks Desktop. Make sure that follow these steps correctly, don’t skip any point. If you still have any problems then contact QuickBooks online support or our certified QuickBooks Proadvisors.