Print checks in Quicken can save your time, effort and also it will help you to avoid mistakes. Here we’ll discuss how to write and print checks in Quicken for Windows. The Quick Print Check feature allows you to write and print checks to avoid critical errors. Apart from reducing the risk of mistakes, it offers the efficiency that increases productivity thus time is saved. Here in the article a comlete solution is present go through full article and get it. If you need further help contact us toll-fre: +1-844-405-0904
For the users who have a page-oriented printer, they need to assume that it’s like printing checks in the paper tray or envelope feeder the same way as inserting letterhead paper. Either you can read the steps below to print checks in Quicken or you can take help from our Quicken support team to save your time and effort.
Table of Contents
How to set up printer to print checks in Quicken
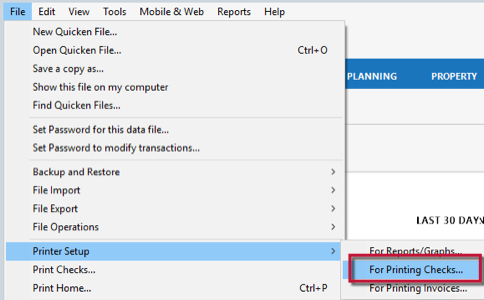
- Go to the File menu then select the Printer setup.
- After choosing Printer setup click on the For Printing checks.
- Select your printer from the Printer list.
- Then select Page-oriented.
- Go for the check style you want to use.
- Select full page source, and if required then a partial page printing style and a partial page source.
- And tab Ok.
- Make sure that printer is turned on, online, and loaded with blank paper or sample check.
- Click on the Align.
Note: Although Check 21 is a federal law and it was enacted to help banks in order to handle more checks electronically. As there might be possibilities that scanners may reject checks that use an incompatible font size or style in the numeric dollar amount field.
If you want then you can print only checks from Quicken that use Arial(font), Regular(font style), 10 pt(font size) in this field. Though the font style and size of all other typed fields do not interfere with the Check 21 restrictions. Therefore, it’s an added advantage for you to again have the flexibility to change this information in Quicken.
Moving further, using Quicken to write and print your checks can save your time and help you to avoid clerical errors.
Additionally, if you want then you can avoid the duplicate work of handwriting checks and then recording them in Quicken.
Troubleshooting
In some cases, there may be a problem when trying to print a check when the wrong tray is selected. To confirm the selection of the correct tray, check out the below steps:
- First, head to the File and look for the Printer Setup and click on For Printing Checks.
- Now go to the Properties at the top of the Check Printer Setup dialog box.
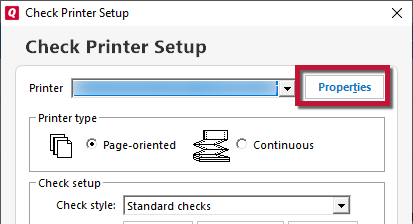
- Review the Paper Source and Media to assure they match your printer settings.
To Print checks in Quicken for Windows
Follow the given below steps to print checks:
You need to enter the transaction first.
- Click Ctrl+W, on your keyboard.
- In the case of multiple check accounts, you need to choose which account to use just by clicking the arrow next to the account name at the top of the Write Check area.
- Next, enter the payee name on the Pay to the Order of line.
- After that enter the dollar amount on the $ line, and then the amount will be written on the following line.
- Again, enter an address in the Address field, or click the Address button. And after that, you need to enter and save the address information for this payee on your QuickFill list. (Optional)
- You need to select a category for this expense. (Optional)
- You can also enter additional information on the Memo line. However, this information possibly is visible if you mail the check-in a window envelope. In order to enter confidential information, such as your account number, you can also use the Message field. And, if in case the message field is not available, then;
- At first select Edit menu > Preferences > Write Checks.
- Next, select the Allow Entry of Extra Message on Check option, and then click OK.
- After that click, Record Check in order to save the check-in your register.
If you need to do any changes in the alignment of the check then follow the given below steps.
How to adjust check printing alignment:
In most case, you won’t have to do anything special to print checks with the text aligned effectively. However, if you have problems you may need to utilize these steps to adjust the alignment of text on your checks but the only when you follow the instructions for printing checks and the text is still not aligned correctly on the print checks.
Once you have to get your checks to print correctly, Quicken saves your alignment settings, so you won’t have to change them again you can print the check with the same alignment in the future.
- Select file > check print.
- Go to the print check window, select the check that you want to print, then click print.
- Adjust alignment.
- Insert the sheet into your printer.
- Click on the print button to print an alignment guide.
- Hold on the alignment guide in the top of a page and checks and verify that the text appears in the right place.
- If you have to adjust the alignment, drag the text as necessary in the preview section of the printer dialog.
- Click on the print button to print an adjusted alignment guide.
- Clear the adjust alignment checkbox and restart printing your checks.
How to print checks in Quicken after they have been entered
- Firstly, click Print, in the Write Checks window, which will take you to the Select Checks to Print screen.
- Next, Insert the checks in your printer the same as you would letterhead paper.
- Now, in the First Check Number field, you need to verify that the number matches the number on your first check.
- And, if you have several checks to print then you can choose which ones to print by using one of these options:
All Checks: It simply prints all unprinted checks, including postdated checks.
Checks Through Date: It prints all checks up to a specific date. And, the current date is considered as the default date. But, you can also change the date by inserting a different dates in the field given.
Selected Checks: Simply allows you to select which individual checks to print. And, after selecting this option, click Choose, select the appropriate checks, and then click Done.
- Now, you need to verify that the Check Style is correct:
Standard Checks: It measures 8 1/ 2 x 3 1/2 inches and has three checks per page for sheet-fed printers, such as a laser, inkjet, or bubble jet. Standard checks for continuous-feed printers, such as a dot matrix or tractor pin, are a continuous sheet of checks.
Voucher: It provides a check followed by two vouchers for sheet-fed printers or also a check followed by one voucher for continuous-feed printers.
Wallet: It provides 6 x 2 5/6 inches with a check stub on the side of each check. They will provide three checks per page for sheet-fed printers, or a continuous sheet for continuous-feed printers.
- If necessary, then you can change your checks printing options:
Checks on First Page: You need to use this option only when you are printing a partial page of the standard. And, for the wallet checks on your page-oriented printer. Also, select the number of checks on the first page.
Print Your Logo: If you created a Microsoft Windows Bitmap logo then only select this option to print on your checks.
Additional copies: Here, if you are printing voucher checks on a page-oriented printer then possibly you can also print up to three additional copies by entering 1, 2, or 3 in the box.
- After that click OK in order to start printing checks from Quicken, or click Print First in order to print only the first check of the group of checks that you selected. In addition, the Print First option is used to verify your check settings by printing one check instead of a batch of checks.
- Finally, in the Did Checks Print OK? Window, press OK if every check printed is according to your expectations. If not then you can enter the check number of the first incorrectly printed check, and then click OK.
Write checks in Quicken for window
Write checks window never shows check numbers. And Quicken checks are prenumbered because most of the banks required prenumbered checks to stop the payment.
Till the check print, Quicken shows PRINT in the number column for each printable transaction in the register. After completing the printing process it changes it with the correct check number. It shows the total numbers of checks you’ve written. But remember that it will not print at the bottom of the register window.
Quicken easily manage two sets of check numbers in one account. These numbers don’t have any impact on the bank. Check numbers are only for your own record.
In some cases, if you required to write a postdated check, then simply change the date to the date on which you like to check to be payable.
Somehow, if the written check is away from the home, then use the paper checks you have or fill in a Quicken check by hand. Next time whenever you will use Quicken, just insert the transaction in your checking account register.
Follow the instruction to write check
- Select the Tools menu, then click on the Write and Print Checks.
- Choose the account to write a check from.
- Choose Use Online Bill Pay if you want to do online payment. Note: For online payments or bill pay enabled accounts only.
- If you selected online payment, the Print button changes to the send button. The reason behind this is you choose to send checks to the online payment processor printing or transfer instead of printing on your own printer.
- The second thing is the memo field may be included or not is depends on your online payment processor.
- Then enter Payee name.
- Enter the amount in the $ field.
- And then insert the payee’s address and memo. (Optional).
- Does the question arise that it is confidential? Of course not, because the memo may be visible if you send check in a window envelope, we recommend you to enter the confidential information in the message box. To display the message box.
- Select the Edit menu, go to the Preferences.
- In the Preferences, option chooses to Write checks.
- And then select Allow entry of extra message on check.
- Does the question arise that it is confidential? Of course not, because the memo may be visible if you send check in a window envelope, we recommend you to enter the confidential information in the message box. To display the message box.
- Insert Category. This is also optional.
- Select the Record Check option.
- After these processes when you are ready to print or send the checks, click on the Print or Send option at the bottom of the window screen.
We have discussed above the process of print checks in Quicken for Windows. It will also help you to avoid duplicate work of handwriting checks and then recording them in Quicken.
For further assistance, you can contact our Support team at our toll-free number +1-844-405-0904.