In this article, we will learn how to set up company information in QuickBooks Online. It’s quick and easy to change your company name, address, email,or EIN. Read the article for details, follow the mentioned here and be aware of the reason too. Go through the article and set up company information accordingly to the steps suggested in the article, and you realize it is done with ease. So, be with us and learn more & new, If you have a problem contact our QuickBooks ProAdvisor toll-free: +1-844-405-0904
To set up company information three basic steps are mandatory.
- Entering basic company information.
- Choosing your industry.
- Setting up or importing a chart of accounts.
Why do we need to improve company setup information?
It’s a very important thing to update your company information because what you provide in the section it will be affected the content information that appears on the sales receipts, invoices, and estimates to send to your customers. if you don’t complete the company set up its like’s to encounter issues.
For example, in the event that you send invoices to clients who you hope to mail you a check but you didn’t set up your contact data in Company Settings, at that point your receipt will exclude your street number and your clients won’t realize where to mail installments to. This will in all probability postpone installment and result in an income issue for you.
Steps To Set Up Company Information in QuickBooks Online
Step 1: Gather Information about the company & Login into QuickBooks
While setting up QuickBooks, it asks for more information about your company. It’s important to enter all information about the company that should be corrected the first time. You must gather some important information like Business name, Address, Email, website, a digital copy of the logo, Employer Identification Number, Accounting method, and business structure. After that you have to follow the given steps:
- After collecting all the information, you have to log in to your QuickBooks account.
- Then go to the company’s dashboard.
- After that, you have to click on the setting option or you can say gear icon.
- In the settings, you can see the Accounts and settings options, click on it.
- After that, you have to click on the company tab.
- Now you can see all the company information.
Step 2: Edit the Company Name
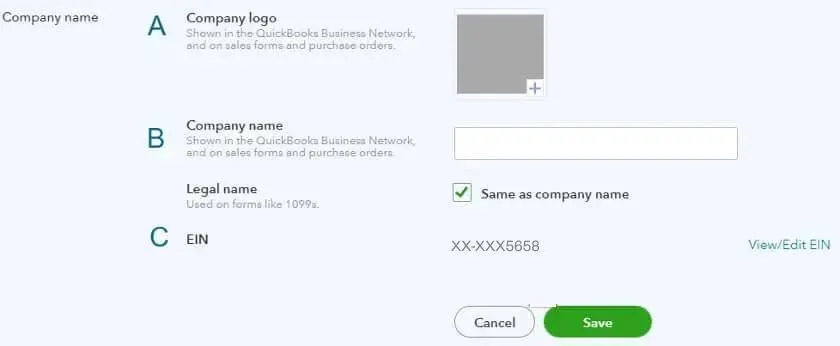
After completing the first step you have to click on the company name section or the pencil icon. This step can be used for editing the information. You will get three items in the company name sections that is the company logo, the company legal name, and the EIN.
Company logo: The company logo is important for creating a presence and positioning in the market. You can add your logo in the form of an image. For adding the logo you have to follow the given steps.
- Go to the company Logo and then click on the Square which is given on the right side.
- Then click on the + button in the square that helps to go to browse the storage where you already save your company logo in the image form.
- Choose your image and click on it. now the image shows the square box which is empty before.
- Now your logo is saved in your QuickBooks online account.
Company Legal Name: After setting your logo, you have to include the company name that you wanted to show on the invoices. You have to enter the legal name of the company which must be the exact match in the IRS and also legally displayed on the tax forms.
EIN: You will get assigned a number by the IRS that should be the exact match with the EIN.
QuickBooks Online lets you track new attainable information taking into account your Company website and Company phone number.
Step 3: Choose the Company type
If you need to change or include the company type then you can do this from the drop-down menu beside the tax form field.
- Sole Proprietor: Sole proprietors of the company are running their business by themselves. For reporting the income and the loss you need to use schedule C that is form 1040.
- Partnership: If you operate your business with your partner, you need to choose your business type. If they need to report profit or loss then they use form 1065.
- S corporation: S companies are businesses that choose to pass through to their shareholders’ corporate income, losses, deductions, and credits for the purposes of federal taxation. They use form 1120s if report income and loss.
- C corporation: The legal form for a corporation in which the owners, or shareholders, are taxed separately from the entity is known as a C corporation (or C-corp). For reporting income and loss they use form 1120.
- LLC (Land Limited Liability Company): In the United States, a limited liability company (LLC) is a type of corporate structure that shields its owners from being held personally liable for the obligations of the firm. Limited liability companies are hybrid legal entities with traits shared by corporations, partnerships, and sole proprietorships.
- Non-Cooperation Organizations: These companies emphasize the social cause rather than generating income so, these companies use form 990 to report annual activities.
Step 4: Accounting Information
The next step, register a business number.
- first of all, enter your Business Number
- Then, Click on the Advanced setting button in the left-hand menu of the Settings window.
- After that, Click Edit under Accounting
- After that, Abandon the First month of the IT (income tax) year as the First month of the company fiscal year and then set up the fiscal year for your organization, you desire to be confident your accounting records are secure and no entries are made in previous periods.
Step 5: Close the Books
We have an option in QuickBooks Online that is known as Close the Books it helps to guard transactions against previous periods being charged.
If you pick the Close the Books feature.
- First of all, select the Close the Books option.
- Now enter the Closing date in the Closing date field. In addition to setting a closing date.
- Enter the password, for example, 256652. Enter the password again in the next field Confirm Password. Now you know that you cannot make errors in previous periods.
- After editing the basic preferences, and before closing the settings window, click on the Save button. In addition, ensures that the settings you have updated are saved and QuickBooks Online has been customized for your company. Now, You will reward to the Company Settings to update or shorten mention as needed.
How to change Company Information in QBO?
Updating company information regularly is a good option for keeping your QB Online data accurate. Follow the steps to change company information like company name, address, email, and phone number:
Update Company Name
- Navigate the settings and find accounts and setting options.
- After that, click on Accounts and Settings.
- Go to the Edit section after selecting Company.
- Now, type a new company name.
Note: You may have to enter a legal name in the legal name section if your new company name differs from the previous name. Otherwise, choose the same as company name.
- Enter your Business number and select Save.
- Last, click on the Done option.
Update your Contact Information
- In the Settings menu, select Accounts and Settings.
- Choose the Company section and edit it in the Contact info field.
- Navigate the company email section.
- Enter the email address that QuickBooks can use to reach you.
Note: Choose the Same as Company Email from the customer-facing email option if you use the same email for your users.
- Enter the company phone number and website as it appears on the sales forms.
- Choose the save option and then click on the done.
Update your company addresses
- Navigate to Settings and choose Accounts and Settings.
- Choose the Company option and proceed to make changes in the Address field.
- Enter the address for your company in the Company address field.
- In the customer-facing address:
- Provide an address for customers to reach out to you or send payments.
- Select the same as company address field if it is the same.
- In the Legal address section:
- Provide the legal address you use for submitting your company’s tax documents.
- If the company address is the same then choose the same as company address.
- Choose Save and select Done.
Set up your company info in QuickBooks Online Payroll
Follow these steps, if you have not set up a payroll
First, go to the Employees or Payroll menu, now look for let’s get your business ready for payday, and under this option, click on Let’s go to Get set up for QuickBooks Online Payroll.
If you’ve already set up payroll
- Click on the Gear icon, and later click on Account & settings.
- Now, you need to insert the legal name for your business.
Make sure you have to use the name under which you registered your company with HMRC. You can find this legal name in the QuickBooks Online Company Settings. - Now, insert the address of your company.
Make sure you have to use the same address under which you registered your company with HMRC. You can find this legal name in the QuickBooks Online Company Settings. - No, save all your changes.
I hope you find this article useful. If you have any query related to this or another topic, you can call QuickBooks Support number [quickbooks]