Want to learn how to set up and print deposit slips in QuickBooks Online? If you are using QuickBooks then you can print deposit slips on the pre-printed forms that you can buy from the Intuit Market official website. But first, you need to learn how to set up and print deposit slips in QuickBooks Online. After Reading this entire article carefully, you will learn to print deposit slips flawlessly and with ease. Meanwhile, you can also hire our expert if you need to get it done by them. Then contact us: +1-844-405-0904
Setup Deposit Slips
Follow the steps mentioned below before you start printing your first deposit slip. Once you set up the printing settings then all the information on your deposit slip will print in the correct field of the pre-printed forms.
To edit and modify the printing settings you need to open the Bank Deposit window in QuickBooks Online and select the Print option and then select the Setup and Alignment option.
Print a Sample Deposit Slip
First, we need to check how information is filled in the form by default settings. To do this, we need to set up a deposit slip and then print a sample deposit slip.
TIP: If you are printing your first deposit slip then we recommend printing it on blank paper or regular paper so you can align without wasting any pre-printed forms.
Follow the instructions mentioned below to print a sample deposit slip.
- From the left side navigational panel, click on the +New icon.
- Then, under Other, select the Bank Deposit option.
- After that, select the Print option.
- Next, to open the Print Deposit Slip Setup window you need to select the Setup and alignment option.
- Then, select the View preview and Print sample option.
- Again, select the Print option.
- Once the sample is printed on the blank paper, you need to put it on top of the Pre-printed form and hold both against a light source.
- If all the printed information perfectly lies in the correct area of the form then click on the “Yes, I am finished with the setup” option in the Print window and if you are not satisfied with the results then select “No, continue with the setup“.
You may also need to set up your Adobe Reader if the sample printed page is not still aligned with the pre-printed form.
Set up Adobe Reader
You should download and use Adobe Reader for controlled printing and consistent printing in QuickBooks Online.
- First of all, you need to download and install the latest version of Adobe Reader available on your system.
- After that, set Adode Reader as your system’s default PDF reader.
- Then, select the View preview and Print sample option.
- Again, select the Print option.
- Once the sample is printed on the blank paper, you need to put it on top of the Pre-printed form and hold both against a light source.
- If all the printed information perfectly lies in the correct area of the form then click on the “Yes, I am finished with setup” option in the Print window and if you are not satisfied with the results then select “No, continue with the setup“.
Even after this if the sample printed page is not still aligned with the pre-printed form then proceed to the next step so you can fine-tune the alignment of your pre-printed page.
Fine Tune Alignment
To go to the Fine-tuning screen form window, first, go to the Bank Deposit window and select the Print and then select the Setup and Alignment option. In the next window, select the “No, continue the setup” option twice.
After that follow the steps mentioned below carefully to fine-tune your sample printed page’s alignment with the pre-printed forms.
- In the Preview window, you need to compare the alignment grid with the grid on the Fine-Tune Alignment page.
- Then, you need to match the grids on the screen with your printout by dragging. Once the grid is matched then QuickBooks Online will make the required adjustment to alignment. Some changes in the horizontal and vertical offset are also made as per requirement.
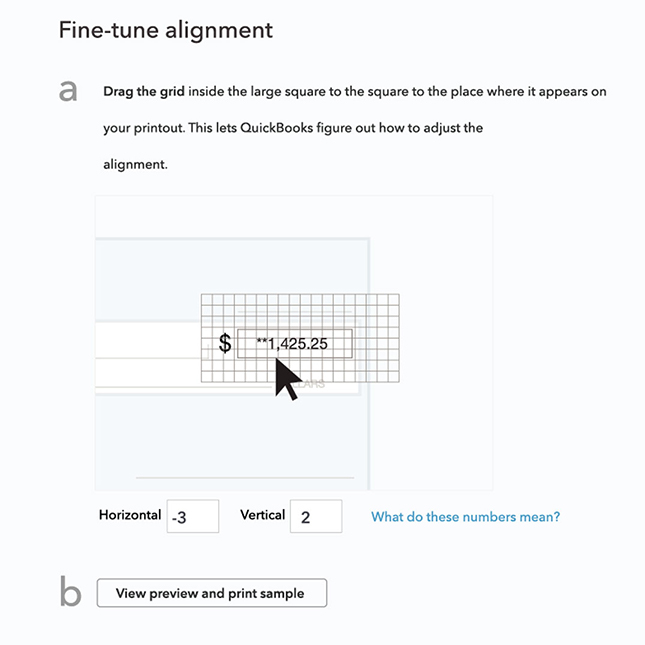
- If you want to learn more about the Horizontal and Vertical offset then click on the “What do these numbers mean?” option.
- After that, print the information on the sample deposit slip to make sure that all the information is in the correct fields of your preprinted forms. To do this, first, click on the View Preview and Print Sample option and then select the Print option.
- Select Final Setup, if your sample deposit form is perfectly aligned with the preprinted form. If the alignment is not perfect yet then you need to continue to fine-tune the alignment until done.
If the changes that you have made using the alignment tool failed to save then follow the instructions below to fix this error.
- First of all, you need to open the fine-tune alignment window.
- Then, make the adjustment on the on-screen grid to match it with the printout.
- Once the grids are matched, select the Finish setup option and print the sample deposit slip. You should check out the Print Deposit Slips section below for the detailed steps.
- Repeat the steps mentioned above until all lines are not aligned with the preprinted form.
How to Print Deposit Slips in QuickBooks Online
Once you have adjusted the printing settings of the deposit slips, you are ready to print a deposit slip in QuickBooks Online. Follow the instructions mentioned below carefully for this.
Before you start to print a deposit slip make sure to complete the tasks mentioned below.
- First, you need to create a deposit transaction in the Bank Deposit window.
- Second, you need to specify the account when receiving payment against an invoice as Undeposited Funds or when you are creating a sales receipt as well.
You also need to put the printable deposit slips in the printer if you are going to print the deposit slips instead of the summary. You can order printable deposit slips from the Intuit Marketplace.
Here are the steps for printing a deposit slip:
- From the left side navigational panel, click on the +New icon.
- Under the Other section, select the Bank Deposit option.
- By doing this Bank Deposit window will open, here you need to select the customer payments for which you want to deposit.
- Then, select the Print option. You also need to select whether you want to Print Deposit slip with the summary or Print Deposit summary only(If you have filled deposit slips by hand then this will be useful). If you want to check the print alignment then you can do it by selecting the Setup and alignment option.
- Select Print and further procedure may vary based on the browser you are using. The printing icon can either be on the floating bar of the preview page or on the separate Preview window. If the preview window is blank or you can’t see the print icon on the screen but you are asked to download the pdf file manually then first you need to download the file and open it. After that, you have to print it from there.
- Once you are finished printing the deposit slip, close all the preview windows or printing windows.
- At last, select Save and Close.
The Bottom Line
We hope you found our article resourceful and valuable as well. We have discussed the detailed procedure on how to set up and print deposit slips in QuickBooks Online. In addition to this, we’ve also discussed how you can set up and align deposit slips in QuickBooks Online before printing them on actual preprinted forms.
If you have any queries related to the deposit slips in QuickBooks Online or any issue related to QuickBooks software then contact our team of Intuit Certified QuickBooks ProAdvisors. For more information call us at our 24/7 toll-free QuickBooks customer support number +1-844-405-0904.