In general, charity donation helps needy people but here in the business, if you make any donation that will help you out on your taxes. It is very easy to enter & record a donation in QuickBooks that will help you out on your taxes. Get step-by-step instructions to learn how to do so. The article here is to provide all the details related to steps to record donation with images that show the real interface of working on it. Reading the complete article enables you to record a donation in QuickBooks on your own. Still, having an issue contact our QuickBooks ProAdvisor toll-free: +1-844-405-0904
QuickBooks allows users the facility to record item donations and charitable contributions in the form of cash, checks, and credit cards. These revenues should be recorded as donations to guarantee that proper tax areas are used for the year-round deduction.
It is always great to create a sales receipt form for creating the extra tracking options such as the type of donation, the program, or the source of the donation, instead of listing donations as deposits. This information will keep a significant amount in the case of an audit.
Let’s discuss here the simple steps to record a donation in QuickBooks
Steps To Record a Donation in Quickbooks
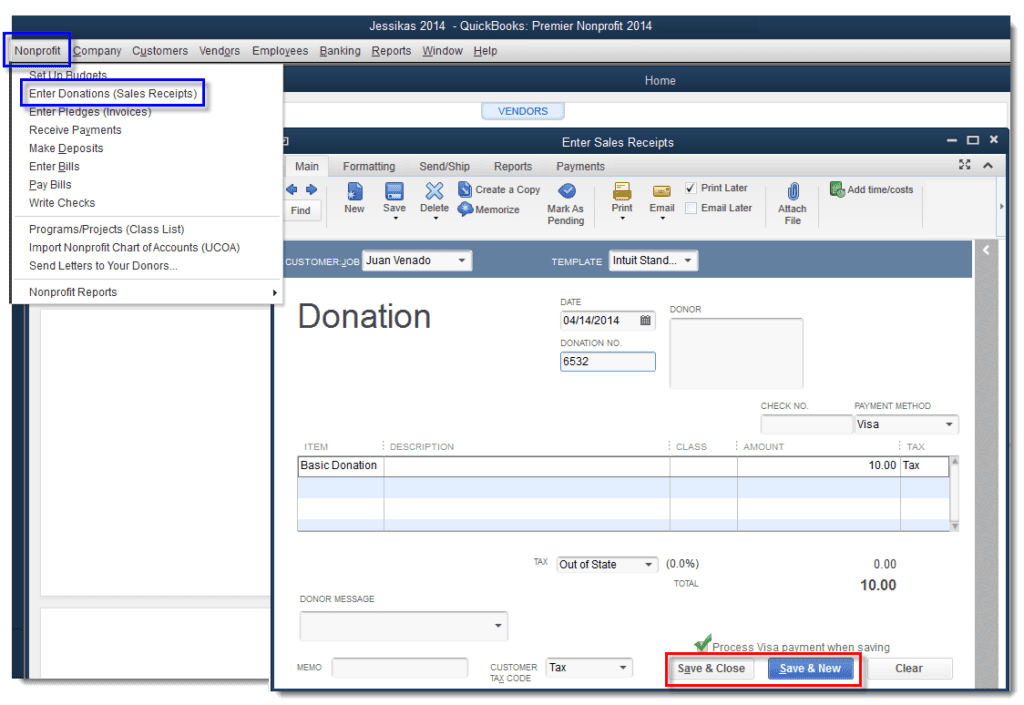
- Open QuickBooks and Go to the “Nonprofit” menu and from the drop-down menu choose “Enter Donations (Sales Receipts)”.
- Again choose the “Customer Job” from the drop-down arrow and pick an existing donor or entity providing a grant.
Note: If you don’t have any donor or grant set up at the time, Go for the “Add New” option to add a new donor or grant.
- After that choose the item that matches the donation type from the item column. If you want to create a new item, then simply go to the “List menu” and after a click on “Item List” and then select “New”.
- From the drop-down list, choose “Type” and then select “Service”.
- Again from the drop-down list select choose “Account” and choose that account on which donations should be deposited.
- In the Class column, select the fund or project corresponding to the donation. For example, a donation made to a particular foundation.
- In the Amount field, insert the total of the donation and select the “Customize” option and choose any field which you need to add/remove to help donations if required.
- On the sales form, select the “Print” option to print the form.
- Select the “Deposit to” drop-down list and, if applicable, select the account to receive the deposit. This area cannot exist for some type of donation sent directly to a charity or organization.
- At last, save & close.
Note: The steps which we discussed above apply to QuickBooks 2013. It may differ slightly from other versions or products.
Steps to Record a Donation in QuickBooks Point of Sale
Step 1
- Open QuickBooks Point of Sale, go to the Customer center and choose “Create sales Receipt”.
- Choose “Add new” from the drop-down Customer menu, and insert the name of the particular organization to which you made an item donation.
- Insert the date in the blank fields named “Item” and “Description,” insert the name of the item you have donated and also give a brief description of the item, including condition, features or year of production.
- From the drop-down menu choose the item quantity and below the Amount option, Insert a dollar value that is equal to the value of your item.
- Now choose “I Want To” next “Change Tax Location” and later select “Exempt”.
- Click on “Save”.
Step 2
Create a spending account for your charitable contributions to help you keep track of the money you have donated.
- Go to the QuickBooks “List” menu and choose “Chart of accounts”.
- Select “Account”, next “New” and choose “Continue”.
- When asked to enter a name in the Account Name field, enter a name that will help you identify this account, such as “Considerations of Interest.
- Last, select “Save and Close” to save the account.
Step 3
- Go to the “Banking” tab to enter the check you have made as a charitable donation.
- Next, select “Write check”.
- From the drop-down menu, select the bank account from which check expenses will be paid.
- Click “Add New” in the “Make Payments” field, and type in the name of the charity or organization that you wrote the check to.
- Insert the check number, date, check amount and if you want additional memorandum in the relevant blank fields.
- From the drop-down menu under “Itemize by account”, choose the name of the account you created for the contribution you donated.
- Choose “Save” to save expenses.
I hope this article helps you to record a donation in QuickBooks or QuickBooks Point of Sale without any problem. But if you still have any issues or queries regarding the same or any other issue with QuickBooks, then directly connect to our QuickBooks support team or our certified ProAdvisor team by dialing our toll-free +1-844-405-0904 and get instant help.
Thank for visiting Wizxpert.