Want to connect QuickBooks Point of Sale to the E-commerce store for the easy sale of your items, and services? In this article, we will know you, how to set up E-commerce for QuickBooks Point Of Sale, and the configuration procedure of POS using Webgility. In the meanwhile, you can call our experts for the best, and instant service through this toll-free number+1-844-405-0904.
QuickBooks Point of Sale is all in one place, where we can manage inventory more efficiently and can accept new payment types at any time, and anywhere. While integrating QuickBooks POS to the e-commerce platform we need the help of Webgility to use the e-commerce platform at an advanced level.
After signing up for Webgility, anyone can post items, sells, and email receipts all from Point of Sale. Then if you’re ready to check your sales reports, you can see a new field added to filter e-commerce sales. Learn how to set it up.
Procedure to Connect QuickBooks Point Of Sale to E-Commerce Store
Follow the 3 steps to integrate the QuickBooks POS with the e-commerce platform;
Step 1: Register Webgility for QuickBooks Desktop POS
Before you move to connect with Webgility, you need to register and sign-up for an account. Here is how:
- First, go to File,
- Then select E-commerce.
- Then go to Webgility to register
- Next set up your account.
Now your account is ready to connect your Webgility to POS.
Step 2: Activate Webgility to QuickBooks Point of Sale
After registering with Webgility, you can register and connect to Point of Sale. Here is the procedure:
- First, Go to File.
- Then select Setup Interview.
- Click on E-commerce.
- Next click on Sign In and enter your Webgility sign-in info.
- Review the Authorization screen.
- Now click on the Agree & Continue option.
- Select OK.
- Make sure you see Account Status: Active.
After doing this process properly, go back to Webgility and connect Webgility Desktop with QuickBooks Desktop Point of Sale 19.
Other Useful Resources:
- How to Start an Office More Efficiently
- What You Need to Know About Taxes and Life Insurance
Step 3: Posting Settings for QuickBooks POS on Webgility Desktop
These posting settings are recommended to set up in the Webgility, but it is totally up to you, that you want to set up it or not. These are optional. Remember that, this is not recommended for QuickBooks commerce or for the point of sale.
To get started, follow the below procedure;
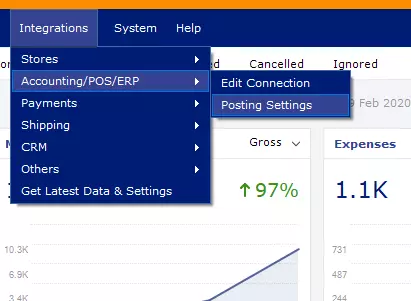
- Go to Integrations section.
- Select the ‘Accounting/POS/ERP‘ option from the list.
- And then the ‘Posting Settings‘.
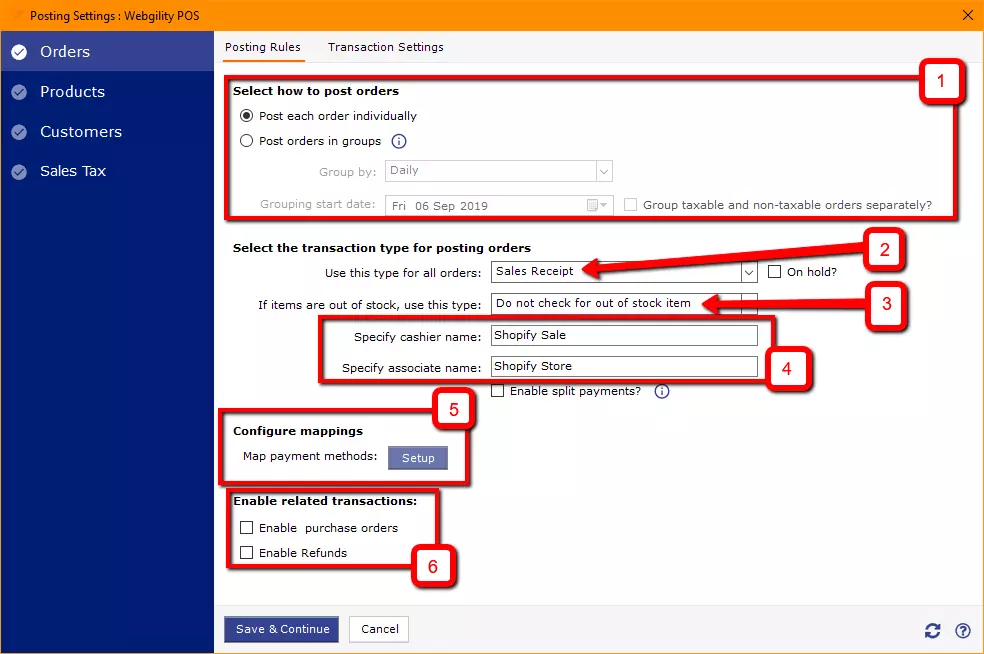
Set Up the Posting Rules
Follow the procedure to set up the ‘Posting Rules‘ from the ‘Orders‘ tab;
- In ‘Post Orders‘, you can post each order individually.
- Apply the ‘Sales Receipt‘ for all orders in ‘Transaction Type‘.
- Select ‘Do not check for out of stock items‘, if iteams are out of stock.
- Name after the online store, in the ‘Cashier/Associate Name‘ section.
- In the ‘Enable Related Transactions‘ section, leave blank unless otherwise noted in the implementation.
- Leave blank unless otherwise noted in the implementation, in the ‘Payment Mapping‘ section.
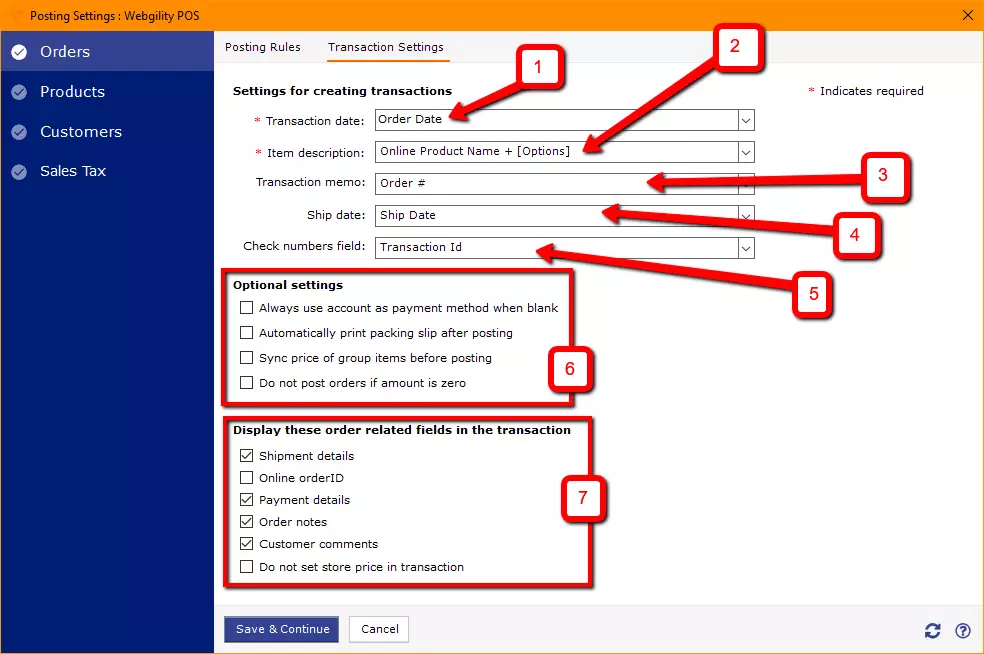
Set Up the Transaction Settings
- In the Transaction Date, set the order date.
- Put the product name, and the other details of the item in the Item Description.
- Enter the order number in the ‘Transaction Memo‘ field.
- Use the ‘Ship Date‘ option, for the shipment date.
- Put the transaction Id in the Check number field.
- Uncheck the box unless otherwise noted at implementation time, in the Option Settings.
- Display this related field in the transaction, is used to populate into the note on the transaction.
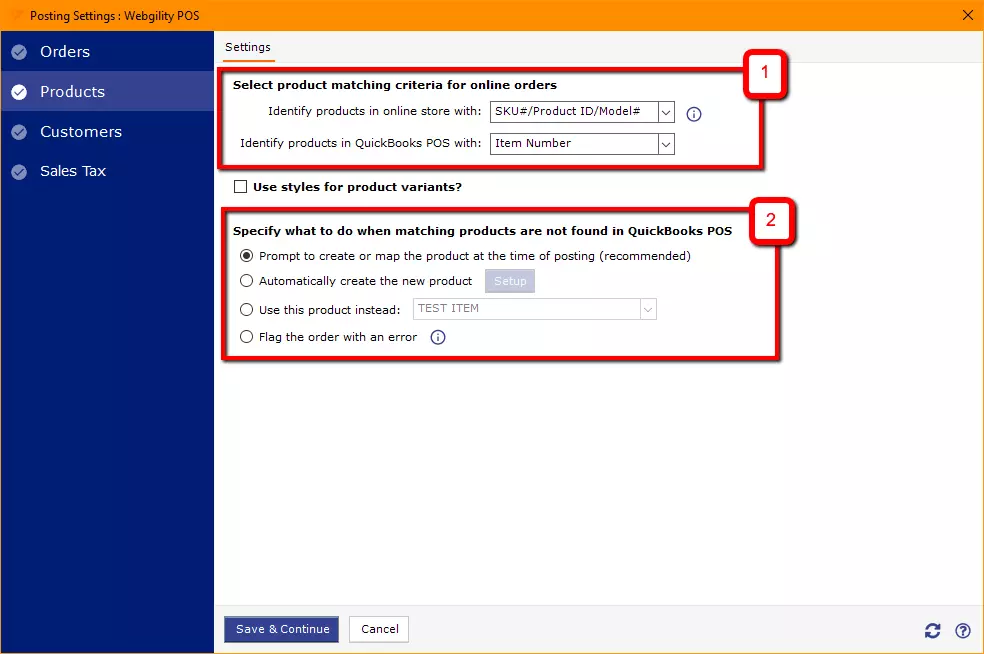
Set Up the Products
- Choose Product Matching Criteria for Online Orders:
- Identify products in the online store with
- SKU#/Product ID/ Module
- Identify Products in QuickBooks POS with:
- Item Number (regularly)
- Identify products in the online store with
- Specify what to do when matching products are not present in QuickBooks POS:
- Prompt to make or map the product at the time of posting
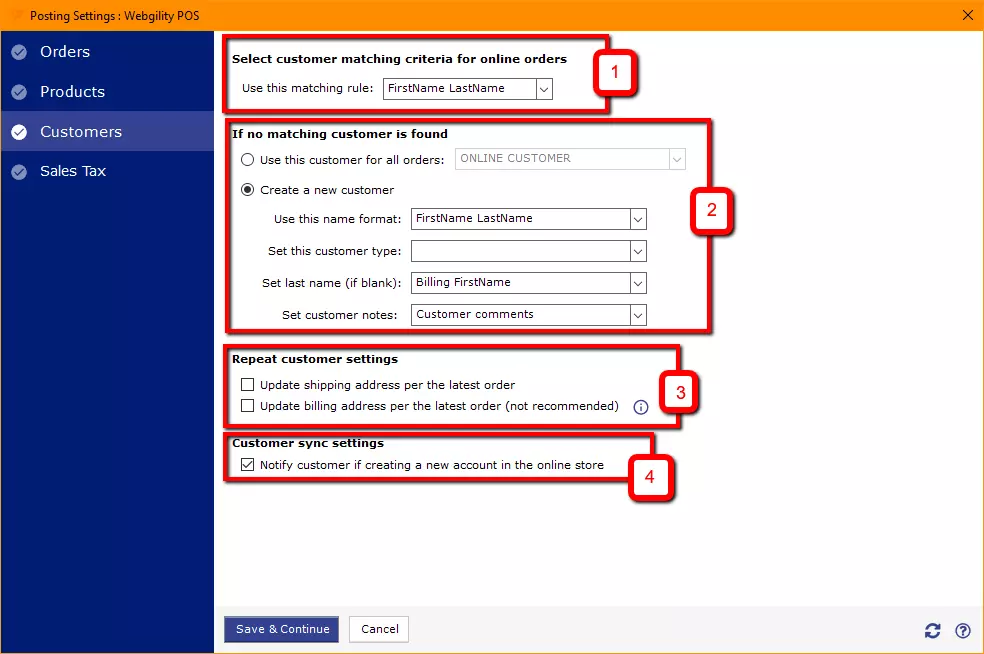
Set Up the Customers
- Chose customer matching criteria for online store:
- Use this matching rule: FirstName and LastName
- If no matching customer is found:
- Create a new customer:
- Use this name format
- FirstName and LastName
- Set this customer type:
- Optional
- Set the last name (if blank):
- Billing FirstName
- Set customer notes:
- Customer Comments
- Use this name format
- Create a new customer:
- Repeat Customer Settings:
- Leave unchecked unless noted in the implementation
- Customer Sync Settings:
- Leave check unless noted in the implementation
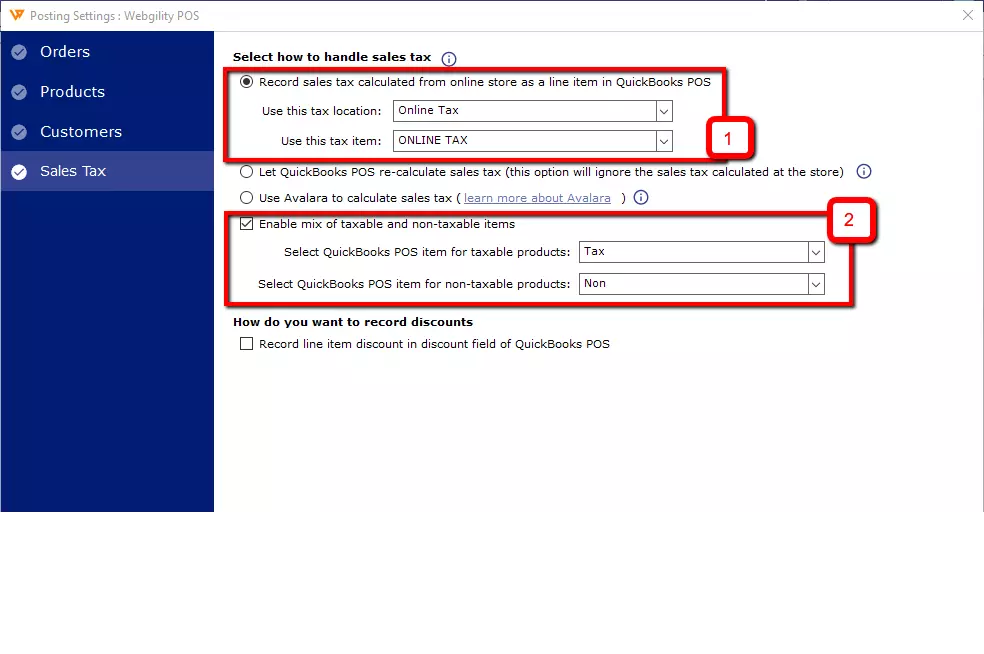
Set Up the Sales Tax
Before you start this area, you ought to review your current tax situation. The below are recommended settings we discover are most applicable when working with QuickBooks Point of Sale but might not apply in your specific situation.
- Pick how to handle sales tax:
- Record sales tax calculated from the online store as a line item in QuickBooks POS:
- Use this tax location:
- Select your online sales tax location
- Use this tax item:
- Select your online sales tax item
- Use this tax location:
- Record sales tax calculated from the online store as a line item in QuickBooks POS:
- Allow a mix of taxable and non-taxable items:
- Check the box
- Choose QuickBooks POS item for taxable products:
- Tax
- Choose QuickBooks POS item for non-taxable products:
- Non
Set Up the Sale Tax Configuration:
Webgility has three arrangements to assemble sales tax for QuickBooks. We recommend using My Online Store to calculate tax as your sales tax configuration.
Here are the differences between the options to help you determine which sales tax configuration is right for your business. Be sure to ask your Webgility deployment manager what works best for your business.
- Using the Online Store to calculate tax:
If you use your online store to collect sales tax, it blocks QuickBooks from using its built-in sales tax feature and will show the sales tax as a line item on the certificate. You’ll need to configure a new Tax Location and tax item to record into QuickBooks Point of Sale.
This option should be used if you need to collect a variable tax rate for your state but don’t suppose to collect for other states.
- Using QuickBooks Desktop Point of Sale to calculate tax
- You don’t anticipate having to gather sales taxes at a special rate than what’s collected in your brick-and-mortar store. If you are doing not hit any threshold for cross-state tax nexus remittance and you’ve got one rate across your state, this is often the simplest option.
- You’ve built out a tax nexus of Tax Locations in QuickBooks Point of Sale. In this case, you would like a separate Tax Location. When you do that, you would like to map the individual Tax Jurisdictions you care about collecting for remittance and map them (either by state, county or zip code) within Webgility Desktop.
Congratulations, now your QuickBooks Point Of sale is on the e-commerce platform. Feel free to contact our certified QuickBooks ProAdvisors through this toll-free number +1-844-405-0904 to solve any kind of doubts or queries related to this topic.