Are you one of those that get out the stamp-pad and rubber-stamp to place an overdue on your unpaid invoices before you email them? Perhaps you print a watermarked overdue on blank paper and print your QuickBooks Invoice on high of that. In this article, we will discuss the new invoice past due stamp feature inQuickBooks and Show Past Due stamp on invoices. If you are facing problems while identifying past due invoices. Do not worried about it.QuickBooks Desktop 2018 has all of the features related to overdue stamps on Invoices. Go through the article and get all your queries resolved, in case having any trouble contact our QuickBooks ProAdvisor toll-free: +1-844-405-0904
And, there’s a rising curiosity among everybody to understand what new options dig can provide. For the past few days, accountants and our many readers are ceaselessly asking the North American nation regarding what they will expect from QuickBooks Desktop 2018.
Overview of new Quickbooks Invoice past due to the stamp feature
Intuit will launch several features for the Quickbooks invoice past due stamp is one of them. With current versions of QuickBooks, are you facing hassles while identifying past due invoices or sending reminders to your customers regarding overdue payments?
If yes, you don’t need to worry any longer. QuickBooks Desktop 2018 comes with the feature of overdue Stamps on Invoices, victimization that you’ll simply filter and determine overdue invoices and additionally get them written in PDF format.
The past due stamp is actually going to work access all desktop versions of QuickBooks pro. Quickbooks premier was be included in this list in the past due to stamp actually kind of need every invoice has there has overdone payment basically. Invoice is open and makes the payment somewhere in the past is now can have a label and tag this is the past to actually chose whether or not.
Well, QuickBooks 2018 finally provides you with the power to place an overdue stamp on your written and emailed invoices, also show the message on the viewing copy inside the interface.
By default, this new late stamp solely displays on the viewing copy of QuickBooks Invoices. It does not print on either written or emailed invoices unless you choose to flip printing on.
To assemble written or emailed copies to indicate the overdue stamp
- Start at the produce Invoices screen.
- Select information.
- Choose Manage Templates and click OK.
- Check the “Print overdue stamp” Checkbox.
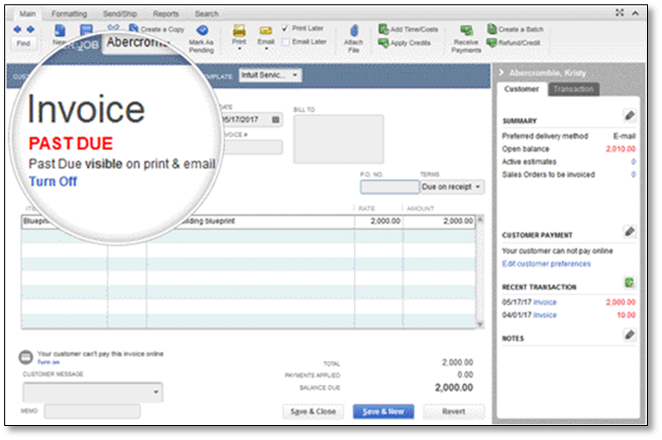
- When the “print” choice is enabled, the on-screen version of your invoices can show a message indicating the overdue stamp is visible on print and email versions of the Invoice
You can simply disable the stamp from printing on the Invoice you are viewing by merely clicking the blue “turn-off” link. Turning it off here does not disable the printing of the other invoices. The Past Due stamp appears on your printed or emailed invoices in the manner shown below:
QuickBooks Desktop For Windows
Add the Past Due stamp from the Templates list
- First of all, Go to Lists then Templates.
- Now, find and edit the invoice template you use for collections, From the list
- Select Print Past Due Stamp from the “Company & Transaction Information” section.
- Select Ok.
- Now you can open an invoice that is past its due date. The Past Due stamp shows on the invoice.
- Now you are free to print the invoice or send it through email with the PAST DUE stamp.
Add the Past Due stamp directly from the invoice
- First, open an invoice past its due.
- Now, choose Formatting, then choose Manage Templates.
- Choose the invoice template you want to use and select OK.
- Select Print Past Due Stamp from the “Company & Transaction Information” section, Select OK.
- Now you are free to print the invoice or send it through email with the PAST DUE stamp.
How to Turn off the past due to stamp
- Unchecked the Print Past due to stamp box, if you are on the basic customization window.
- If past due invoice is open, you can simply click the Turn of a link and past due stamp will be removed.
QuickBooks Desktop for MAC
These features are also available for QuickBooks Desktop for MAC 2019.
Add the Past Due stamp on invoices
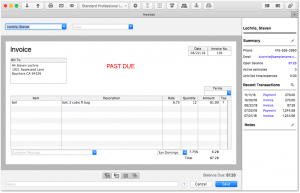
Important: The “Past Due” stamp can only be turned on or off on a template level setting.
- Open an invoice past its due.
- From the Top, select the templates drop-down, then Edit Current Template.
- Select Fields in the Layout Designer, Select the Print tab.
- Select the size of the Past Due stamp.
- Now, exit out of the Layout Designer and then select Save.
- Now, you are free to print the invoice or send it through email with the PAST DUE stamp.
How to Remove Past Due Stamp from invoices in QuickBooks
First of all, we have to verify that everything is set up properly with the term period in QuickBooks. Sometimes in QuickBooks even though you have set a 90 days term period but actually it is not not set properly for 90 days. We have to take some steps to verify this. You may also have to verify and rebuild the QuickBooks data. But first, let’s verify the term in QuickBooks. For this,
- First, open QuickBooks and then go to the upper-left corner of the screen and select the Lists menu.
- Here, select the Customers and Vendors Profile Lists option.
- Then, choose the Term Lists option.
- After that, locate your Net 90 term and once you find this then right-click on it and select the Edit Term option.
- Next, remember to select the option (for a Net 90 Term, and make sure to select the Standard option and also verify that the Net due in should say 90)
- Click on OK to save the changes that you made.
To check whether the past due stamp is still visible or not, open an invoice and then look for the past due stamp. If you are still seeing the past due stamp on the invoice then to remove it we recommend you to rebuild the data in QuickBooks.
NOTE: You should only implement this procedure on the computer that hosts the company file.
- Open QuickBooks and then from the upper left corner of the screen, click on the File menu and then select the Utilities option.
- Here, select the Rebuild data option.
- Then, click on OK when QuickBooks asks you to close all the running windows.
- After that, click on OK when QuickBooks tells you to create a backup before it can start rebuilding the data.
- Then, a new window will open. Here, select on the Options.
- Next, click on the Browse option and then select the location on your computer where you want to save the file.
- After that, select the No verification option and then click OK to continue the process.
- Then, checkmark the box stating Use this location and then select Next.
- Click on the Next again and then save the file.
- As soon as the backup is completed, rebuild will start automatically.
The Bottom Line
We hope this article helps you to solve your queries, if you are still facing some problem then please visit customer support for QuickBooks or Dial +1-844-405-0904