In this article, we will discuss how to enter, edit, delete & set up expenses in QuickBooks Online. Setting up Expenses can add to the following features in QB. Read the detailed article and find the steps to enter & set up expenses in QBO, edit expenses in QBO, we have provided related images to cater a better understanding of the steps and process being followed. So, just go through the article and get all your queries resolved, if any remains the same then contact our QuickBooks ProAdvisor toll-free: +1-844-405-0904
- You can run profitability reports if you have entered expenses in QuickBooks Online by customers.
- Bill customers back for items that you purchase on their behalf.
- Manage bills through accounts payable.
- Create purchase orders to send to your suppliers.
Table of Contents
Steps to Enter & Set-Up Expenses in QuickBooks Online
Here we are going to show you how to enter expenses in QuickBooks Online and in addition to this we are also going to demonstrate how you can edit and delete expenses that you have previously recorded.
Tip: If you want to create large number of expenses then instead of recording them one by one it will be a lot easier to enter them in Account History.
Create or Enter expenses in QuickBooks Online
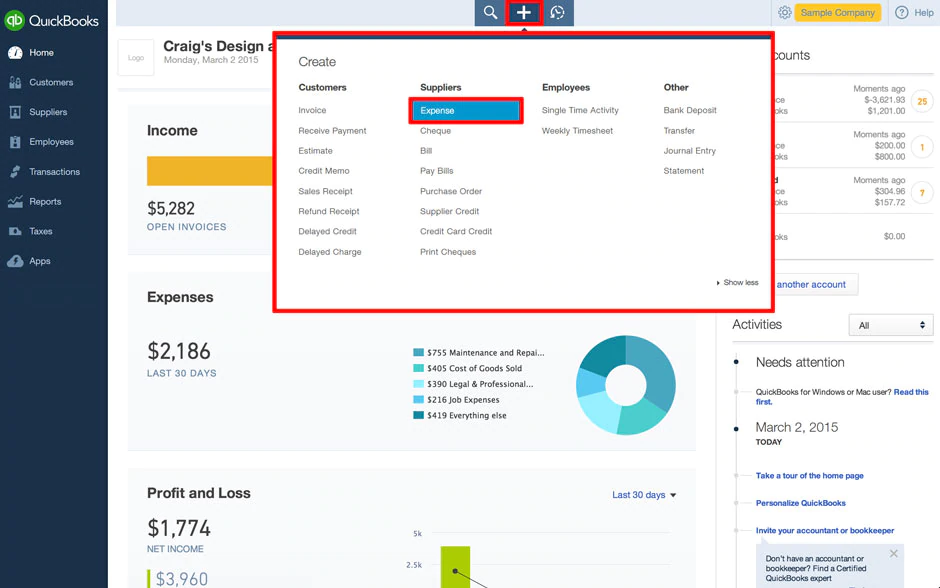
- From the top menu bar, click on the (+) icon or Create menu.
- Here, under the Supplier column select the Expenses option.
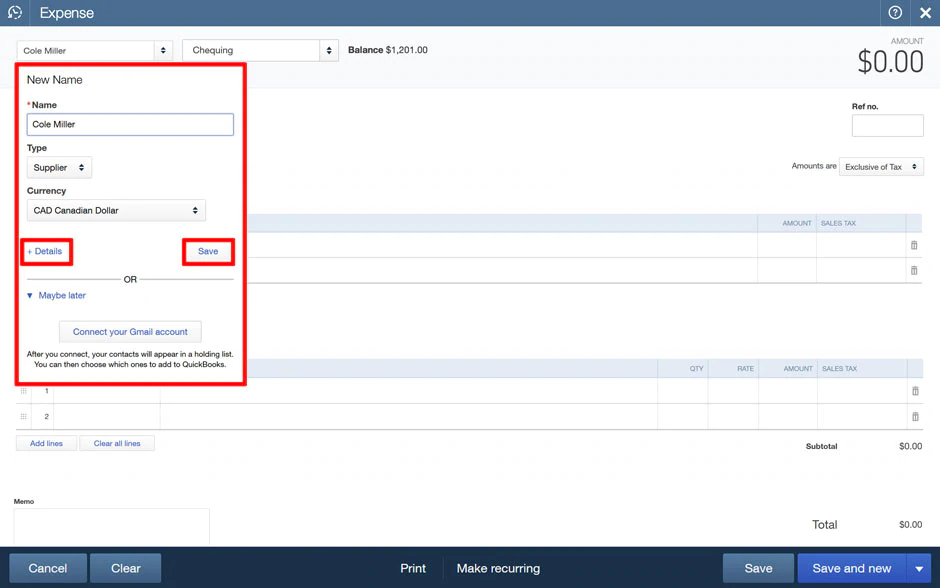
- In the Payee field, enter the name of the supplier or vendor and then click on Add. You can either mention the name of a person or a business. If there are multiple petty cash expenses in your transaction then you can leave this field blank.
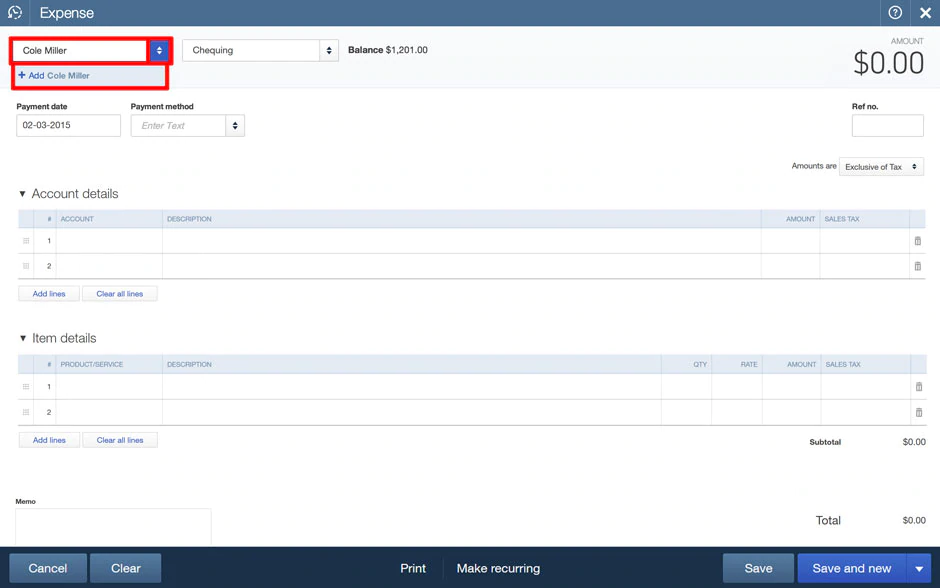
- Click on + details to add more information like the type of currency & supplier or vendor, etc. Select Save to do it later.
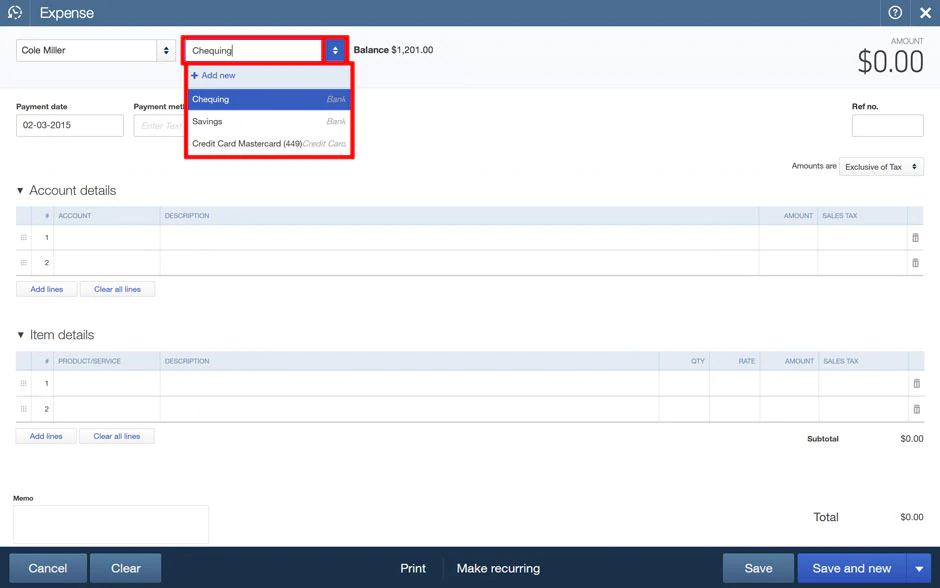
- After that, choose a Payment Account from which the money of purchase is going to be deducted. Always remember that if you are using a debit card for the transaction, you have to choose a Chequing Account, no matter even if the card has a Visa or Mastercard logo on it.
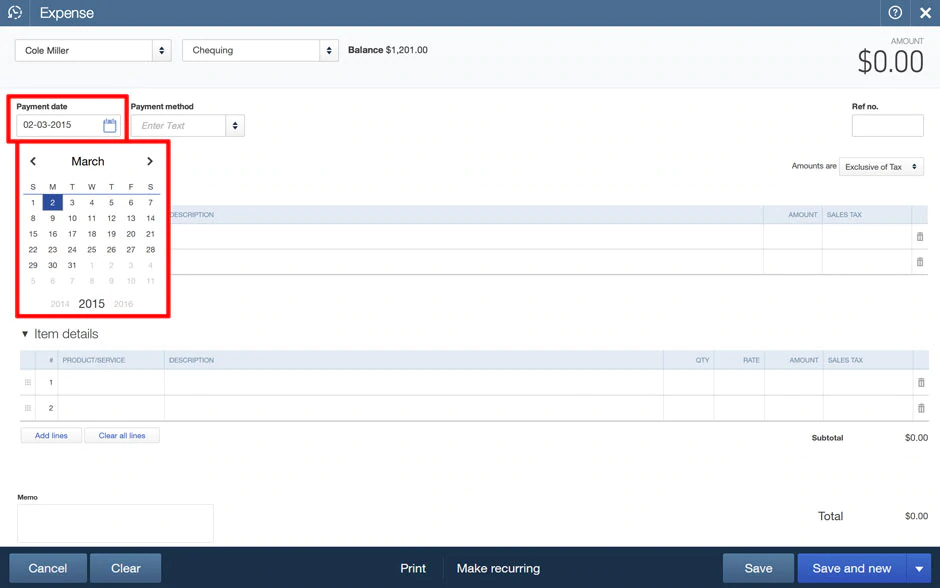
- In the Payment Date field, enter the date of the purchase.
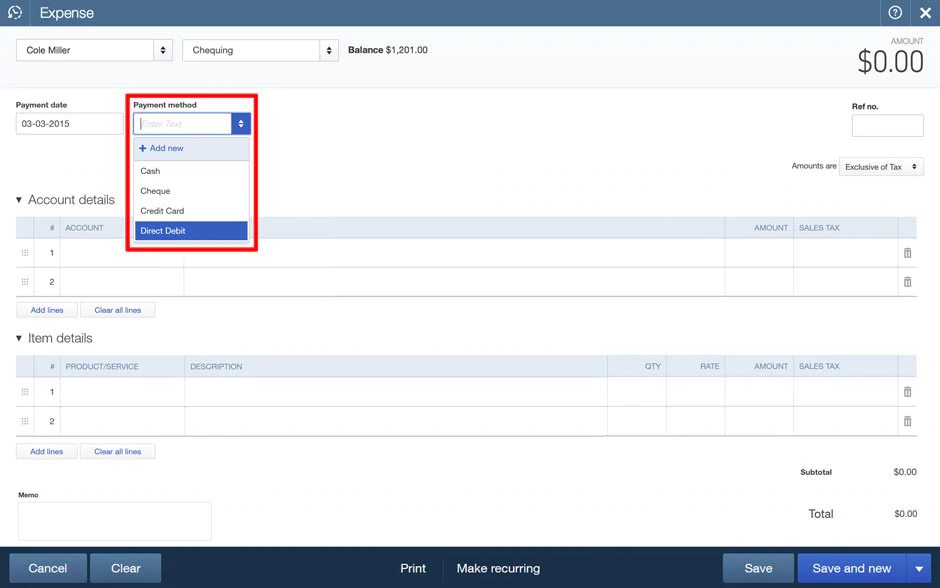
- In the Payment Method field, here select how you made the purchase. For Example credit card, debit card, cheque, or cash.
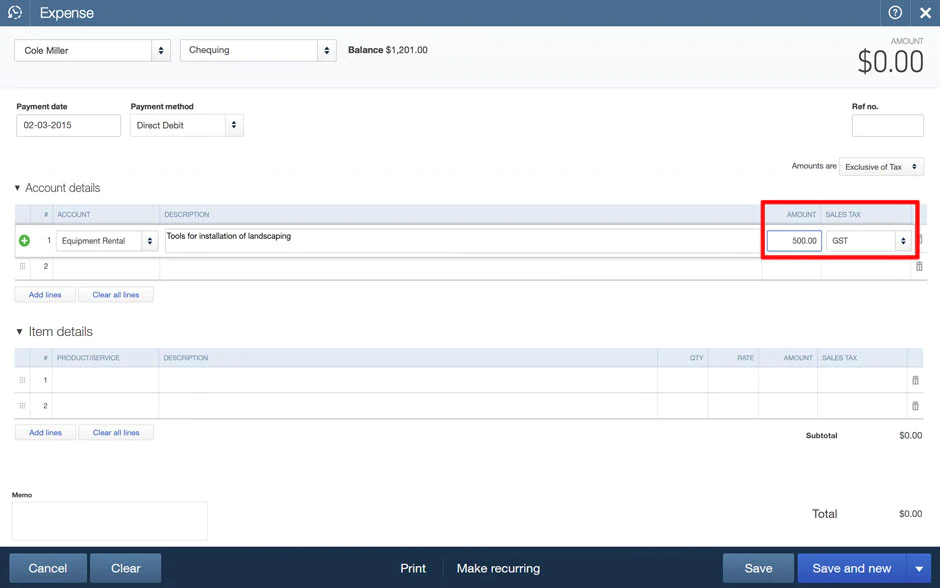
- Under Account, you need to choose a category for the purchase you have made.
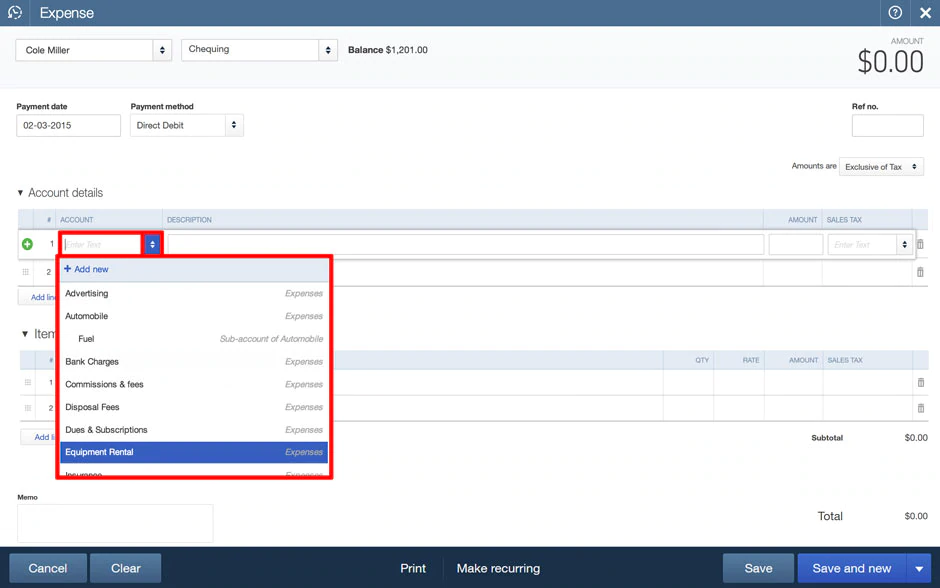
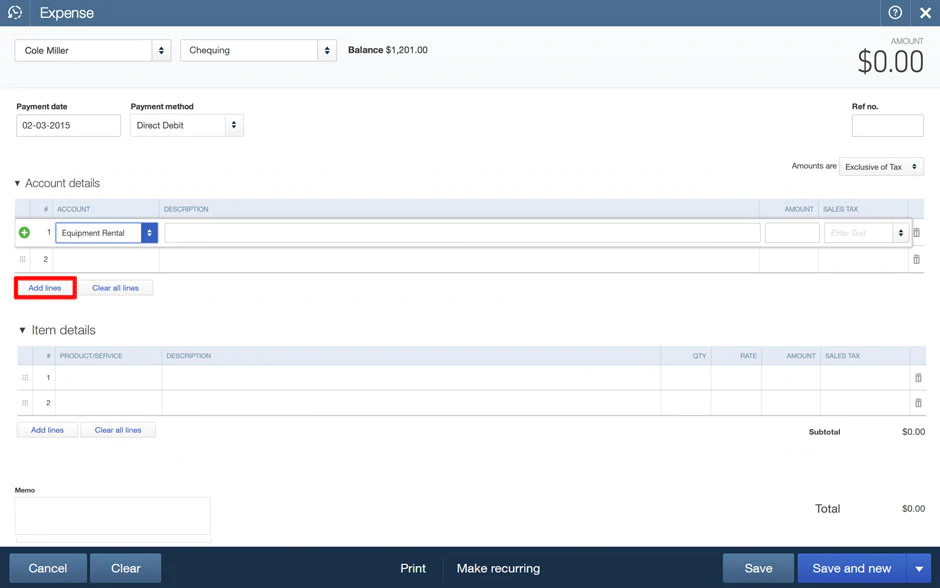
- NOTE: If you can’t find the desired category for any particular item then you can add a new category and amount by clicking on the Add lines option.
- (Optional) In the Ref. No field, for the tracking you can enter an identification number from the purchase receipt. (NOTE: QuickBooks Online Plus users can turn on location and class tracking from the Account & Settings option. After that, there will be an additional location, and class tracking fields will appear.)
- (Optional) In the Description field, you can enter a description of the purchased product or service.
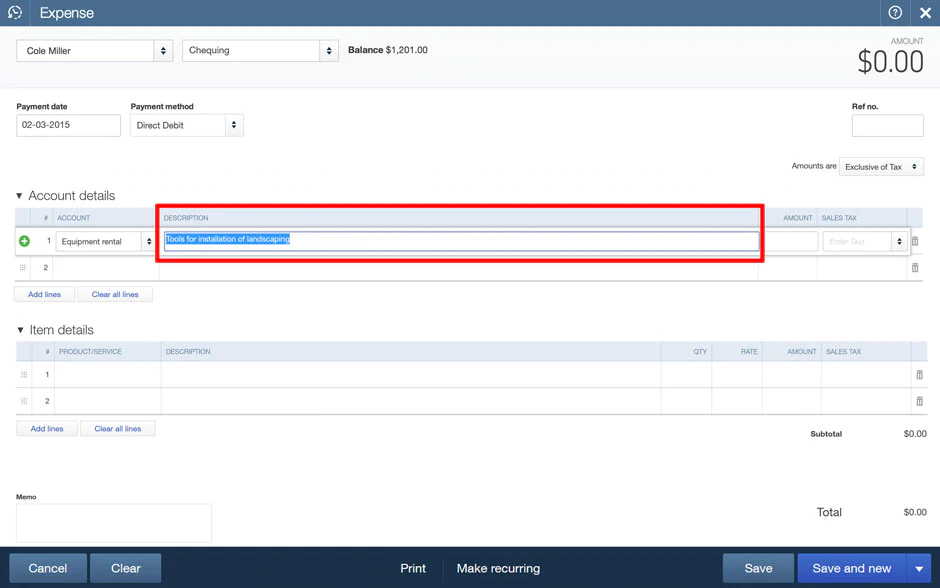
- In the Amount field, enter the amount of purchased item and if applicable then add the tax in the Tax field.
- If you want to create another expense then click on Save and New or select Save and Close if you are finished.
Some options to consider that will help you in tracking expenses before you Save and Close.
- If you have turned on Billable Expense Tracking feature then you can see the Billable column as well. Then, checkmark the Billable column and enter the name of the customer. You can use this feature it you are billing to a specific customer. To enable this option, go to the Accounts and Settings>Expenses Tab.
NOTE: If you received any credit for an expense that was billed in past to a customer then make sure to mention that customer on the credit and checkmark the Billable box too. Otherwise, the customer will be charged for the expenses on the next invoice and credit will not appear as well.
- If you want to see an income vs expense report for each & every customer then you should run an income by Customer Summary Report.
- Also, you should add a brief note or Memo if you want it to be on reports that include the purchase or in the Account History.
- If you are using an expense voucher then make sure to print it so you can have a voucher’s paper copy.
Edit Expenses in QuickBooks Online
Remember that the changes you will made to an expense that is billed to a customer may also change the customer’s invoice.
- From the left-side navigational panel, select the Expenses option and then click on Expenses.
- Search the expense that you want to edit in the Expense Transaction window.
- Then, click on View/edit from the action column.
- Make the required changes in the transaction.
- Once finished, click on the Save and close.
Delete Expenses in QuickBooks Online
- From the left-side navigational panel, select the Expenses option and then click on Expenses.
- Search the transaction you wish to delete in the Expense Transaction window.
- Then, click on the Action drop-down menu, and select the Delete option.
- If you are sure, then select Yes to delete the expense. You can still view the records of deleted expenses from the Audit log. You can access the audit log by going to the left panel and type Audit log in the search bar.
Below you will find a complete description of each feature:
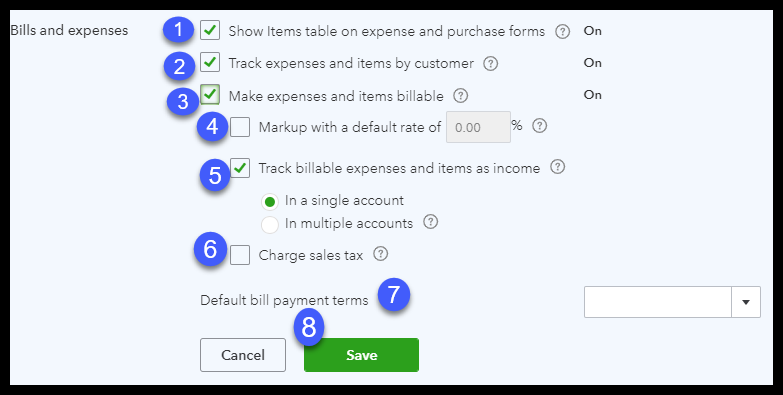
- Show items table on expense and purchase forms: This feature adds a Product/Service table on expense and buys items so you can itemize products and services that you have purchased.
- Track expenses and items by the customer: If you buy an item on behalf of a buyer and you want to link this item to that buyer, then this feature helps you to add a custom column on expense and purchase forms.
- Make expenses and items billable: this feature helps you to add a billable column on expense and purchase forms so you add expenses and items on sales forms to charge the buyer for items buy on their behalf.
- Set up a default, markup rate: this feature is only available if you have turned on the make expenses and items billable It allows you to set up a default markup rate for items you plan to bill your customer for.
- Track billable expenses and items as income: this feature is only available if you have turned on the make expenses and items billable features above. You can select to track this income in one account or in multiple accounts.
- Charge sales tax: this feature should be activated if you need to charge your customer’s sales tax.
- Set up default payment terms: this feature helps you to set default payment terms for all bills that you enter into QuickBooks. If the payment terms vary by vendor, you can modify them in the vendor profile when you set up your vendors in QuickBooks. By setting up a payment in the vendor profile, you will receive reminders when a bill is coming due.
- Purchase orders: In this feature, if you need to send purchase orders to your suppliers. You will need to turn this feature on here.
How Setting up and Entering Expenses in QuickBooks can benefit your business?
As we mentioned in the above sections there are several options from which you can choose while you set up expenses in QuickBooks Online. Now the question arises “is it even worth spending time in setting up & entering expenses in QuickBooks?”
To answer this, here are the advantages of entering expenses in QuickBooks Online.
1:– Pay Bills on Time
If you have set up default payment alerts in QuickBooks then you will receive a notification whenever your bill is about to become due. In addition to this, whenever you open QuickBooks software you will be provided with a list of supplier’s bills that are coming due. This will help you in keeping account payable bills updated all the time and then you can also have a good credit rating.
2:- Easily get payments of all purchased items on behalf of your customer
If you have purchased items on behalf of your customers then with the help of QuickBooks you can keep track of all those items. Using the “mark expenses and billable” feature you are allowed to tag expenses to the customer who is supposed to be billed for the item.
3:- Track Sales Tax
If you are selling any products that are a matter of sales tax then whenever you sell such a product, QuickBooks will automatically calculate sales tax for you. And you just only need to run a report and you’ll know how much sales tax you have to pay to the State.
Wrapping Up!
We hope you find this article useful. If you have any queries related to this or any other topic, you can call our team of Intuit Certified QuickBooks ProAdvisors for the instant solution of any issue. Call us on our 24/7 toll-free technical support number +1-844-405-0904.
Watch this video to learn more about How to Set Up Expenses in QuickBooks Online.