Learn here how to reconcile QuickBooks for the Mac operating system. Here, we have tried to explain what is the features of the QuickBooks Reconcile tool, and what are the problems users face while using this particular tool in QuickBooks. Read the complete article to get all your queries resolved, Go through the article to learn the steps to reconcile in QB for Mac and its usage. If you have any other Query or need support for QuickBooks Mac contact us at our toll-free number +1-844-405-0904.
Account Reconcile in QuickBooks Desktop is one of the powerful concepts, it helps to coordinate all the banking transactions in QuickBooks Desktop for mac. It creates a friendly environment between the owner and the banking process. As everyone knows, account-keeping is the backbone of every business organization.
It takes a little bit of time to consume and also needs high accuracy. Otherwise, its effects will reflect the entire process in your business.
What’s a reconciliation?
Reconciliation refers to comparing two related accounts to ensure that everything matches with accuracy. For example: While reconciling, you are comparing QuickBooks entries with your bank entries. You need to make sure that the difference between the QuickBooks and the bank account is US$0.00.
When to reconcile
If you reconcile your account every month then it is better to avoid mistakes in financial matters. The second thing is you’ll learn more about your organization how much it performs and what steps to take for sound financial condition. It also helps in knowing the QuickBooks data Information and their accuracy. It helps in many tasks like finding out the current net worth of your organization. Correct the errors to make tax time considerably simpler and Improve the conversation with your accountant.
Consider these points before starting the Reconciliation
- Always back up your company file.
- Make sure that your starting balance is always correct.
- All the statement period transaction is entered in the QuickBooks.
- Always keep a record of your bank and credit card statements.
What is reconciled in QuickBooks and usages
Reconcile is the process of balancing a checkbook. In QuickBooks, Reconciling your accounts helps you to compare the transactions recorded in QuickBooks Online against the transactions processed through your bank.
Only cash-flow accounts can be reconciled; therefore, when you go to reconcile an account, you’ll only find accounts listed on yourbalance sheet report in the drop-down box as choices to reconcile.
In your bank statement, make sure what appears on the statement is recorded in your checkbook. In the end, you know what is your available balance is for that period and find out some unrecognized transactions in your balance sheet. Reconcile in QuickBooks helps to uncover all the duplicate transactions like unrecognized charges.
The problems related to reconciling in QuickBooks for the Mac operating system.
Sometimes users try to Reconcile bank accounts on a specific date. However, the user can not find out where to enter the statement ending date. This is a common issue for all QuickBooks users. Here I am going to describe a simple and easiest solution for this particular problem. Users must follow the step-by-step process, that is given below.
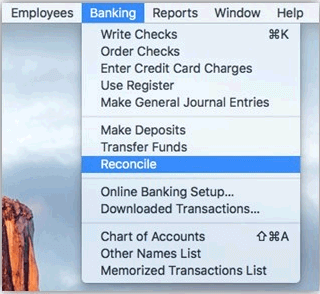
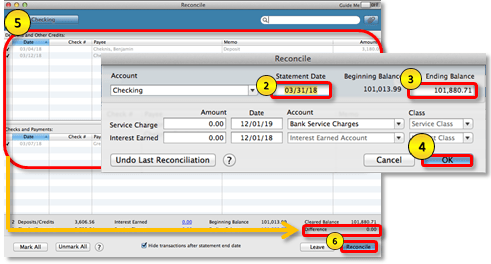
Step 1: Choose the Reconcile option, from the banking menu drop-down list.
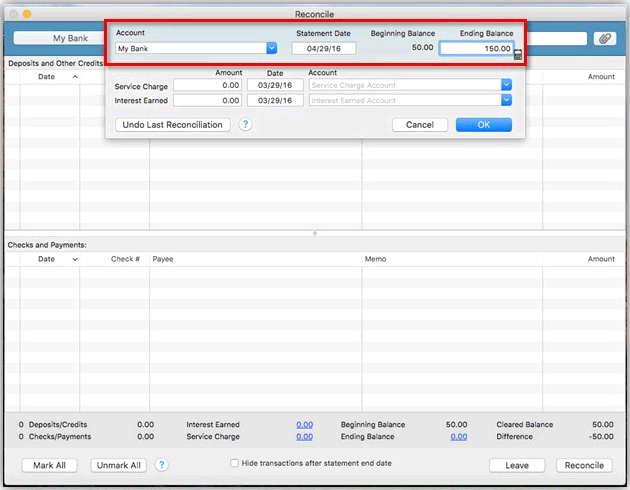
Step 2: Put the Ending Balance of your statement. in the column named Ending Balance, you can see the column in the top right corner of your interface.
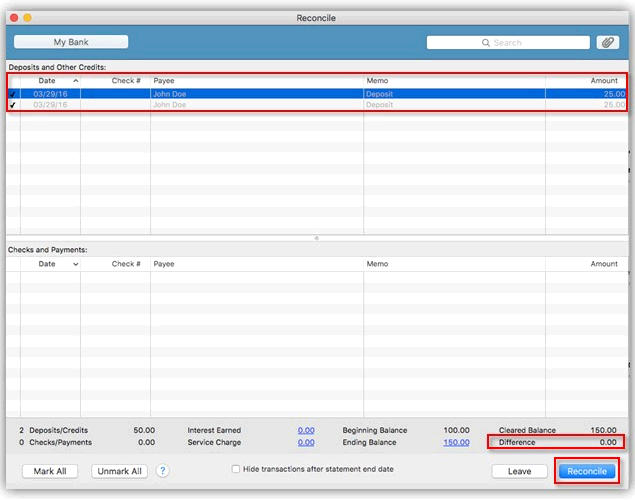
Step 3: To confirm all the cleared transactions in the Deposits and other credits box as well as the checks and payments box. After confirmation to the Click Reconcile option.
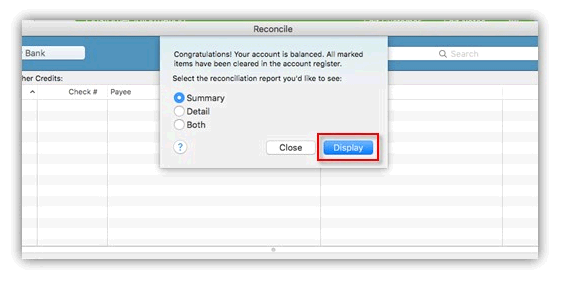
Step 4: Now you get one new screen with a congratulatory message, for you reconciling your accounts. Select the Report that works best for you; otherwise, Click Close if you do not want a report. then Click Display on the screen.
After completing the above steps successfully. You get a solution to your problem. The final Reconciliation report will have the correct date you reconciled for.
Reconcile an Account In QuickBooks for Mac
You can start reconciling after getting the bank statement. But you have to reconcile each month separately. For this:
- You need to go to Banking and then choose Reconcile.
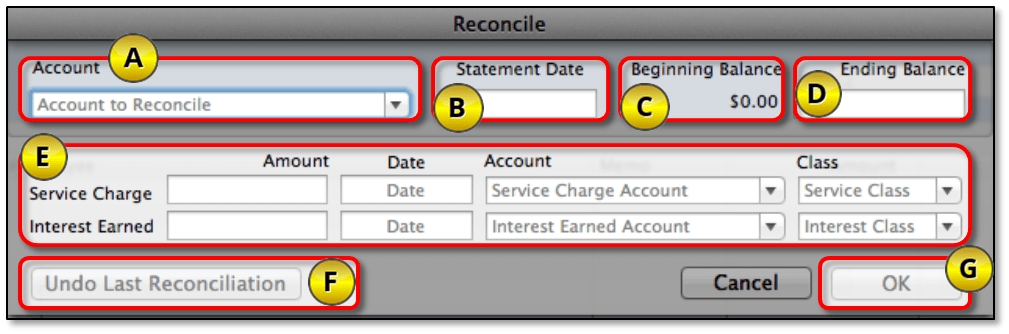
- Now you have to click on Account.
- After that select the bank account or credit card that you require for reconciliation.
- Now you need to select the statement date which is filled in automatically. If you want to change then change it to match your statement.
- Then QuickBooks gets the ending balance from your last reconciliation and automatically enters it as a beginning balance.
- Based on your bank statement you have to enter your Ending balance.
- Now in the next step, you need to fill in the Interest Earned and the Service Charge.
- Then click on OK if all the field information is correct.
Match transactions
Now you have to run all the options available in the window:
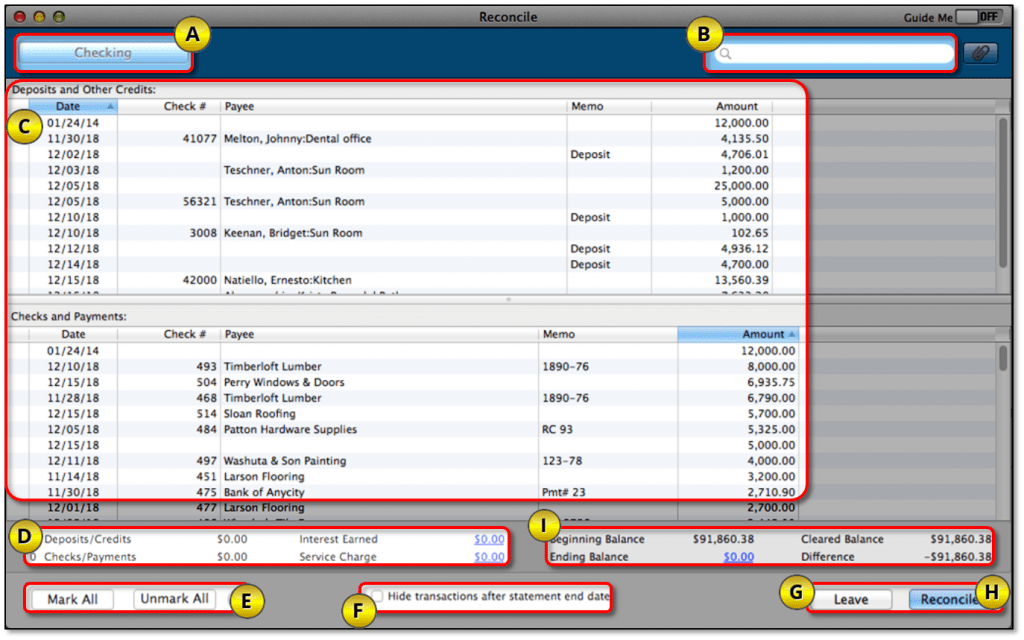
- Account: You can view the information from the Reconciliation window and shows the account is being reconciled. You have also the option to change the information from the reconciled window.
- Search field: By using the criteria of Name, Amount, Account, Date, Check number, or Payee, you have the option to look up uncleared transactions.
- Checks and Payments, Deposits, and other credits: These are the QuickBooks entries for uncleared transactions. Compare the transactions to the information on your credit card or bank statement. Changes are made to the Cleared Balance as you select transactions.
Note*: Charges and Cash Advances (purchases) for credit card accounts and if payments to credit card company then Payments and Credit.
- Items you’ve marked cleared: This is the total quantity and number of checks and deposits that you have chosen. If the summary provided on the statement is the same by your bank then you can utilize the summary to identify any differences.
- Mark All/Unmark All: You can choose these buttons for selecting or deselecting transactions. If you correctly enter all transactions for the statement then you can save your time by selecting at once.
- Select Hide transactions after the statement’s end date to see the transactions on or before the statement date.
- Leave: For exit from the reconcile window, you can choose this but if you return to this window again you’ll find the selected item is still marked.
- Reconcile Now: When all the transactions are matched you can select this.
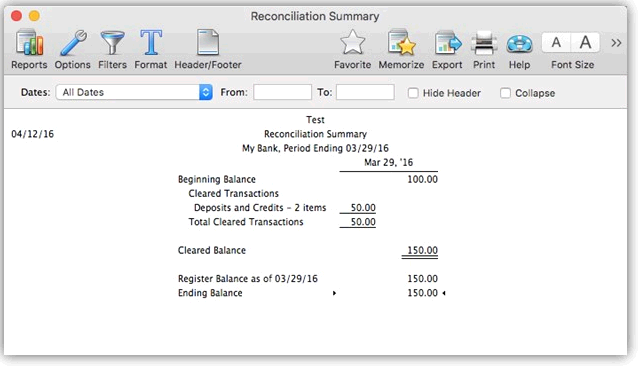
What happens if the difference is Zero?
In case the difference is Zero then Reconciliation saves by the QuickBooks shows the Select Reconciliation report window. Now you have the option to print it or close it. If you need to print then:
- Choose the type of report in the Select Reconciliation report window.
- Now choose the details you want in the report.
- Detailed
- Summary
- Both
- None
- After doing the above steps, choose Done.
In case you need to go to the report Click on Reports then choose Banking after that click on Previous Reconciliation.
What happens if the difference isn’t Zero?
The Reconcile Adjustments window will shown if the balance isn’t Zero. Here are the options that are available in this window.
Return to Reconcile: If you want to go back to the previous window then choose this.
Enter Adjustment: For completing the reconciliation process you need to choose this. Under the special expense account, journal entries will automatically be entered by QuickBooks. It can be edited in your chart of accounts if needed.
What if we don’t want to enter an adjustment?
In case you do not want to enter an adjustment then find the reason for the difference you have to follow the steps.
- Reconcile after undoing reconciliations from the one whose discrepancy is forward.
- To only reconcile the affected transactions, Run a Special Reconciliation.
Special Reconciliation
You have to delete the renter transactions while troubleshooting the bank and credit card accounts’ issues. It may be possible that you need to reconcile them again by deleting the transactions.
- Firstly you need to go to the banking.
- After that click on Reconcile..
- Now in the field of Statement dae, enter the incorrectly reconciled month date.
- Enter the balance plus or minus the difference in the Ending balance field. Add the difference to the beginning balance if it is positive. Subtract the difference from the beginning balance if it is negative.
- Next, click on OK.
- Checkmark the transactions that were not reconciled on the Reconcile screen. Ensure the difference is Zero.
- After that, you need to choose the reconcile button.
- Check the Previous Reconciliation Detail Reports. Take note that the same data will now appear in both reports.
If the above process can’t able to solve your problem please dial the below toll-free number for additional guidance and technicalsupport +1-844-405-0904.