Today, we will tell you about a new topic that helps you in converting your QuickBooks files to Quicken. Do you want to convert from QuickBooks Desktop to Quicken? If yes, you will know all the information here related to the issue. This situation happens when you are previously working with QuickBooks Desktop but now due to some reasons, you are willing to move your data to Quicken using Microsoft Excel, move it with simple and easy steps for converting your data successfully. For help and support contact us : +1-844-405-0904
Read this article till the end to get the complete details of the topic. Now start talking about the manual steps you have to follow on your PC in the given order.
Steps To Convert From QuickBooks Desktop To Quicken
Here are the steps to Convert from QuickBooks Desktop to Quicken, check out:
Step 1: Export Your Charts Of Accounts(COA) And Vendor List
How To Convert From Export To IIF
Look at the basic steps for converting from Export to IIF. These are:
- Visit the “File” menu, and then you have to choose Utilities >> Export >> Lists to IIF Files
- In the next step, just Mark “Chart of Accounts” and “Vendor List” and then choose “OK”
- From the Export Window:
- From the Drop-down list, you will get the “Save in” option. Select the location where you want to store the IIF file(You can either save in QuickBooks Desktop).
- In the File name field, just delete the asterisk(*) and then enter a name.
- In the end, hit the save button and then “OK”
Sample exported Chart of Accounts data

Sample exported Vendors list data

How To Convert From Export To Excel
Look at the basic steps for converting from Export to Excel. These are:
- First of all, Visit the “Vendors” menu and then Choose “Vendor Center”
- Go to the Excel drop-down, Select “Export Vendor List”
- After that, From the Export Window just pick Create a new worksheet: in a new workbook, then Pick “Export”.
- In the end, simply store the file(Excel Sheet).
Sample Vendor List exported using Excel

Step 2: Export Your Information From Quicken Into A .QIF Format
- Make a copy of your QuickBooks Desktop Information and paste it into your Quicken(.QIF) file
- Now open the.IIF file (follow the simple process to open it: Right-click on the file and then choose Open With>> Choose Program>> Microsoft Office Excel
Note: QIF import is now not available for checking, savings, credit cards, 401(k), and other brokerage accounts. It is only replaced within a .QFX import file.
- Go to the File Menu and then choose “Export”
- Choose .QIF file for Accounts and Address for names.
Sample exported Account List


Step 3: If You Work With Quicken Home & Business, You Can Export/Import The Address Book From Quicken In The .QIF Format
- Make a copy of your QuickBooks Desktop Information and paste it into your Quicken address file
- Exporting your address
Note: You have to manually enter at least one address to Export in Quicken
- Visit the “Tools” menu and then choose “Address Book”
- Then Highlight a Payee
- Go to the “File” menu, and then choose “Export”
- Choose “Addresses” and then pick “tab”
- After that, Enter the file name, then hit “Next”
- Choose a Quicken Field, then “Add”
- Repeat the above steps including step “5” and “6” whenever all fields you want to import are selected.
- In the End, Hit “Done”.
Sample exported Information List

How To Import Your Addresses
Once you have successfully exported the list, it is essential to map the field by matching Quicken Fields to QuickBooks Desktop Fields.
- From the “File” menu, select “Import”
- After that, choose “Addresses” and then Pick “Tab”
- If you are not getting the file automatically, Choose Browse and then locate your file.
- In the next step hit “Next”.
- Choose “Quicken Field”, then “Add”
- Repeat the above step, once all the fields you have selected are ready to import, after that hit “done”
Tip: We are always recommended before completing one step, don’t move to the next step, if you do this, you will get unsuccessful results.
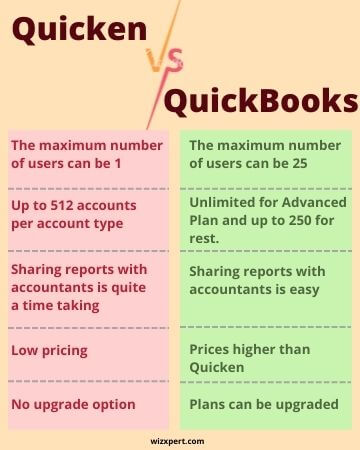
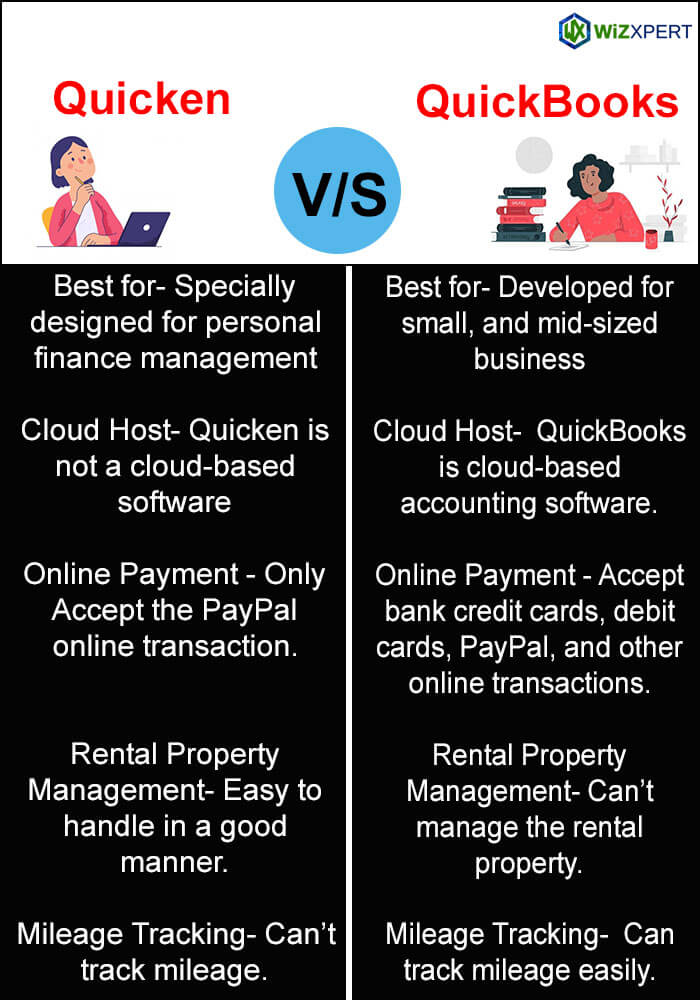
Find the differences between Quicken and QuickBooks;
Hopefully, you manually fix your issue based on “How to Convert from QuickBooks Desktop to Quicken”. We have discussed the step-by-step procedures in this article, just to offer good understandability as well as a high-quality experience. But, if you are looking for advanced support for the same issue, then you are eligible to get connected with Intuit Certified Professionals through the 24/7 toll-free number +1-844-405-0904. Contact us anytime and from any location.