Are you facing the QuickBooks cannot communicate with the company file issue? This is primarily due to the company file’s Firewall, which is blocking incoming and outgoing communication. What should you do if you receive a Firewall error message? Hold on and read the entire article to discover the solutions to this problem. If you are having trouble figuring out what you are looking for, call our QuickBooks professional team at +1-844-405-0904 for assistance.
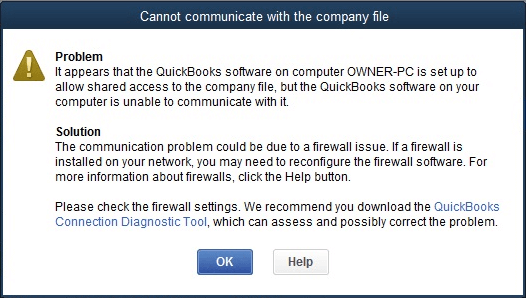
When QuickBooks fails to communicate with the company file or make a connection with it, a “cannot communicate with the company file” error box displays on your screen. The error message states that the program is installed on the user’s computer to allow shared access to the company file, despite this, the QuickBooks software fails to communicate with the company file for an unusual reason.
In recent days, many users have reported that they are getting an error while connecting to the network company file. This happens most of the time when they update their OS or software to the latest version.
The specific QBDataServiceUser for your version of QuickBooks needs full control access to the folder containing your QB company file. The error or warning offered by software comes when it is not documented properly. Remember you should always have a backup of your company file. In case you lost your data that will help you.
Note: Intuit does not support firewalls or anti-virus programs. You may need to consult the program provider for assistance with installing and setting up your program.
Reasons for the Company File Connection Error
Here are the several reasons behind this issue, let’s explore:
- When the installed firewall is not configured properly or installed on the network.
- The connection to the server has been lost or showing an incorrect configuration setting.
- The QuickBooks Database Server Manager is not running on the server.
- .ND file is damaged in QBD or missing.
- Incorrect DNS setting.
- The company file is damaged or corrupted.
When this error occurs, QuickBooks displays an error message on the screen, which usually reads “QuickBooks cannot communicate with the company file.” The message can vary depending on the version of QuickBooks you are using.
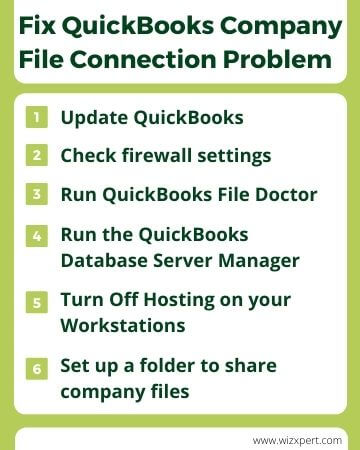
Solutions for Fixing QuickBooks Company File Connection Problem
Go through with the following solutions on how to fix QuickBooks cannot communicate with company files. check out the below list.
Solution 1: Automatic Update
By updating QuickBooks, lots of bugs can be fixed automatically with new features. Follow the steps given below.
- From the QuickBooks Help menu, go to the Update QuickBooks.
- Click on the Update Now option under the Update QuickBooks window.
- Ignore this table, you don’t need to modify anything there.
- Tick the checkmark in the box marked
- Reset Update to delete all prior update downloads. This will help you to improve the amount of time required for the update.
- Select Get Updates.
- The current release will automatically download and you just need to restart QuickBooks to install the update.
- Allow all positive options to install the new release while restarting QuickBooks.
Solution 2: Manually Configure Exceptions and Ports to your Firewall
Here are the step-by-step instructions to manually configure exceptions and ports to your firewall.
- Go to the Start menu, and on the search bar enter firewall.
- Choose the Windows Firewall on the program list.
- On the right-hand side, go to the Advanced Settings.
- Now you need to go to the Inbound Rules and right-click on it and choose the New Rule.
- Choose the Program, then click on Next
- Choose this Program Path then click on Browse.
- Search for one of the paths, then choose Next.
- Make sure Allow the Connection option is selected, then choose to Next again.
- Assure that all profiles are check-marked, If prompted, then choose Next.
- Give the rule a name, then select Finish.
- You need to repeat the steps above for the Outbound Rules (for step 4 inbound rules, select Outbound Rules).
- You have to try to open QuickBooks Desktop again in multi-user mode or on your network to see if the issue is resolved.
Solution 3: Do Changes in your Network-Related Windows 10 Settings
Windows can share the QuickBooks company file over the network by changing the network settings:
- The easiest method to perform this on Windows 10 is to access from Windows 10 Sharing and look for the Start Menu for sharing.
- Again look for the list generated in Step 1 and go to the Manage advanced sharing settings.
- Search the All network to expand on the right-hand side setting select the down arrow (displayed in the red box below)
- Choose the toggle button marked to turn off password-protected sharing.
- Save all the settings.
- Now, you need to start QuickBooks and try to connect to your company file, your file should open normally as long as other “network issues” exist.
- Other network problems may involve, but not be restricted to:
- Not correctly installed or multiple-configured QuickBooks hosting database servers.
- When you are unable to start the needed firewall ports on both the server and client workstation computers. Not accurately network “file sharing” configuration on the server computer.
Solution 4: Manually Update QuickBooks
Steps for manually updating your QuickBooks are given below.
- First, need to stop Company/Logoff from the File menu.
- You have to do this step for every company that is open If you open multiple company files in QuickBooks Desktop.
- You need to perform this step for each company file that is open. If you want to open multiple company files in the QuickBooks Desktop, choose File and then select Exit.
- Go to your home screen or desktop, navigate to the QuickBooks Desktop icon and right-click on it and open with Run as administrator.
- Make sure that you are on the No Company Open screen.
- From the Help menu, select Update QuickBooks.
- Select Options.
- Choose the Mark All option then choose to Save option.
- Select the Update Now option.
- Go to Reset Update then click the Get Updates button.
- When you got the update complete message arrives, quit QuickBooks Desktop.
- Again reopen the QuickBooks Desktop.
- Go with the Yes option, if you receive the message to install the update.
- When your installation is finished, Restart your computer.
Solution 5: Download the QuickBooks Tools Hub and Run QuickBooks File Doctor
First, you have to download the QuickBooks Tool Hub and need to run the QuickBooks File Doctor. This tool works like a mini repair of your server and firewall. When it is finished, most probably your issue will be resolved and you can easily open your company’s file on the QuickBooks Desktop.
Solution 6: Run the QuickBooks Database Server Manager on your Server
Your server machine stores your QuickBooks company file and all other hosts attached to the network are workstations
- Go to the Network Issues.
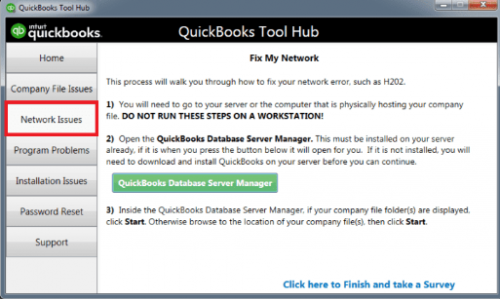
- Look for the QuickBooks Database Server Manager. If prior QuickBooks is not installed on your server then you will be prompted to install it.
- Open the QuickBooks Database Server Manager, and choose Start Scan if you are able to find your company file folder. If you are unable to see your company file then you need to browse to the location of your company file and then choose the Start Scan.
- The QuickBooks Database Server Manager will automatically fix your firewall permissions.
- Select Close, when the scan completes.
When you have completed the above steps then try to find and open the folder you’ve scanned. Be sure that there is an ND file in the folder. It seems like this: [your company file] .qbw .nd. If you are unable to see the ND file then scan the folder again. If not, then proceed to the next solution.
Solution 7: Turn Off Hosting on your Workstations
Be sure the Host Multi-User Access option is off on your workstations. These are computers connected to your network that don’t host your company files. Your server computer should be the only one hosting.
- Launch QuickBooks at any one of your workstations.
- Keep in mind, here do not open the company file. Rather, go to the File menu and look for the Utilities.
- Make sure to not click on the “Host Multi-User Access” option, and proceed to the next workstation. This one doesn’t create the issue.
- If you find anywhere Stop Hosting Multi-User Access is a choice, click on it.
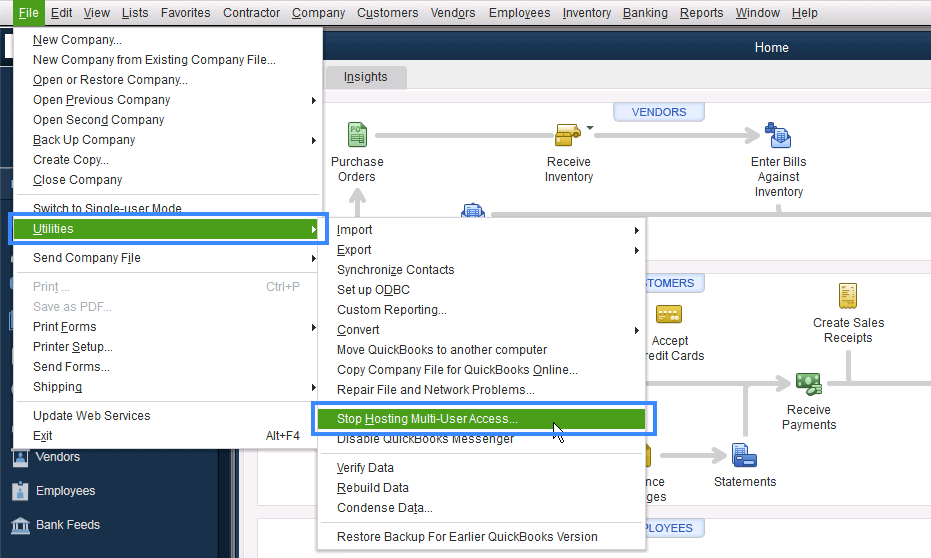
When you have checked all your workstations, go to your server computer and reset your hosting settings.
- Start QuickBooks on your server computer. Go to the File menu and look for the utilities.
- If you find any choice of Host Multi-User Access, click on it. Repeat this process and choose Stop Hosting Multi-User Access. This will reset your multi-user mode.
- Repeat the same method one more time and choose Host Multi-User Access. If you are still facing the error, then we recommend you contact our technical support team so they will assist you with fixing your firewall.
Solution 8: Rename the.ND and . TLG Files
The.ND and . TLG files are configuration files that QuickBooks uses to access company files. If these files are damaged or corrupted, you may encounter the “QuickBooks Cannot Communicate With The Company File” error. To fix this issue, you can try renaming the.ND and . TLG files. Here are the steps to follow:
- Open the folder that contains your company file.
- Locate the files with the same name as your company file but with.ND and . TL
- Check your network connectivity: Verify that your computer is connected to the same network as your company file. If your network is experiencing issues, try resetting your router or modem.
- Restart QuickBooks and your computer: Close out of QuickBooks and restart your computer to see if that resolves the issue. Sometimes, simply restarting can fix connectivity problems.
- Check firewall and antivirus settings: Make sure your firewall and antivirus settings are not blocking QuickBooks from accessing the company file. Check with your IT department or consult your antivirus software documentation for instructions.
- Use the QuickBooks File Doctor tool: QuickBooks provides a free tool called the QuickBooks File Doctor that can diagnose and repair issues with company files. Download and run the tool to see if it can resolve the issue.
- Verify and rebuild the company file: Open the company file and select “Utilities” > “Verify Data” to check for data damage. If damage is detected, select “Utilities” > “Rebuild Data” to fix the issues.
- Restore a backup of the company file: If all else fails, restore a recent backup of the company file to see if the issue is resolved.
Frequently Asked Questions
How to Restart QuickBooks Server Manager?
These are the steps to be followed:
1. Go to the Start button and click on Control Panel.
2. Search Administrative Tools and select Services from the list.
3. Right-click on the QuickBooksBDXX service and select the Restart button.
What to do if Network Data File Extensions are Not Showing Up in Windows 10?
Here’s what you can do:
1. Go to Options and click on the Change folder.
2. Select the Search button and click on the View option.
3. Now, deselect the hidden extent of the file type and click on OK.
How do Restart the QuickBooks Server Manager when both QuickBooks Desktop and Server Manager are Installed on the Server?
Follow the procedure given below:
1. Open QB Desktop and locate the file option, then choose Open Company.
2. Company file will be displayed on the screen.
3. Select the Next option and mark the open file in multi-user mode.
4. Select Open, then log in to the company file.
5. Click on the log-off option to close the company file.
6. Enter the Database in the Start option.
7. Lastly, click on QuickBooks Database Server Manager.
Do not be concerned if the error persists after following the above steps. For expert guidance and assistance, contact our QuickBooks ProAdvisor. Call [quickBooks], our toll-free number.