Facing trouble due to the error ‘QuickBooks unable to connect to a remote server’? Nothing to worry about, In this article, you will get all your related stuff, so be with us and read the whole article to get the solution to this issue. So, go through the article and understand the causes for which the error occurs and learn different methods with easy steps to resolve the issue. If the problem continues then contact our QuickBooks ProAdvisor toll-free:+1-844-405-0904
Intuit always update its own product according to user requirements so user prefers this product. QuickBooks is a powerful and easy-to-use financial management system for medium-sized businesses. Quickbooks has easy-to-handle, easy-to-use features and their simplicity and availability are very impressive that so many users are using this. Growing Businesses with QuickBooks solutions is beneficial.
It has the ability to support up to 30 concurrent users and handle large amounts of data and transactions simultaneously. Sometimes users face errors such as being unable to connect to a remote server, below we discuss all possible causes and solutions related to the remote server.
Causes of Unable to Connect to Remote Server
Some primary causes are:
- A third-party firewall is installed on the network.
- The server connection is lost or not set up properly.
- QuickBooks database server manager is not able to run on the server due to the server condition being bad.
Symptoms of QuickBooks when there is No Connection between the Remote Server
Below mentioned are the symptoms of QuickBooks when there is no connection between the remote server:
- Your system becomes unable to share files.
- The error pops up on the screen.
- The peripheral devices will not work properly as they will not respond to the given commands.
- Your system will start hanging again and again.
QuickBooks Unable To Connect To Remote Server
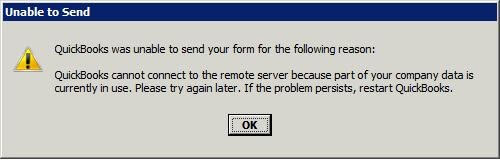
QB has a common problem with Remote access. Many businesses want to be flexible to use it from anywhere. The problem arises when QuickBooks is unable to connect to a remote server. It will show an error when you access the company file, but QuickBooks is unable to Communicate with it, this communication problem can be due to a Firewall issue.
How to fix QuickBooks Unable To Connect To Remote Server:
Check out below the best possible reasons to resolve this error.
Solution 1: Update to the Latest Release
- This issue has been resolved in the latest release of QuickBooks Desktop 2017.
- Go to the Update to the Latest Release page.
- Be sure your product is selected, if not, click the Change link and select your QuickBooks product.
- To download the updated file, click the Update button.
- If you want to learn how to set QuickBooks to automatically download and install the latest updates click Setup Automatic Updates.
Solution 2: Create The Network Data (ND) File
- On your keyboard, press the Windows key once.
- Now type in QB Database Server Manager.
- Choose Database Server Manager.
- Now, if you can not find the QB Database Server Manager in the program list, you might need to uninstall and reinstall QB.
- Confirm the installation process.
- In the QB Database server manager window and browser to the location of the folder containing the company file(s), click Add folder.
- When all folder is added, click Scan.
- After scanning QB company flies, you see this file under QB company files found.
- Verify that .nd files are created for each data file.
Solution 3: Validate QuickBooks Desktop File Hosting
Most of the time, the hosting services are responsible for this error. Go with the below step to resolve this error:
Step 1: Turn off hosting on all workstations
- Very first, go to the QuickBooks File menu and look for the Utilities and click on it.
- Next, click on Stop Hosting Multi-User Access.
- When you see the option Host Multi-User Access instead of Stop Hosting Multi-User Access then you need to click on “Yes” to confirm.
Step 2: Turn on Hosting on the server computer
- First, go to the Windows Key and insert the Windows task manager in the search bar, and hit Enter.
- On the Task Manager windows, click on the more details.
- Next, go to the Services Tab and place QBDBMgrN.exe from the list.
- Now open the run, just by pressing and holding Windows + R key on your keyboard to verify the file.
- Later, on the run box, enter services.msc and select OK.
- Now, continuously tap on the letter Q on your keyboard, until you find QBDBMgrN.exe.
- Lastly, you have to start the service and click on the Automatic start option.
Solution 4: Check Settings Webmail Preferences
- Go to the QuickBooks Edit menu, and select Preferences.
- Choose to Send Forms, on the left panel.
- Select the email account you are using and click Edit, under My Preferences.
- To the SMTP Server Details section and set the server name and port to your email provider settings in the Edit Email Info screen.
- To Set up your email service in QuickBooks Desktop for a list of SMTP Servers and Ports.
Solution 5: Reset Internet Explorer Settings to Default
- Open Internet Explorer (IE) in your system.
- Now, click the Tools menu (Alt +T) or the gear icon.
- Go to the Internet Options.
- Click on the Advanced tab then click Restore Advanced Settings.
- Click OK and close the browser.
Solution 6: Organize QuickBooks Database Server Manager
- First, click on the Window Key, and search in the search bar QuickBooks Database Server Manager.
- Now, start QB Database Server Manager, and also remove the pre-existing folders.
- Next, in the database manager, add the QuickBooks Company File Folder.
- Later, you need to scan the folder and make notes of the errors in the QuickBooks Database server manager.
Steps to fix data connectivity issue to Remote Server
The QuickBooks Connection Diagnostic Tool is a small application that will test the connection between the client and the database server manager. It helps you to understand what is happening. If you get an error and the diagnostic tool cannot connect to your database server, you’ll need to work on the server.
When Intuit QuickBooks works, the SMB accounting software is incredible; when it doesn’t work, it’s an absolute nightmare. The next time you’re unable to connect to your QuickBooks data file, try one of the solutions outlined below for getting your company file up and running.
Database Server Manager
Most likely, all you have installed on your server is the QuickBooks database server manager. With the help of this tool, you can instruct the service where to monitor for data files. If you don’t let the QuickBooks database server know where the data files are, those files will not be made presented to clients.
Place your data files on a shared folder on the root of c:\\(such as c:\\Data or c:\\QB) and make sure everyone who needs access to the file has full rights. This makes everything a lot easier. Then open the QuickBooks database server manager.
Prevention of repair
Here are some of the best tips for keeping your data file in tip-top shape, so hopefully you won’t need to resolve a data file connection in the future.
- Clean your data
- Verify and rebuild your data
- Log out of QuickBooks
Dial our QuickBooks Support Number +1-844-405-0904 if you are unable to connect your QuickBooks to the remote server by following the above instructions. We are always here for you!!
Frequently Asked Questions (FAQs)
How to connect QuickBooks to the server?
To connect QuickBooks to your server, you have to just scan them, and to perform the process of the scanner, you have to follow the below-mentioned steps:
1. First, click the Window button on the keyboard of the server to open the start menu.
2. Now, type the database in the search engine of the start menu to open the QuickBooks database server manager.
3. Go to the scan tab in the menu of the QuickBooks database server manager.
4. Then, click on the browse button to search for the location of the company file.
5. Now, click on the Ok button to complete the process.
6. You are now ready to scan the system, just select the scan button to start scanning.
How to access QuickBooks remotely?
To access QuickBooks remotely, follow the given below steps:
1. First, open the splash top business app on your system.
2. Now, from the list of computers, search for your computer.
3. When you found your system, click on the remote session button to start the session.
4. By following the above step, you are able to view the other computer screen on your system.
Now, you can open QuickBooks remotely on your remote computer.
How to access QuickBooks Company from another computer?
Follow the below-mentioned steps to access QuickBooks Company from another computer:
1. Enter the login ID and password to open the QuickBooks account on your system.
2. Select the file menu from the top of the screen and then select the restore company option from the drop-down menu of the file.
3. Now, open the company file and press the next button.
4. Click on the browse button to open the location of the file.
5. Now, select your company file from the list of files.