Want to change a recurring payment in QuickBooks? This article has all the information to troubleshoot your problem, On this page, we have mentioned various methods to change the QuickBooks online recurring payments, and where and how to manage this issue all the data is submerged in this article. So go on it and get your issue resolved. Still facing the problem contact us on +1-844-405-0904 for instant support for QuickBooks payment.
This article outlines the steps to modify, suspend, and track your current QuickBooks online recurring payments. Note that payments already processed cannot be modified.
Methods to change a recurring payment in QuickBooks
There are many ways to change a recurring transaction or payment in QuickBooks, some of the following:
Where to Manage Recurring Payments
After you set the recurring charges, you can view and use them through the QuickBooks recurring billing page.
You can break down additional details to change a recurring payment in QuickBooks and develop this report.
Do one of the below to open the recurring payment page:
- If you sync recurring payments with QuickBooks, open QuickBooks and set Customers> Credit Card Processing Activities> Recurring Payments.
- whether you utilize standalone recurring payments, sign up to your Online Service Center, go to the menu bar on some page and select Processing Tools> Manage Recurring Payments.
Change A Recurring Payment in Quickbooks
To change a recurring transaction in QuickBooks, click on the customer name to open the payment features. In some cases, you can make changes directly to the list.
Here are some things you can do:
Edit payment details
You can change the amount, or modify the customer name, address, credit card number, or card expiration date. At times, you can also change the billing schedule.
- Click on the customer name to view the attributes.
- Locate the section that contains the information you want and click the Edit link for that section.

- Make desired changes like:
- Customer contact information
- Amount: Only before the first monthly cycle if the item is used, otherwise at any time if the item is not used
- Description
- Start Date: Only when the start date is in the future (tomorrow or later). If this field is not editable, it means that the start date has expired, and you cannot change it.
- Frequency: Only if the live frequency is monthly or yearly. Learn more about changing the timetable.
- Day of the month: If the frequency is yearly or monthly and the start date has passed, you can choose the day of the month you want to pay next.
- Last Date: You can change the last date tomorrow or any day after that. You can also change the last date for expired payments. However, you cannot edit the last date for payment with a frequency set once.
- Credit Card Number
- Credit card expiration date: If the card number has not changed, just enter the new expiration date and do not re-enter the same card number. Enter the card number only if it has changed.
- The cardholder’s name and billing address
Important: If you change the primary terms of QuickBooks recurring billing, get a new signed authorization from your customer.
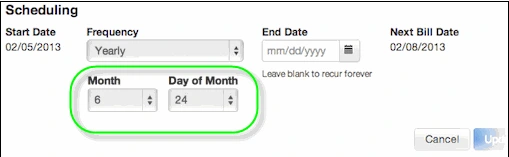
Change the upcoming bill date
The Next Bill Date is dynamically calculated based on the Start Date, Frequency, and End Date of payment.

Only some current schedules are editable. If you cannot edit a field, explore back in the bullet list of editable fields in this article to find out.
TIP: Change the next billing date once: If your QuickBooks online recurring payments is monthly or yearly, select the next billing date from the month and day of the month. If you wish, you can change it back before the next scheduled payment.
How do I change billing schedules for frequencies other than monthly or yearly?
At this time, you can only change monthly or annual frequencies. But there are some workarounds for other frequencies. if you wish:
- Change to/from an unavoidable frequency: for example from daily to weekly. You must create a new recurring payment and terminate or delete the existing one.
- Make a modification to the next billing date once for an unavoidable frequency: defer payment between the next bill date, and create a new recurring payment for that day. When you and the customer are ready to get back on the timetable, resume recurring payments.
View payment activity
You can see a list of real payments made for recurring payments that you have set. To do this, click on the customer name to see the details and click on the Payment Activity tab.
Remove Recurring Payments
To delete a record completely, delete it. Do this in one of two ways:
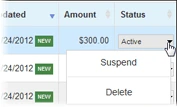
- Go to the Status column in the Manage Tax Recurring Recurring List. Click on the dropdown arrow and delete.
- For Recurring Charges and to see details on the Payment Details tab, click the Delete button.
Suspend Payments
The customer can suspend their magazine subscription for a month if they will be out of town, and then resume it after their return.

- Go to the Status column in the Manage Tax Recurring Recurring List. Click on the dropdown arrow and Suspend.
- For Recurring Charges and to see details on the Payment Details tab, click the Suspend button.
Resume hanged recurring payments
If you have made a recurring payment, the Status column and details page have a Resume choice rather of a suspended choice. Say that your customer comes back from vacation and wants your services again. Suspended put up resume and payment will initiate on the next scheduled date.
Receive a recurring payment
In the search box above the list, begin typing the name, explanation, or any text correlated with that recurring payment. As you start typing, the list is automatically filtered to show the cases where it found the text you entered. This text can exist in any region and can appear anywhere within the region.
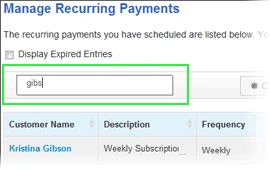
Notice Recurring Payments That Have expired.
At the summit left of the screen, click the Display Expired Entry checkbox.
If your customer continues to receive payment confirmation emails, you can stop these messages by turning off the customer notification email for recurring payments.
Work with recurring payment reports
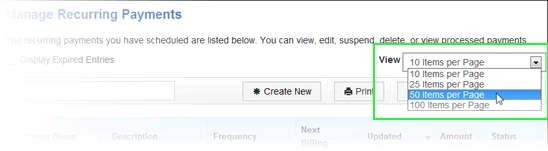
Select how many records you want to see at once
At the top right of the screen, click View dropdown and choose the number of records to display.
See recurring payments that are off-screen
In the lower right, click the Previous or Next button.
Sort list
Click on some column titles to sort by that field. Click once more to sort in reverse order.
Print Report
Go to the top of the list and choose Activities> Print.
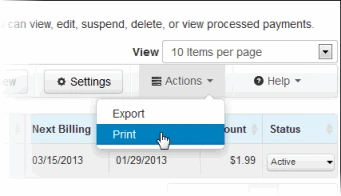
Export to Microsoft Excel
Go to the head of the list and choose Actions> Export.
Closure
Whatever the above facts clearly explain how to change recurring payments in QuickBooks,
- Various methods to change a recurring payment in QuickBooks, it contains where to manage recurring payments, change a recurring payment in QuickBooks, edit payment details, and change upcoming billing dates,
- How do I change billing schedules for frequencies other than monthly or yearly? It contains view payment activity, removes recurring payments, resumes hanging recurring payments, and receives a recurring payment.
There are several ways to change recurring payments in QuickBooks but I discussed a few of the most important facts.
FAQs
How to edit recurring transactions?
Firstly you need to go Recurring transaction list for edits. Let’s follow up to start editing recurring transactions.
- First step you need to go to the settings icon and click on Recurring transaction.
- Then you need to choose a template and click on Edit.
- Now if you change the name of the recurring template then go to the top left of the screen. You can also set Reminder, Unschedule, or Schedule.
- Even more, you can indicate how long you want to use it and whether you want to receive notifications in advance.
- The transaction setup is located below the schedule details make any necessary changes if needed.
- Now everything has been edited, choose Save template.
How to Change the date on a Recurring Transaction
- The first step is to choose the setting icon and select Recurring Transaction.
- Then on the top left you can see the Template type, you can edit according to your wish if needed.
- Then next select the template you require to edit then click on Edit.
- After that, you have to go to the left of the recurring template and click on the Edit Schedule button.
- Then make changes to the schedule according to your wish.
- Finally, select save template.