When a QuickBooks user decides to shift his/her business from QuickBooks Desktop to QuickBooks Online, he/she needs to go through the process of exporting the charts of accounts. Today in this article we will guide you to successfully export your charts of accounts in QuickBooks Desktop. Read the article till the end. This will make sure that you export your chart of accounts properly.
How to Export Chart of Account in QuickBooks
Now let us look at the steps of exporting charts of accounts in QuickBooks Desktop
Step 1 Exporting COA
- The first and foremost step is to open the QuickBooks company file and look out for the chart of accounts that you want to export.
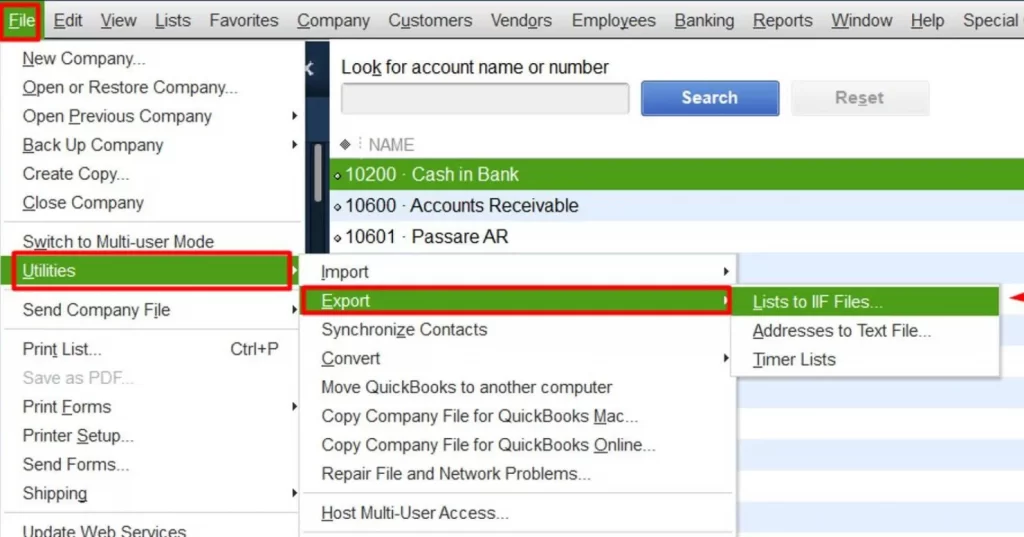
- After selecting the Chart of Accounts then you have to click on the “File” menu and then click on “Utilities”.
- Then you have to click on “Export”.
- Then you have to open the lists of “IIF Files” and from that list, you have to select “Chart of Accounts”.
- Then a window will appear on your screen to save the files. You must select the location where you want to keep the file and save it.
Step 2 Converting the Files
- For converting, you have to open a new Excel file.
- Then you have to select the “From Text” option. After that, a window will appear on your screen having the text “Import Text File”.
- Then you have to open the file where you have saved the Chart of Accounts.
- Then you have to click on the “Delimited” option and then select “Next”.
- Then you have to select from the options of delimiter and then you have to select “Column Data Format”.
- When you have completed all the selections, then you have to click on “General”.
- Then you have to save the file and select the location where you want to save the file.
- Then you have to select the existing excel worksheet and then click on “Okay”.
- Then you have to open the drop-down list of the file menu and click on “Save as”.
- Finally, your file will be successfully saved in the form of an Excel sheet.
Now if you want to export the Chart of the account in Quickbooks Online then follow the given steps
Steps for exporting the Chart of accounts in QuickBooks Online
- The very first step is to open the QuickBooks company file.
- Now from the dashboard, you have to select accounting.
- Now the next, you can see two options on the screen chart of accounts and reconcile. Select Chart of accounting.
- Then the list of the Chart of accounts is open. You have to click on the Run report button.

- After that select the Export icon and click on Export to Excel.
- Then the save as dialog box is open, you have to save it with the file name.
Why should you Export Chart of Accounts in QuickBooks
In QuickBooks accounting software you must create a properly designed company file which is very much time-consuming. In this software, many default and inbuilt templates are available that help you to reduce the time consumption of exporting charts of accounts.
NOTE:- i)You must keep a copy of the QuickBooks file before you start the process of exporting the chart of accounts. If you lose your data while transferring the chart of accounts, then you can use this backup file.
ii) When you import or export the files, you must be logged in as an administrator.
iii) If your company file is being used by more than one user, then you must ensure that you are not using an active multi-user mode.
Final Words:
We hope that now you can export the Chart of Accounts easily by yourself. We will recommend you follow all the steps carefully without skipping a single step to export the Chart of Accounts successfully. You can drop a call to us at +1-844-405-0904 if you need any help from Wizxpert through the QuickBooks ProAdvisors.