In today’s article, we will explain to you how to add users to QuickBooks. Find out the steps to create a user login and set permissions for additional users. As we know very well QuickBooks allows the multi-user environment, and it is recommended to create & set permissions for new users or also for existing users. Transactions are allowed to users and are also very helpful to make any changes to the file and are also tracked by the user who logs into the file. Go through the article here you will get several steps to perform this task and some extra information as a Note. Still, having trouble let us know; contact us at: +1-844-405-0904
Steps to add a QuickBooks Online user
Step 1: Invite your new user
- Go to Settings ⚙, and click on Manage Users. If in case, you are not able to click on this, then it means you do not have the authority to manage other users. So you need to contact to admin user for help.
- Next, click on the Add user.
- Choose the user type that you need to create. Further options will show on the screen, this option will be related to the user type you select.
- Insert your new user’s name and email address, and next, click on Save.
Step 2: Ask your user to accept the invitation
When you add the new user, at the same time your user receives an email from the email address-email@intuit.com. This email contains your business’s name and a message that says “Ready to get started? Let’s go!”
Ask your user to click on the “Let’s go!” link in the email, this link will redirect your user to the sign-in or account creation page. Now the user needs to sign up or insert the info to create a new account.
Note: If in case, your user directly lands on the sign-in page, they might use the same email address that is already used with an Intuit account. Maybe they used it for a different product. Do not panic, you can use the same address to sign in. If your user cannot sure, ask them to click on I forgot my user ID or password at the bottom of the screen.
Manage user role or permissions
- First, you need to log in to QuickBooks with an admin credential or with a user which has permission to manage users.
- Then go the Settings ⚙.
- Click on Manage users.
- Next, look for the user that you want to edit. And then go to the Action column and click on Edit.
- Go to the User Type drop-down ▼ menu, and click on the new user type.
- Click on the user settings, if applicable.
- Click on the Save.
- Now, your user needs to log out and log in again to QuickBooks Online to see the updates.
How to delete a user
Note: Always remember, when you delete a user, it’s permanently deleted. But you can view their history in the audit log after deleting the user.
- First, you need to log in to QuickBooks with an admin credential or with a user which has permission to manage users.
- Next, click on Settings ⚙.
- Go to the Manage users.
- Now, look for the user you need to delete. Next, under the Action column, click on the arrow icon and click on Delete.
- Next, go to the confirmation window and click on Delete again.
How to use predefined roles
Users have the option to select from 14 predefined roles that cover common roles that are marked with an (*) asterisk. It is used to view all the transactions of your business.
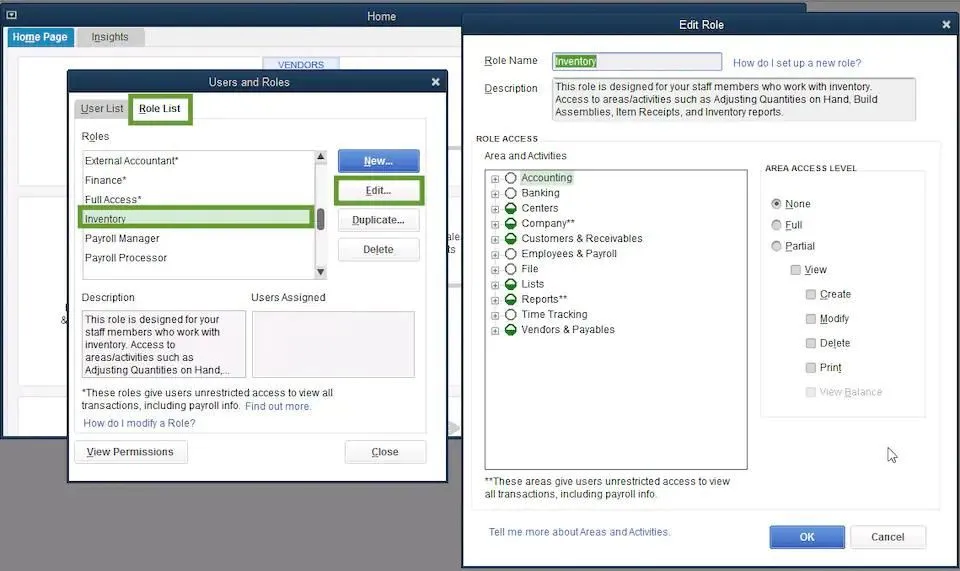
- From the menu, you have to click on the Company.
- Then the next step is to select the Users.
- After that, you have to select set up users and roles.
- Now admin password is asked so enter it and select OK.
- After doing the above-mentioned steps, select the Role List tab.
- Select a role accordingly and then edit to review its permission.
- Now you can see the Area and Activities option where you can select None, Full or Partial through which you can set the level of access.
- Once you have done all the things according to your convenience then save with the OK button.
Steps to create a new custom role
- Again from the menu, you have to click on the Company.
- The next step is to select the Users.
- After that, you have to select set up users and roles.
- Now admin password is asked so enter it and select OK.
- Then the next step is to click on the Role List tab and then select New.
- Now you have to give the name of the role with the option of description.
- Now you can see the Area and Activities option where you can select None, Full or Partial to set the role permission.
- After setting the permission for each area you have to select OK to save it.
Steps to generate user login and set permissions for new users
- First, go to the menu bar, choose Company, Set Up Users and Passwords, and Set Up Users.
- Select Add User from the User List dialog box.
- Register your User Name and Password and for confirmation enter the password again. (it is optional but recommended)
- If you want to add extra licenses to your QuickBooks file, then select the Explain link.
- After this, If you did not create a password then choose Yes to create a password and No if you already created your password to skip this step.
- Now here choose the access choice:
- All areas: It gives full access to QuickBooks except those which need Admin access.
- Selected areas: Enables you to select the choices for access to each sensitive section of your QuickBooks data.
- Here you are working on the tenth screen (you can also see in the image) you can also reexamine the permissions settings.
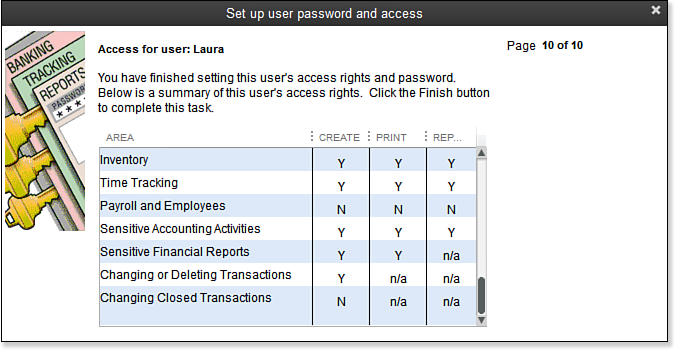
- Every dialog box will provide details about access levels and most include some or all of the following permission levels:
- No Access
- Full Access
- Selective Access: It allows the following options
- Generate transactions only
- Generate and print transactions
- Generate transactions and reports
If you are unsure of the limits of the permissions set in QuickBooks Desktop Pro or Premier, we advised you to make it for the create-only option – the highest level of security. Then log in as the new user and the area the employee will work in to determine whether or not the permissions provide the control you need. QuickBooks will tell you what level of permission is required for anything you do.
Frequently Asked Questions
You can set up 5 billable users and 2 Accountant users in QuickBooks Online.
- Go to the Menu bar and Choose “Company” in QuickBooks.
- Select “Set Up Users and Passwords.”
- Look for the “Set Up Users” option to initiate the “User List” dialog box.
- Here select the name of the user whose you want to change the permissions.
- Start QuickBooks.( First, update your file to the new version if it is prompted on your screen).
- Select the File menu > click Utilities > then choose Host Multi-User Access.
- In case, If it shows Stop Hosting Multi-User Access then it means you are already hosting multi-user access.
You have to pay a cost of $ 299.95 / per additional user (but QuickBooks sometimes offers discounts for multiple users, so it’s recommended to check first from Intuit official website). Basically, QuickBooks allows three users for QuickBooks Pro and QuickBooks Pro Plus.
- To prevent users from viewing account balances, user rights of use must be restricted.
- Go to the Company menu, select User and Password, and after set User.
- Select the selected areas of the QuickBooks option, then continue to select the next until you are on the Sensitive Accounting Activities page. Select an access
We are hoping that you’ve now learned how to add users to QuickBooks & set permissions for new users in QuickBooks. The above discussed are the most flexible way to create and set permissions for new users in QB accounting software.
But if you are still facing a problem understanding the features of QB and you want to learn more then you can have assistance from our team of QuickBooks ProAdvisor. Our team consists of certified and experienced QuickBooks professionals who can instantly solve any issue related to accounting and bookkeeping. Call us at our 24/7 toll-free customer support number +1-844-405-0904 to know more.