Facing a QuickBooks payroll update error or failing to send usage data in QuickBooks Desktop while updating? If yes, then here is the one-stop solution for all your issues. we will address the main reason behind this error and also provide you with one of the best solutions to fix this error. Sometimes it shows “QB ran into an error while trying to send usage data” This error occurs due to the incorrect time zone of the desktop or you have created the Accountant’s copy. Go through the article and get all your queries resolved. For more info contact us toll-free: +1-844-405-0904

We will talk about QB payroll update errors if you facing an issue like failing to send usage data while updating or other errors in QB payroll then you’ve landed on the right article. We refer you to this blog if you are facing a Payroll update error with code 15106
Table of Contents
Main reasons behind QuickBooks payroll update error- Failed to send usage data
It occurs due to the following common reasons:
- If the time zone is incorrect in your system.
- If you create a copy of an Accountant.
QuickBooks payroll support also provides you with an efficient method to solve both problems very easily you can contact QuickBooks payroll support contact number Our US-based experts available 24/7 to provide you perfect solution to your problem.
Points to Remember before resolving QuickBooks update error
It is important to keep some points in mind before troubleshooting the steps and consider each point that helps you to resolve the error easily and avoid problems in the future.
- Before sending payroll data, users have to delete the website files and the temporary internet files if they are using QuickBooks Online Payroll in Internet Explorer.
- In case of an internet connectivity issue, users need to reset the router for 10 to 15 seconds.
- Internet connection settings should be updated in Internet Explorer.
- If users are using the QuickBooks online desktop app then they ensure that they are using the Updated version of the QuickBooks payroll and tax tables.
- Restart your computer after making an update. If still the issue is not resolved then you can follow the given troubleshooting steps.
Solutions To fix the Payroll update error in QuickBooks while trying to send usage data
Method 1– Edit Your Payroll Service Key
For edit your payroll service key you need to follow the given steps:
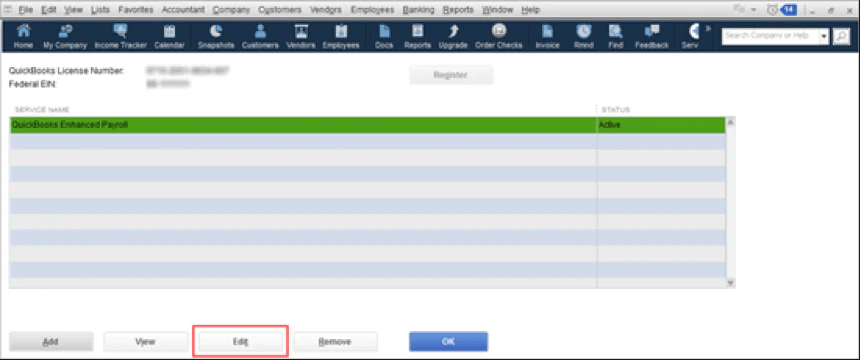
- Go to the Employees option in your QuickBooks software then select My payroll service and then the Manage service key option.
- Click the Edit, option then clear the checkbox on “Open Payroll Setup” and hit Finish. This should send your service key to activate.
- After that back to the main setting page and,
- Go to Employees, then My Payroll Service, then Send Usage Data.
If the above method does not work or does not fix your issues move on to the second method.
Method 2- Check the date & time of the file location in your system
Here are the steps to check the date and time in Windows Vista and XP:
- First, go to the computer’s system tray (on the bottom of the screen), you can see the displayed time, click on it.
- If in case, you are not able to edit the time from your system tray, click on Start, and later go to the Settings, next click on the Control Panel, and then click on Date and Time.
- Next, go to the Date and Time window, look for the Date & Time tab, and click on it.
- Here, you need to set the date and time and later go to the Time Zone tab.
- Click on the correct time zone.
- If you are in a daylight-saving time zone, you have to choose the Automatically adjust clock for daylight saving changes checkbox.
- Next, click on OK.
- Now, you need to verify the updates just by double-clicking the time in the system tray.
For Windows 7 operators, do the following steps.
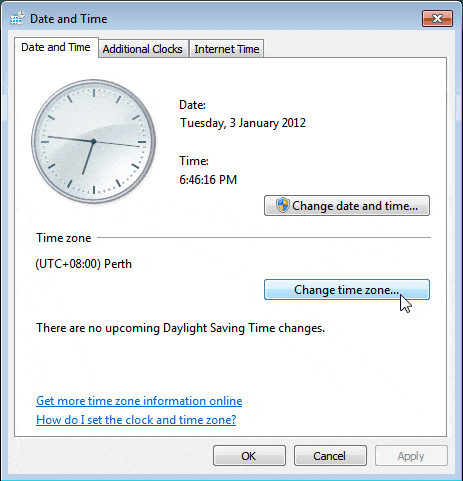
- First of all, open your desktop and double-click on the date and time that shows at the bottom of the window screen.
- There is another option if you are unable to change the date and time from the system then go to the start option or you can press the window button from your keyboard.
- Select the Control Panel option.
- Choose Clock, Language, and, region options.
- In the next window, you will be shown two more options date and time settings and region and language.
- Click the date and time option.
- After that on the Date and Time button, click on the Change date and time button.
- Choose the current date and time, then click on the OK button.
- After that, click OK and then click OK again.
- After that, check if the time and date are correct in the system or not.
For Windows 8, do the following steps:
- Open Control Panel.
- Click on Clock, Language, and Region.
- Under Date and time, click on Set the date and time.
- Click on Change date and time settings.
- In the Date and Time tab, click on the Change date and time button.
- Choose the correct date and time.
- Click OK.
- To change the time zone, click on the Change time Zone button and then select the preferred time zone.
- If you are in a daylight-saving time zone, click on the Automatically Adjust Clock for Daylight Saving Time tick-box.
- Click OK.
- Now check that the date and time are correct or not.
If the above method doesn’t fix your issue, then try the next method.
Method 3: Check if there exists an Accountant’s copy.
- If Date and time are correct, then toggle the time zone (correct, wrong, correct) by following the simple steps:
- If an Accountant’s copy exists, remove the restrictions manually or you can wait until the Accountant’s copy is returned. But still remember that when you, remove the. So, you have to ensure to verify with your Accountant.
- Now, try to send it to Intuit.
- If the error continues to exist, then delete all the online transactions that have been sent.
- Click on Edit from the top menu bar
- Then Click on Find (or press CTRL+F ).
- After Clicking on the Advanced tab.
- In the Filter box, choose the following options:
- Go to the drop-down menu, choose the filter Detail Level, and select Summary Only.
- Then Go to the drop-down menu, select the filter Online Status, and choose Online to send.
- After Go, the drop-down menu, select the filter Posting Status and choose Either.
- Then, click on the Find button from the top right corner of the Find screen.
- After that, review the results:
- If you find any non-payroll transactions, then complete their processing.
- And if you find paychecks, delete them immediately and then try to send them to Intuit again. If it is done successfully, recreate the paychecks.
Method 4: Download Payroll Updates in Safe Mode
- You need to shut down your system first.
- Then next, you need to start your system in the safe mode.
- Now you have to press the F8 key for Advanced Boot Options.
- Next, you need to download the updates of QuickBooks Desktop Payroll.
- After that, you need to reboot the system in normal mode.
- Then Download updates now.
Method 5: Reset Internet Explorer Browser Setting
- First, you need to open the Internet Explorer Browser.
- Then you can see the three dots on the right side of the window click on it.
- Then select Internet options and then click on the Advanced tab.
- Next, choose Restore Defaults or Reset Option.
- Then after doing the above steps, you need to click on the Apply button.
- Then finally click on OK and then close tabs.
Method 6: Repair QuickBooks desktop software.
- Open the control panel first.
- Then hit on the programs or programs and features option.
- Then you can see the list of programs on your screen you have to choose QuickBooks.
- Next, you need to right-click on Quickbooks to choose the Uninstall/Change option.
- After that, you need to click on the repair tab.
- After all the steps are completed you need to check if the issue is resolved or not by opening the QuickBooks.
Method 7: Installation of Digital Signature Certificate
- Firstly you need to open the system and go to the C: drive.
- Next, go to the Program Files/Intuit in Windows Explorer.
- Then from the option list select the QuickBooks.
- Then right-click on the QBW32.exe file and choose the properties.
- Now from the menu, you need to click on the Digital Signature tab.
- After that verify whether Intuit is selected in the list of signatures or not.
- Then choose the Details option and then the View certificate option.
- Choose the install certificate option under the certificate box.
- Next, continue to click on the Next button till the final page shows up on the screen.
- Then click on the finish tab and reboot your system.
- Finally, open the QuickBooks and open the payroll software.
To know more about common payroll errors and their troubleshooting steps, you have to visit QuickBooks Payroll‘s complete guide.
Hope, the above information will help you properly with your issue and surely get rid of QuickBooks payroll update error. But if you are still unable to fix this issue or you need further assistance then dial our toll-free +1-844-405-0904 and get in touch with our certified Intuit ProAdvisor to take the instant solution.