If you are using the QuickBooks accounting software for managing and bookkeeping your business accounting data then you may be familiar with the errors like overpayment and underpayments. So, here we are going to show you how to write off customer and Vendor balances in QuickBooks, Read the complete article to get your query resolved and learn to write off. If you want to learn more or any help then contact our QuickBooks ProAdvisor toll-free:+1-844-405-0904
Usually, it takes more time to collect and pay due balances than to clear them from your accounts but we still have to do this if the amount is incorrect. In this article, learn two ways to remove the customer’s and vendor’s amount. We recommend you consult your accountant before writing off any balances in yourcompany file.
Methods to Write off customer and vendor balances
Method 1: Create a Journal Entry to Write Off the Customer and Vendor Balances
In Account Receivable (A/R)
- First, you need to create an appropriate Journal Entry.
- Go to the QuickBooks Company menu and then select the Make a General Journal Entry option.
- After that Make General Journal Entries window will open, here you need to change the date and fill the entry number as well (if necessary).
For the customer with an overpayment.
- Go to the Account section and then click on it. From the drop-down menu, you need to select the Account Receivable (A/R) option.
- Then in the Debit section, in the first line enter the overpayment amount and then go to the name section and click on it. From the drop-down menu, you need to select the name of the customer.
- Go to the Account section again and in the second line, select the Offset Account. After that, go to the credit section and enter the overpayment account. Normally, an offset account is an Expense Account.
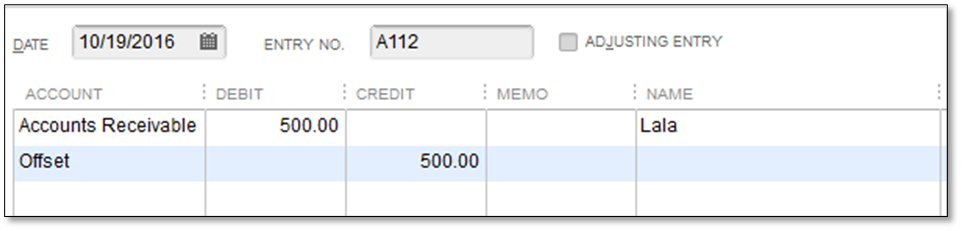
- Once you filled all the details, click on the Save and Close option.
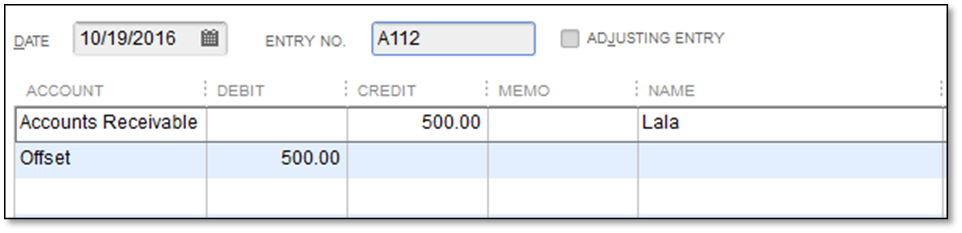
For the Customer with an overpayment
- Go to the Account section and then click on it. From the drop-down menu, you need to select the Account Receivable (A/R) option.
- Then in the Credit section, in the first line enter the underpaid amount and then go to the name section and click on it. From the drop-down menu, you need to select the name of the customer.
- Go to the Account section again and in the second line, you need to select the Offset account. After that, go to the debit section and enter the underpaid amount.
- After filling all the required information, click on the Save and Close option.
- Apply the General Journal Entry that you just created to the existing Debit/Credit.
- From the top menu bar, click on the Customer menu and then select the Receive Payments option.
- In the Received From field, you need to enter the name of the customer.
- After that, select the appropriate invoice and then choose Discounts and Credits option.
- Then, under the Credits tab, you need to select the Available Credit option. After doing that click on done.
- Once you filled all the required information, click on the Save & Close.
In Account Payable (A/P)
- First of all, you need to create an appropriate General Journal Entry.
- For this, go to the top menu bar and then click on the QuickBooks Company option and then select the Make General Journal Entries option.
- After that, Make General Journal Entries window will open. Here, you need to type the entry number (if required) and also you need to change the date.
For Vendor with an overpayment
- Go to the Account section and then click on it. From the drop-down menu, you need to select the Account Payable (A/P) option.
- Then in the Credit section, in the first line enter the overpaid amount and then go to the name section and click on it. From the drop-down menu, you need to select the name of the customer.
- Go to the Account section again and in the second line, you need to select the Offset account. After that, go to the Debit section and enter the overpaid amount.
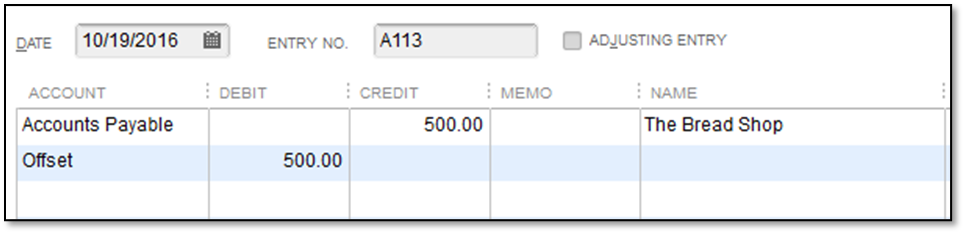
- After filling the required information, click on the Save & Close.
For Vendor with an underpayment
- Go to the Account section and then click on it. From the drop-down menu, you need to select the Account Payable (A/P) option.
- Then in the Debit section, in the first line enter the underpayment amount and then go to the name section and click on it. From the drop-down menu, you need to select the name of the customer.
- Go to the Account section again and in the second line, select the Offset Account. After that, go to the credit section and enter the underpayment account.
- Once you filled the information, click on the Save & Close button.
- Apply the General Journal entries that you just created to existing debit/credit.
- From the top menu bar, click on the Vendor option and then select the Pay Bills option.
- After that, select the appropriate bill and then choose the Set Credits option.
- Then, under the Credit tab, you need to select the available credit option and then click on the Done button.
- Once you filled all the required information, click on the Save & Close button.
Method 2: Use Discount to Write Off the small amounts
To write off the small customer and vendor balances, first, you need to create an account and an item.
Charge Off Account
- First of all, Create a Charge Off Account.
- For this, click on the List menu from the top menu bar and then select the Chart of Accounts option.
- After that, click on the Account button and then select the New option.
- Then, select the Income options and then Continue.
- In the Account Name field, type Minor (A/R) and (A/P) Charge Off and then select the Save & Close option.
Charge Off Item
- After creating the account, you need to create a Charge Off Item.
- For this, click on the List menu from the top menu bar and then select the Item Lists option.
- After that, click on the Item button and then select the New option.
- In the Item Type drop-down menu, choose the Other Charge option, and then select Continue.
- Then, in the Item Name/Number field, you need to type the Minor Charge-Off.
- In the Tax Code field, you need to select the Non-Taxable Sales option.
- In the Account field, select the account named as Minor (A/R) and (A/P) Charge Off. (This the same account that we created in the above step.)
- Once all the required fields are completed, click on the Save button to create the item.
Now you can write off the small amount for vendors and customers based on the underpayment or overpayment balances.
For Customer with an underpayment
- From the top menu bar, click on the Customers menu and then select the Receive Payments option.
- Then, click on the Received From field, and from the drop-down menu, select the name of the customer.
- After that, select an appropriate invoice from which you want to write off the amount.
- Then, select the Discount & Credit option.
- In the Discount tab,
- Enter the underpaid amount in the Amount of Discount field.
- In the Discount Account drop-down menu, select the Minor (A/R) and (A/P) Charge-Off account.
- After filling all the required fields, click on the Done button to close the Discount & Credit window.
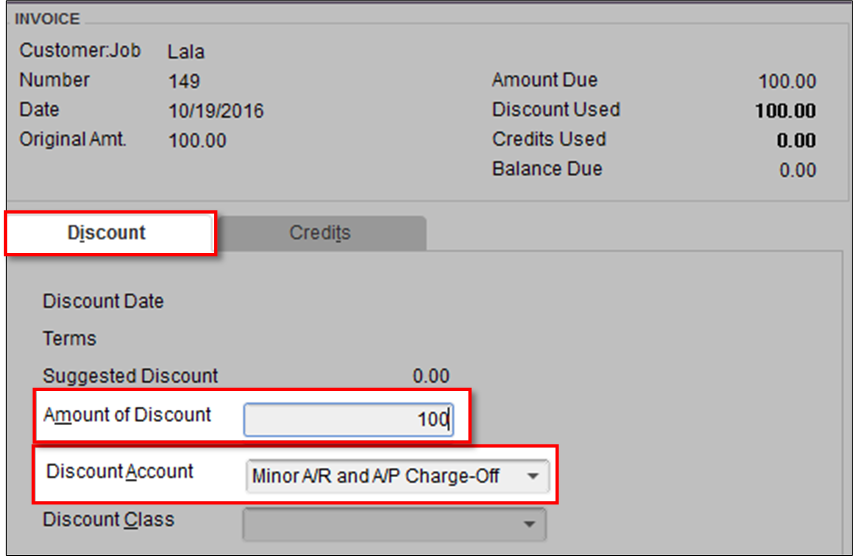
- And to close the Receive Payments window, click on the Save & Close option.
For Customer with an overpayment
- From the top menu bar, select the Customers menu and then select the Create invoices option.
- In the Customer Job field, you need to select the name of the customer.
- At the bottom, go to the items section, and in the first item field line, select the Minor Charge Off option.
- Then in the Amount section, enter the overpaid amount.
- At the top right corner of the window, click on the Apply Credits button.
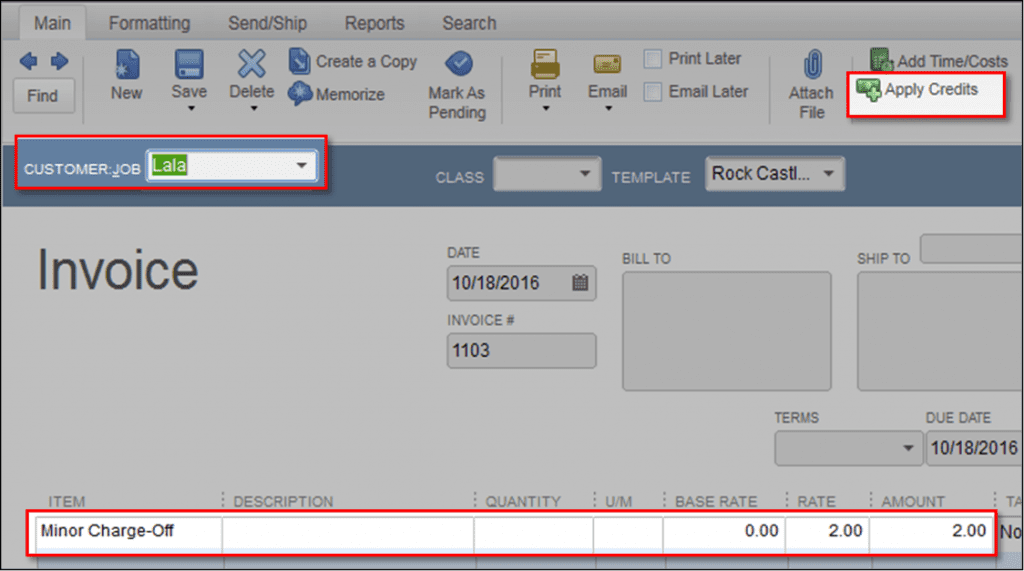
- Then Apply Credits window will open, in the Available Credit section, select the credit. (Make sure that that the amount of credit should match the amount on the invoice.)

- After that, close the Apply Credits window by clicking on Done.
- Once all the required information is filled, click on the Save and Close button.
For Vendor with an underpayment
- From the top menu bar, click on the Vendor option and then select the Pay Bills option.
- After that, select the appropriate bill from which you want to write off the balance.
- At the bottom of the window, click on the Set Discount button.
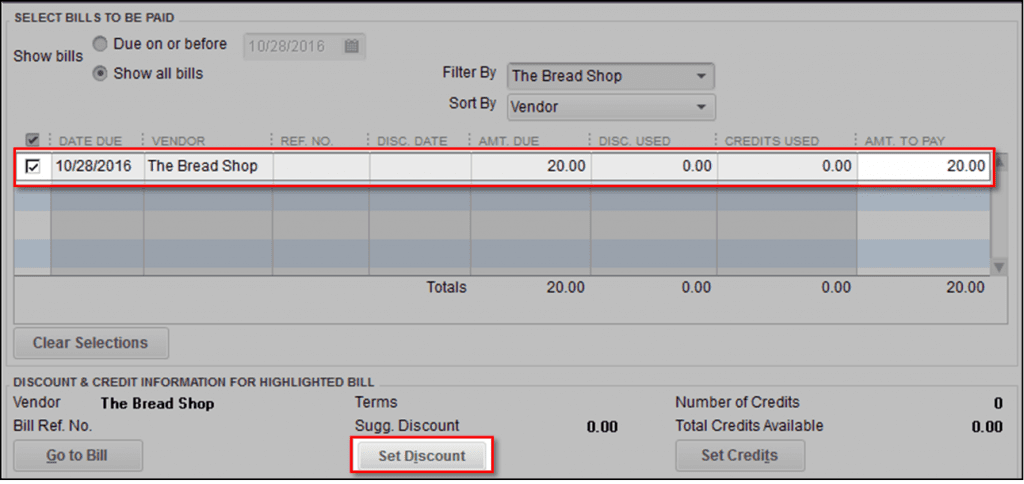
- Click on the Discount tab.
- In the Amount of Discount field, enter the underpaid amount.
- In the Discount Account field, select the account named Minor A/R and A/P Charge-Off. (This is the account that we have created above.)

- Close the Discount and Credit windows by clicking on the Done button.
- After that, click on the Pay Selected Bills to close the Pay Bills windows.
- In the Payment Summary window, click on the Done button.
For Vendor with an overpayment
- Here, you need to create a bill that will offset the credit.
- For this, go to the top menu bar and click on the Vendor option and then select the Enter Bills option.
- In the Vendor drop-down menu and select the suitable vendor.
- In the Items section, select the Minor Charge Off in the first line of the item field.
- Select Save and Close.
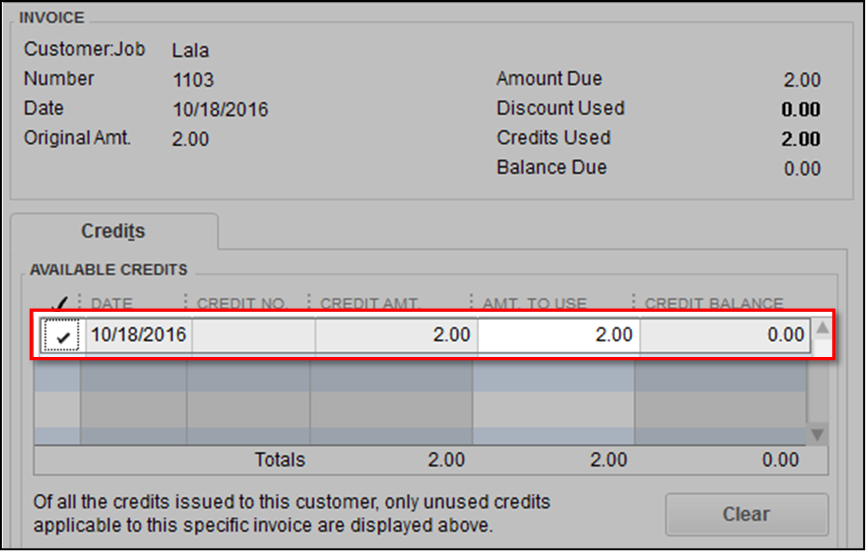
- Then, you need to apply the available credit to the bill that you have just created.
- For this, go to the top menu bar and click on the Vendor option and then select the Pay Bills option.
- Then, select choose the bill that you created for offsetting the credit.
- At the bottom of the screen, click on the Set Credits button.
- Go to the Credit tab and select Credit.

- Click on the Done button and close the Discounts and Credit window.
- Click on the Pay Selected Bills and close the Pay Bills window.
- And finally, close the Payment Summary window by clicking on the Done.
The Bottom Line
Above in this article, we have discussed how to write off customer and vendor balances in QuickBooks. We have mentioned two different ways, the first with using the General Journal Entries and the second method with using the Discount feature of QuickBooks. We hope that now you can write off the customer and vendors’ overpaid or underpaid amount.
If you have any issues or queries related to this article or any general questions related to the QuickBooks accounting software then you can contact our team of Intuit Certified QuickBooks ProAdvisor. Our team consists of experienced technical experts who can solve any problem instantly. For more information, you can contact us via our 24/7 toll-free QuickBooks support number +1-844-405-0904.