In this era, you need to handle your finances by using QuickBooks Online, which is one of the best tools to run a small business. Through the vendor list QuickBooks Online, you can manage all your suppliers and expenses more effectively. You can easily keep tracking on suppliers, contractors, or service providers to whom you pay, and it is a best feature to organize them in one place. In this blog, we’ll help you understand what the vendor list QuickBooks Online is, why it is important, and how you can manage your business payments with an explanation.
What is a Vendor List QuickBooks Online?
A vendor list QuickBooks Online is one type of record that keeps all the data of people or companies of your business from whom they buy goods or services. It helps you to keep track of payments, bills, and expenses for each vendor in one place. Name, address, contact information, and payment terms are such details that are in the vendor’s profile. You can easily create a purchase order, enter bills, and make payments with the vendor list. Through this, you can also view the status of how much you owe from each vendor and your total expenses.
Why is the Vendor List Important?
You can manage all the suppliers and payments in one place by taking help from the vendor’s list. It keeps all the records or data by tracking how much you owe, from whom you buy, and when the dues of payments. Duplicate entries and missed payments can also be avoided by it. You can quickly maintain good relationships with your suppliers, find details of contact, and view past transactions with a clear vendor list. In short, the vendor list can generate accurate financial reports, organize bills, and track spending with improved accuracy.
How to Access the Vendor List QuickBooks Online?
We have clearly and simply discussed the process in steps with a proper explanation of how to access the vendor list QuickBooks Online, as in the following ways.
- Open the official site of QuickBooks Online to sign in with your QuickBooks Online account by using your username and password.
- In the left-hand menu, press the “Expense” button.
- From the drop-down option, click the “Vendor” and select it.
- The list of vendor pages will open after selecting, and you can see all the vendors that you have added.
- To make any edits or see the details or past transactions, just click on the name of any vendor.
Tip: Through the vendor list, you can easily track and manage all the people or companies that you buy goods and services from.
How to Add Vendors to the List?
You can easily track bills, payments, and expenses for each person or company that you buy from to know where is the vendor list in QuickBooks Online or how to find vendor list in QuickBooks Online by adding the vendors to the list. Here are some simple, proper explanations discussed below.
- Register your QuickBooks Online by using your username and password.
- Press the “Expenses” button on the left-hand menu bar.
- From the dropdown list option, select the “Vendor”.
- Then, click on the button “New Vendor”.
- Put to fill in the details of the vendor’s name, address, company, email, and phone number.
- If needed, add some extra information, like payment terms or tax details.
- To finish adding the vendor to the list, click the “Save” option and make it permanent.
How to Edit or Delete Vendors?
Here are some simple and clear explanations discussed in a step-by-step process on how to edit or delete vendors, as in the following ways:
Steps to Edit a Vendor
- Register your QuickBooks Online account from the official site.
- Select the “Vendors” option after clicking the “Expenses” button from the left menu bar.
- Find the vendors to edit the one you want and click on their name to open it for making changes.
- Press the Edit button in the top right corner menu bar.
- Change the details, like name, email, or payment terms, to make them updated.
- Click the “Save” option when you’ve finished.
Steps to Delete a Vendor
- Go to the settings, then open the “Expenses”, and select “Vendors”.
- Search out or identify the vendor from the list which one you want to remove.
- Click on the arrow of the dropdown, which was next to their names.
- Select the past transactions that are kept to hide the vendors, and make them inactive.
- Click the Yes button for confirmation when prompted.
Note: If the vendors have their transactions in QuickBooks, you can’t delete them completely. Only you can make them inactive.
Tips for Managing Vendors List QuickBooks Online Efficiently
To manage vendors list efficiently, follow these simple tips explained below.
- Check the names, addresses, and contact info to keep the details of the vendor updated and correct.
- Set clear payment terms to avoid confusion by adding due dates and preferred payment methods, which will be easy for you.
- To record every bill and payment of what you owe and what’s paid, you can keep tracking them.
- Uploaded invoices, contracts, or receipts are such documents of each vendor’s profile that need to be attached for easy reference.
- To keep your list clean, review the vendor list regularly and remove inactive vendors.
- Use reports to check the expenses report of the vendor to know with whom you’ve spent the most.
- Be active in responding quickly to vendors’ queries and sharing payment updates to maintain good communication.
Tip: Mostly, reviewing vendors and organizing them helps you to avoid errors and save time tracking to build a stronger relationship with the business.
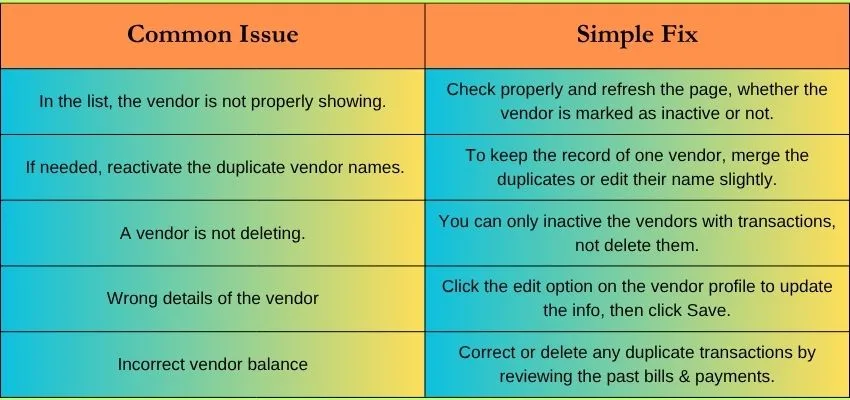
Common Issues and Fixes
When you manage the vendor list QuickBooks Online, some common issues will appear, so here we have discussed some common issues and their simple fixes with clear and simple explanations, mentioned below.
Conclusion
In conclusion, to keep all the information of your supplier in one place, the vendor list QuickBooks Online is a helpful tool. You can easily track bills, payments, and expenses because it allows you to do it. We have discussed everything in the above that you need to know about the vendor list QuickBooks Online, with a brief explanation. In case you have any queries or issues, you can freely contact our QuickBooks support service, and they will assist you with better guidance.