Are going to run QuickBooks Desktop for the first time? Don’t be so nervous, in this article, we will guide you to set up QuickBooks Desktop for the first time. After downloading and installing QuickBooks Desktop you need to set up your QuickBooks so, stay with this page till last to know how to set up QuickBooks Desktop. In the meanwhile, you can get support from our certified QuickBooks experts through the toll-free number +1-844-405-0904.
Procedure to Set up QuickBooks Desktop from the Initial
Here are some of the basic, and necessary steps to set up, and run the QuickBooks Desktop. Complete the steps one by one to set up it successfully.
Step 1: Create a QuickBooks Company File
Creating a company file in QuickBooks Desktop is the first step to running it. Follow the procedure to create a company file;
- First of all, open QuickBooks Desktop, and go to the ‘No Company Open’ window.
- Click on the ‘Create a new Company’ option.
There will be two options available to proceed forward;
If you need to get started right away;
- Click on the ‘Express Start’ option or the ‘Start Setup’ option.
- Fill out the business name, industry, and business type field.
- And click on the ‘Create Company File option.
If you need to a complete setup;
- Click on the ‘Detailed Start’ option.
- And put all the information in the form.
After choosing any one of the options, go for the next steps;
- Follow the on-screen instructions to complete the setup process.
- At last, click on the ‘Start Working’ option.
Step 2: Add Customers and Vendors in QuickBooks Desktop
After the complete installation, and setting up of the profile of QuickBooks Desktop, your first step is to add customers and vendors to QuickBooks Desktop. Follow the procedure to add a customer;
- Go to the ‘Add/Edit Multiple List Entries’ windows.
- And select the list from the ‘List’ drop-down menu, that you want to work with.
- Then add entries to the list.
- Click on the first empty row, at the end of the list, and start making your entries.
- Click on the ‘Save Changes’ option, and fix the error, if you have any.
Step 3: Add Employees
Follow the procedure to add an employee in the ‘New Employee’ window;
- Click on the ‘Employees’ tab, and then on the ‘Employee Center’ option.
- After that, click on the ‘New Employee’ option.
- Fill out the Personal, Address & Contact, Additional Info, Payroll Info, and Employment Info tab to add an employee successfully.
Step 4: Set Up Items for Buying, and Selling
Now set up items for buying, and selling, by following the below steps:
To Create an Item:
- Visit ‘Lists’, and click on the ‘Item List’ option for Windows, or the ‘Items’ option (for Mac).
- Select the ‘Item’ option, and then the ‘New’ option from the ‘Item List window. (for Windows)
- Click on the ‘Plus +’icon, and then select the ‘New Item’. (For Mac)
- Choose the item type, fill out the field, and add your own customized fields.
- And at last, click on the ‘Save’ option.
To Create a Discount Item (Only for Mac):
Here is the procedure to create a discount item;
- Select the ‘Items’ option from the ‘Lists’ menu.
- Then click on the ‘Plus +’ icon, and select ‘Discount’ in the ‘Type’ Field.
- Put the name, description, and discount amount of the item.
- Now, you have to enter the account that you use to track discounts.
- And last, click the ‘Ok’ option.
Step 5: Set Up Bank Accounts
Follow the procedure to set up a bank account in QuickBooks;
- Go to the ‘Banking’ menu, and select the ‘Bank Feeds’ option.
- Then click on the ‘Set up Bank Feeds for an account option, and enter your bank name in the field.
- And then select the bank.
- Click on the ‘Enrollment site’ link.
- There you may need to apply for a direct connection.
- If in case, you need approval from the bank then contact your bank, and ask if there is any need for a special login credential or not.
Step 6: Set Up Sales Tax Information
You can follow the below procedure to set up the sales tax information;
- Select the ‘Preferences’ tab from the ‘Edit’ menu.
- From the window, select ‘Sales Tax’, and then the ‘Company Preferences’ option.
- Turn on the sales tax, and then add the sales tax item, group, the non-taxable status of an item, non-taxable status of a customer.
- Also, create a specific tax code.
- After that, set the sales tax basis, and take it into the company’s accounting and preference.
- Then set up the preference for paying sales tax monthly, quarterly, and annually.
- At last, click on the ‘Ok’ option.
Step 7: Set Up QuickBooks Administrator & Password
Follow the procedure to set up the QuickBooks administrator and password.
- First, visit the ‘Company’ tab and select the ‘Set Up users and Password’ option.
- After that, click on the ‘Set Up Users’ option.
- Decide to make an administrator.
- Again visit the ‘Company’ tab> Set up Users and Passwords > Set Up Users.
- Then go to the User List window, and click on ‘Admin, and then ‘Edit User’.
- After that, you may need to answer some of the questions for security purposes.
- Go to the ‘Challenge Question’, select questions, and give answers in the ‘Challenge Answer’ field.
- At last, click on the ‘Next’ option, and then the ‘Finish’ option.
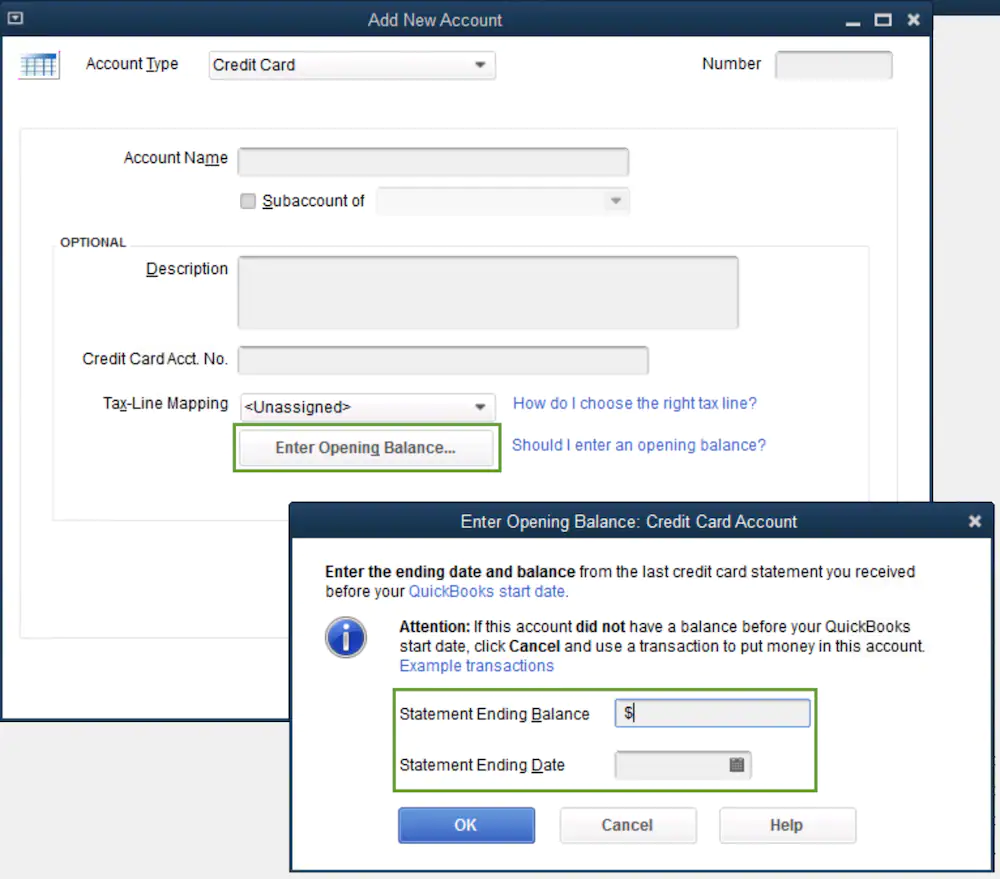
Step 8: Enter an opening balance
You can enter the opening balance for your QuickBooks by following the procedure:
- First of all, you have to sign in to your bank’s website.
- Now go to your QuickBooks and click on the company menu.
- After that select the chart of accounts for continuing your procedure.
- The next step is to right-click on the chart of accounts and then you have to select NEW.
- Now you have to enter the account type, so select the Bank or Credit card, and then click on continue.
- Give the name for your account if you are using more accounts of the same bank, and give a different name that is not written earlier so that you can recognize it well whenever doing your transaction.
- After that, you have to fill out the asking details in the empty fields.
- After filling in all the details you have to click on ‘Enter Opening Balance’, and then save & close. Now you can start your QuickBooks with a new opening balance.
Tips to Set Up QuickBooks Easily
Here are some of the tips, by which you can easily set up, run, and learn QuickBooks easily;
- You have to install your QuickBooks and then register for QuickBooks. You have the option to choose any of the packages, according to your budget and requirements.
- After that, you need to customize the account setting from the menu. Open the company tab and then add the company contact details from the preference. In the account setting, you’ll get many options that are payroll, invoice automation, time tracking, and credit card payments which you can edit according to your need.
- If you are done with the account setting, you have to import the data from Excel which you can utilize for using a bank account to make transactions. For this, you have to select the company tab, and then from the more section, you have to choose the import data from the more section.
- Now for transactions from a particular bank, you have to merge it with QuickBooks. For this, you have to enter the banking details from the banking tab that you can sync with the software. After syncing, you have to attach the vendor’s name and the customer’s name to every transaction which helps in managing and organizing the debit and credit details.
- In the next step, you have to merge your credit card by entering the details of your credit card from the available banking tab on the menu. Add your bank and then select the credit card option that launches the credit card setup wizard.
- Customize the invoices with banking, you can design your format for the invoices and can make changes in the pre-made invoices through the formatting tab. for creating new invoices, you have to select the customer tab and then click on the customization menu and then choose to create invoices.
- Now you are going to the end of the setup process with the final step by shifting all the contacts to QuickBooks. All the data which can be exported to QuickBooks are in the form of CSV files or excel files from which the data are extracted automatically by QuickBooks.
Learn Some Basic Settings in QuickBooks
The above steps were necessary to set up. But apart from these steps, there are some basic steps, which are important for you to know.
- Pay bills
- Customize sales receipt
- Set up passwords for additional users
- Backup of QuickBooks data
- Receive payments from customers
Get Wizxpert Expert Support for Easy Set-Up
Wizxpert will help you to set up the QuickBooks Desktop easily. The certified technical QuickBooks members can guide you remotely to set up all the things in the right way. Feel free to contact us through the toll-free number +1-844-405-0904 for the best, and instant guidance.
It’s all about setting up of the QuickBooks Desktop for the first time. Hope you found the article informative, and now you have the knowledge to set up the basic settings of QuickBooks Desktop