Taking care of your business’s assets is very critical for maintaining accurate financial records and ensuring compliance with accounting standards. It is important to keep a record of the sale correctly in QuickBooks, whether you’re selling fixed assets like equipment, furniture, or a vehicle. A proper way to record sale of assets in QuickBooks is essential in businesses.
Through this article, we’ll guide you by providing with a step-by-step process to make a record sale of asset in QuickBooks to help you navigate the disposal entries of assets, by ensuring the accuracy of asset sales and maintaining the integrity of other financial statements.
Understanding Asset Sales in Accounting
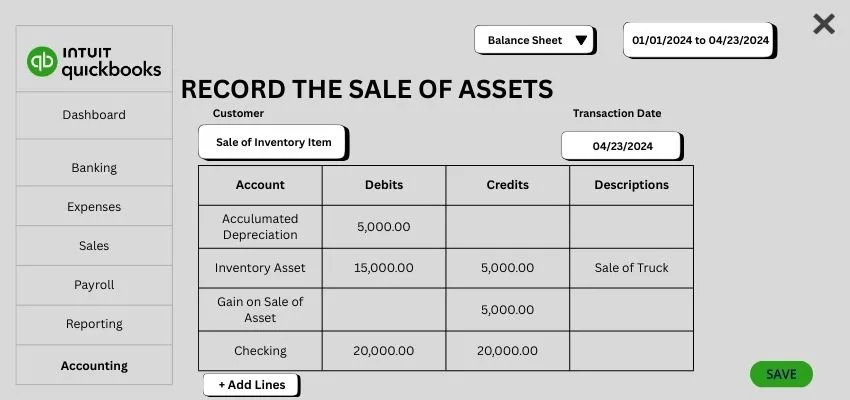
The sale price becomes income when you sell a business asset and record it first in QuickBooks. To receive the amount, select the bank account by entering the buyer’s information in the New Bank Deposit option. Use a new journal entry to remove the asset from books to debit accumulated depreciation, and for original cost, use the credit asset in accounts. Make a record of the difference as a gain, if the sale price is more than the asset’s book value, or if it is less, mention it as a loss.
Through this, QuickBooks reflects the cash received process by ensuring it removes the asset to show the profit and loss correctly.
Things to do Before Recording Sale of Asset in QuickBooks
While gathering all details of the asset, including the original cost of purchase, accumulated depreciation, and the sale price. To make sure that QuickBooks assets are updated, confirm your payment method (cash, bank transfer, etc.) Through this, you can ensure accurate profit and loss calculation.
Some preparations that you need to start before you record sale of asset in QuickBooks are as follows:
- Make a collection of documents to purchase invoices, depreciation records, and sale agreements.
- Verify the value of asset books quickly.
- Check properly that all depreciation has been recorded till the date of sale.
- Allow them to confirm the payment details and information of the buyer.
- For an easy entry into QuickBooks, prepare a journal entry template.
Steps to Record Sale of Asset in QuickBooks Online and Desktop
QuickBooks Online
While you record sale of asset in QuickBooks Online, it ensures that the received money makes you visible, removes the asset that has been sold from your books, and captures the loss or gain. Through this, your balance sheet report and tax reports were kept as accurate and updated.
Here are the steps to record the sales, as follows:

- Press the + New option and choose the bank deposit to keep a record of payments.
- Click on the Customer/buyer to add the amount and date of sale.
- Go to the Chart of Accounts in the Settings.
- Search out the asset accounts.
- Select the New Transaction for a journal entry or use dispose if available.
- Add the value of the asset from the books.
- Before saving to remove it from your record, note the gain or loss.
QuickBooks Desktop
To make a record sale of assets in QuickBooks Desktop, you need to remove the asset first from your books to record any accumulated depreciation and note the details of the sale. If a journal entry is added to remove the cost of the asset, then create a receipt of sales to record the received cash.
Here are some steps to record sale of asset in QuickBooks Desktop, as follows:
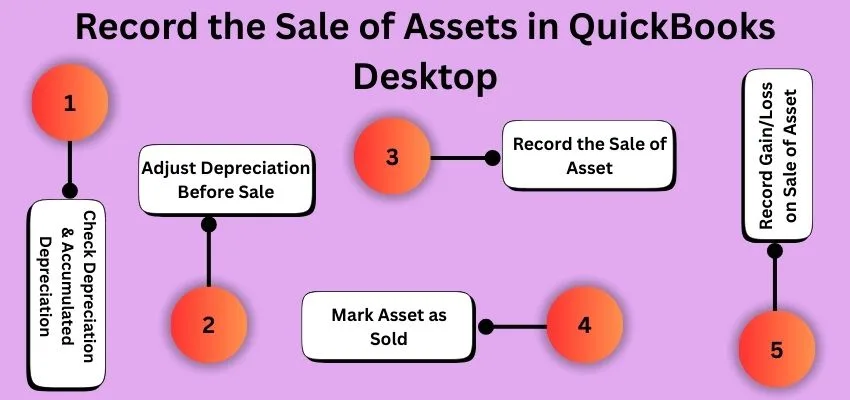
- Note down the original cost value of the sale price to find the information about the asset.
- Make a journal entry to record depreciation if needed.
- Through journal entries, credit the asset accounts to remove the sale and use a debit to accumulated depreciation.
- Create a sales Receipt for the sale price to keep a record.
- Then, post the gain or loss into the “Asset of gain/loss” account.
- Check the balances to see whether they match or not, then see the report for removing the asset.
Why Is the Record Sale of Asset in QuickBooks Important?
To record sale of asset in QuickBooks is important because the financial records are correctly kept and updated to track the profit and loss from the sale. It also removes the asset from the accounts for accurate recording, which was needed for proper tax filing and creating clear financial reports like the balance sheet and track income statements. It also makes planning and making decisions easier for the future to avoid errors and provide you with a picture of your business’s value.
Common Mistakes to Avoid
Mostly, people skip the linking asset with right accounts while they make a record sale of asset in QuickBooks to remove the accumulated depreciation, or misclassify the gain/loss. Through these errors, the profits and tax reports get complicated.
Some steps to Avoid Mistakes are mentioned below:
- Verify and check the details of the asset to purchase, including the price and value of books.
- Select the fixed-asset account to use a specific correct account.
- Adjust the accumulated depreciation to record and clear it before selling.
- Use a journal entry to record the sale receipts of the transaction.
- Record the payments of received money and separate it from any gain or loss.
- Confirm the reports to get matched with bank records to review them.
Reporting and Tax Considerations
When you sale of asset in QuickBooks, record to update books to enter the price of sale, remove the cost of assets, and accumulate depreciation. QuickBooks mostly shows the gain or loss in values of books. Through this your financial reports and tax filings gets affected and ensures the accurate income reporting and gain properly.
Best Practices and Tips

Conclusion
At the end of the conclusion, we conclude that your financial reports can be record sale of asset in QuickBooks correctly and prepared ready for taxes. By this process, you can ensure the compliance in QuickBooks with tax rules, clear financial reports with supports, and helps to avoid mistakes to make the finances of your business easier to manage and understand.