Running a 1099 report in QuickBooks Online helps you to track the payments that are made by contractors, independent to make preparation for tax seasons with ease. QuickBooks organizes everything together in one place to give a view of the totals, check details, and complaint with the rules of the IRS, instead of looking over the records. In this article, we’ll show you the steps by steps ho to run a 1099 report in QuickBooks Online quickly and exactly.
Important Things You Need to Know Before Starting The Topic
Before starting with the 1099 report in QuickBooks Online, we need to understand the basics of the 1099 report in QuickBooks Online is very important. It is one type of form used in reporting the payments, which are made to independent for contractors, freelancers, and other vendors who are not employees. You should know about the IRA, which is typically more than $600 in the calendar year. It overlooks the profiles of vendors, whether they are completed with their accurate tax details or not.
1099 report allows only payments like services, rent, or legal fees, which are included in it. And the excluded payments can be made through a credit card or any third-party processor. Similarly, set up reports in QuickBooks Online are made by vendors to simplify the accurate 1099 preparation of filters.
What is a 1099 Report in QuickBooks Online?
A 1099 report in QuickBooks Online is one type of process to track all your payments independently through contractors during the year. Those who require forms like 1099-NEC or 1099-MISC to send them through a paid over a certain amount for businesses. When calculating these payments manually, QuickBooks gathers all the information by itself automatically to show it in a clear report. It helps the vendors to make sure that they have set up correctly, and it checks the total amount twice. It is a quick way to stay organized by preparing the official 1099 forms.
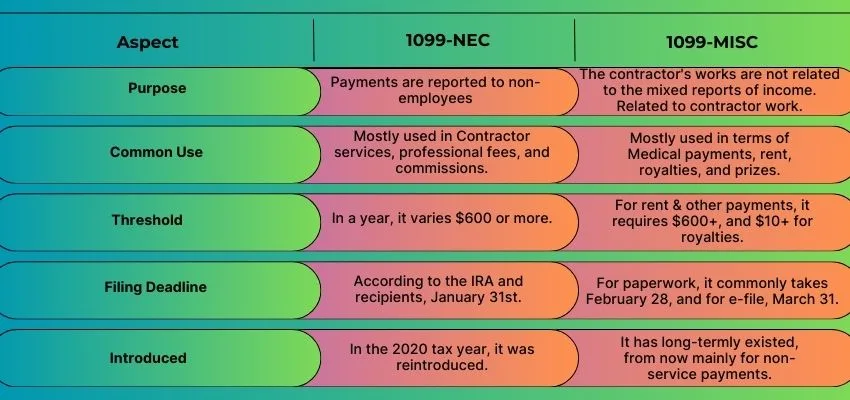
Comparing the Difference Between 1099-NEC and 1099-MISC
How to Set Up 1099s for Vendors in QuickBooks Online?
1099 in QuickBooks Online makes sure that accurate reporting at tax time can be set up for vendors. Before completing the entry of information, you will need the legal names, address, and taxpayer identification number of each vendor from their W-9 form to mark the vendor that they are eligible for 1099 tracking. While generating 1099 reports, QuickBooks gets help from this setup in which the right payments are included. Now, we’ll discuss the whole setup process in step-by-step formation mentioned below:
- Go to the expenses in QuickBooks Online > Vendors.
- Select the edit option for the vendor’s name.
- Click on the edit option to make changes by opening the details list.
- Complete the given details in the form, including the legal name, address, and Tax ID.
- Examine the boxes for tracking payments of 1099.
- Select the Save option to save it permanently.
Preparing to Run a 1099 Report in QuickBooks Online
Before running a 1099 report in QuickBooks Online, first make sure that the details of your vendor are accurate, properly tracking the payments, and in line with the IRS rules or not. To review the transaction categories and check the methods of payment, you need to confirm the information of each vendor on the W-9 form. This preparation it makes you sure that QuickBooks can generate a correct report on 1099 without any errors. Here we’ll guide you through the full process for preparing to run a 1099 report in a step-by-step mentioned below:
- Start by collecting all the information from the W-9 form of each vendor.
- After collecting, enter the details of a vendor in QuickBooks for taxes.
- Make an overlook of the amounts and make the payment into categories.
- Prohibit the payment methods of a credit card or any third-party process.
- Verify $600 IRS threshold by calculating the total of the meet.
- Run the report from 1099 in QuickBooks Online.
How to Run 1099 Report in QuickBooks Online?
1099 report in QuickBooks Online helps you to track the payments of contractors, which helps you to ensure accurate filing and generate the reports by selecting the vendors, reviewing payments, and applying filters with the IRS. Let’s start the step-by-step process to run a 1099 report as follows:
- Go to the expenses, then open the Vendors.
- Click the option Prepare 1099.
- To allow the tax information of the vendor, click on the Confirmation button.
- To categorize 1099, make an outline for accounts.
- View the payments again and confirm them.
- Generate the 1099 reports by selecting the vendors.
Common Issues When Running a 1099 Report
Some common issues frequently arise while running a 1099 report in QuickBooks Online. Sometimes, vendors were missing by putting the incorrect tax details in the W-9 forms or Tax ID. For these things, payments may appear wrongly by which shouldn’t be reported. In this case, unmapped accounts or misclassified expenses can also cause errors. It helps you to avoid mistakes carefully by reviewing the vendor’s profile. Here, we’ll discuss the following common issues as follows:
- Check the tax details of the vendor regularly.
- Don’t forget to verify the accuracy of the W-9 and Tax ID.
- Always prevent the payment methods from Credit cards or PayPal.
- Review the categories and mapping of expenses.
- To meet IRS thresholds, don’t forget to confirm the payments.
Tips for Smooth 1099 Reporting in QuickBooks Online
Smoothing the 1099 report in QuickBooks Online starts by running it by keeping the complete and detailed information about the vendor in the W-9 form and Tax IDs. Always try to categorize the expenses correctly so that the payments will fall under the reportable accounts. To avoid the year-end surprises, regularly review your transactions. Here are some tips in step-by-step formation for smoothing the 1099 report mentioned below:
- Collect the W-9 form and update it.
- Add the details accurately of the vendor for tax.
- Make a group to distribute the expenses correctly.
- Use the mapping system of QuickBooks for accounts.
- Regularly, overlook the payments to the vendor.
- For testing, run the 1099 report.
- Before the final filing, fix all the errors or solve the issues.
Filing Your 1099 Report with QuickBooks Online
It is a straightforward process for filing your 1099 report in QuickBooks Online by saving time duration of tax season. To make sure the name, address, and Tax IDs, first, you need to review the details of the vendor. Payments are automatically identified by QuickBooks to be eligible for 1099-NEC or 1099-MISC, which are totally based on the vendors and accounts as they are set up. It sends directly the forms and the copies of emails to the IRS and contractors by using the 1099 E-file services of QuickBooks. QuickBooks helps by keeping everything organized in one place and also reduces errors.
Conclusion
At the end of the conclusion, we conclude that the 1099 report in QuickBooks Online increases both your tax reporting time and accuracy, which is used only for tracking all your payments independently through contractors throughout the whole year. It is one of the best cloud-based accounting software programs in QuickBooks, used to manage your financial transactions for businesses.