Looking For how to convert QuickBooks Desktop to Online, then we are here to simplify things with adequate means of the solution and easy step to deal with a specific task. If you want to access your data from the office or permit access to the users who are outside of your company, then it is the best decision to switch or convert QuickBooks Desktop to Online. Read the full article to learn it better and do it on your own, while converting if you face any problem at any point then contact our QuickBooks ProAdvisor toll-free: +1-844-405-0904
QuickBooks is one of the best accounting software and is available in two versions online and desktop versions (QuickBooks Desktop and QuickBooks Online) because not every business or organization has the resources to run the Internet all the time.
If you want to access your data from the office or permit access to users who are outside of your company, then it is the best decision to switch or convert QuickBooks Desktop to Online.
Things to know before converting QuickBooks Desktop to Online
Advantages of Convert QuickBooks Desktop to Online
- One of the advantages you can get by converting QuickBooks Desktop to QuickBooks Online is that it is free. Intuit does not charge anything for importing data into the online version
- Efficiently compare reports of the previous year with the current year.
- The main benefit of converting QuickBooks online is that it creates a backup automatically. So you don’t lose your data in any condition.
- After converting to QuickBooks online you can access it from anywhere and anytime from your devices like smartphones, tablets, and laptops without any hassle.
- Converting to QuickBooks online ensures your data security due to save in the cloud so it is also secure from hackers.
- QuickBooks Online is compatible with other applications too so it helps in coordinating accounting with other departments of your organization.
Features Not Available in QuickBooks Online
Although we have evaluated QuickBooks Online as the most reliable small business accounting software. QuickBooks Online does not have some features that are available in the QuickBooks Desktop version. Before you convert the QuickBooks desktop to online, you must examine many benefits of QBO are deserving of losing any of the below desktop features
- Sales orders
- Fixed asset tracking with Fixed Asset Manager
- Price levels
- Estimate to actual reporting
Steps to convert QuickBooks Desktop to QuickBooks Online
Due to some additional features, many companies are converting their QuickBooks desktop to QuickBooks online like accessing QuickBooks from anywhere anytime and getting backup easily and automatically. So follow the methods if you also convert QuickBooks Desktop to QuickBooks Online.
Method 1. Verify Data
First, you have to verify the data and then follow the steps given below:
- Go to File first and then go to Utilities.
- Then next go to Verify.
- In case there is any issue while verifying the data then you can ask to rebuild the data.
- Then check the issue by verifying the data again that it has been solved or not.
Method 2. Save the Company file in QuickBooks online format
Here you need to create a company file copy that is compatible with QBO. For this, you need to go to Files and then Utilities, and after that go to the copy company files. Then save the file on the desktop that creates the QuickBooks file with the “OE.qbw” extension.
Method 3. Import QuickBooks Desktop to QuickBooks Online
You can import easily QuickBooks Desktop to QuickBooks Online through Internet Explorer.
- For this, you need to go to the “Company option” and then “More”.
- After that, select Import QuickBooks Desktop data.
- Then go to the File Option and import whatever file you want.
- Now after finishing the importing process, you’ll get the confirmation email.
Steps to convert QuickBooks Desktop File to QuickBooks Online
Step 1: Verify the Time and File Size Requirements
You are only allowed to import your data to QuickBooks Online within the initial 60 days of the subscription start date. If you have your QBO membership for more than 60 days, you have two options.
- Try to Find a QuickBooks ProAdvisor, who will help you to convert files in the first 180 days of its subscription start date.
- You can also set up a new QuickBooks online subscription by using another email address.
Step 2: Set Your QuickBooks Desktop Data for Export to QuickBooks Online
Follow the steps below to ensure that your data is ready for export
- Update your data: This is an opportunity to clear your data; For example, you can add or change the contact information of customers or vendors.
- Complete outstanding tasks: Ensure all bank accounts are consolidated, payroll is processed, and inventory adjustments are made before converting to QuickBooks Online.
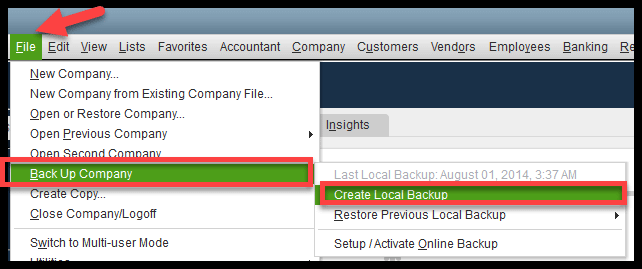
- Back up your data: Create a backup of the data file: The steps to create a backup are as follows.
- First, go to File select Backup Company, and then click on Create a local backup.
Step 3: Sign up for QuickBooks Online Account
Go to the official Intuit signup page for QuickBooks Online and enter all personal information like email address, name, mobile number, and password to secure your online account. It may also ask for additional information like your business.
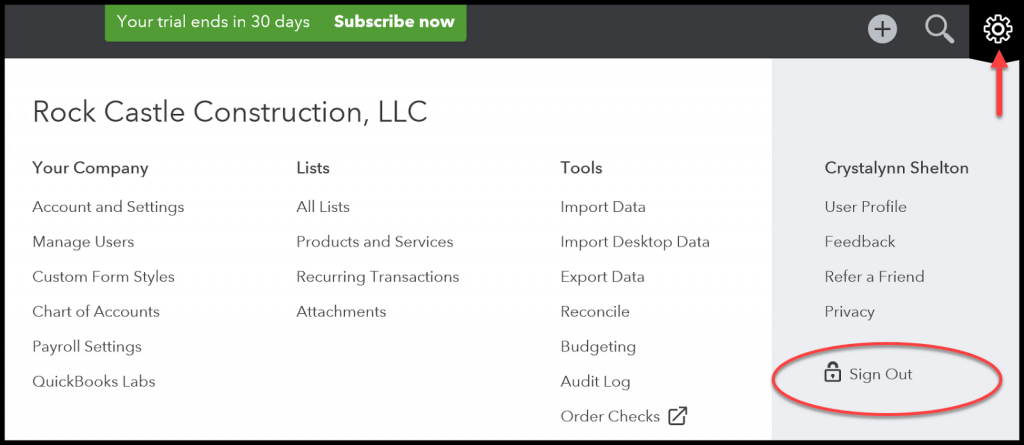
After sign up for your QuickBooks online trial subscription, you’ll be redirected to your company’s dashboard. You need to log out from QuickBooks Online in order to import your data from QuickBooks Desktop. To log out of QuickBooks Online, look at the right top corner, click on the gear icon, and choose sign out.
Step 4: Open QuickBooks Desktop
Login to your QuickBooks desktop program and sign in to the company that you want to convert to QuickBooks Online. You have to export your data from this account and into QuickBooks Online.
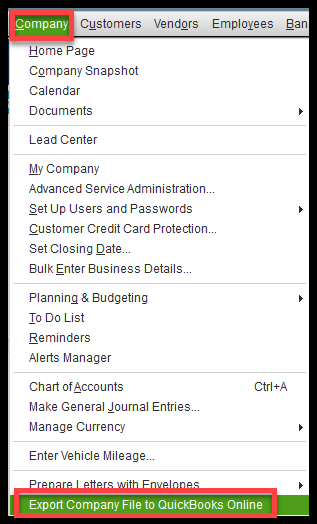
Step 5: Export the Company File to QuickBooks Online
- Open QuickBooks Desktop company, go to the company menu and choose Export Company File to QuickBooks Online.
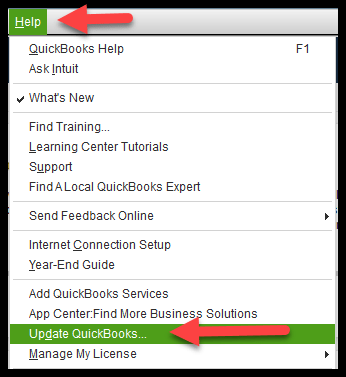
- If you are not able to find the export company file in the QuickBooks Online option then you will need to download the latest update of QuickBooks desktop.
- To update the latest version, go to the help menu and click on update QuickBooks.
- After the update is complete, close the QuickBooks desktop, reopen and sign in, then return to step 2 above
If your QuickBooks desktop program is more than three years old then you cannot update the program to export your company file because QuickBooks has stopped maintaining that old desktop program.
In this case, get a free 30-day trial subscription of the latest QuickBooks desktop and open your company file in the latest updated software, and your data file will be updated. By doing this, you are capable of exporting your company file to QuickBooks Online.
Step 6: Again Sign in to your QBO Account
When you select the data to export to QuickBooks Online then after QuickBooks desktop program will automatically open the QBO account sign-in window. Type your User ID and Password to log in to your QuickBooks Online account.
Step 7: Show whether you are required to import the inventory into QuickBooks Online
If you are maintaining your inventory in QuickBooks Desktop then it’s admired using the average costing method. But, if you prefer existing inventory to QuickBooks Online then it will be worth managing with the first out first (FIFO) inventory method. This can have a vital influence on the value of your inventory, as well as changing your inventory method should be reported to the IRS. Make sure to discuss with your accountant before importing your inventory.
If you click Yes (above picture) then the value of every inventory item can be recalculated by applying the FIFO method as the start date you select. As mentioned above, you need to discuss your accountant before importing your inventory and changing the inventory methods.
If you do not have an account and want to finish your conversion to QuickBooks Online then you can always import your inventory from an Excel spreadsheet after consulting an accountant.
Step 8: Select Your Company in QBO
From the drop-down list, select the QBO company you need to import. If in case, you skipped to set up your account then look for the Create New QuickBooks Online Company link and follow the on-screen guidance.
Step 9: Copy the Data File
Once you are done with all online instructions for choosing your company, you will see a notification the same as the notification below, whose copying process has started. The time it takes to process this depends on the size of your file. It may take several hours for a small file or a large file.
After copying your data file you will see a notification similar to the note below. Click OK, find the button, and log out of the QuickBooks desktop. After this, it recommends not to use QuickBooks Desktop because if you make any changes will not be exported to QBO.
Once your data is ready, you will receive an email stating that your data is ready to be reviewed in QBO, which is given below. Select the Complete your setup option to log in to QuickBooks Online and verify your data.
What are the different terminology used in QuickBooks Online
| QuickBooks Desktop Term | QuickBooks Online Term |
| Documents /Doc Center | Attachments |
| Income Tracker | All Sales |
| Forecast | Budgets |
| Upload & Review Bills | Receipts |
| Non-inventory Parts | Non-inventory |
| Reconcile | Reconcile |
| Payments | Not available in QuickBooks Online |
| Groups | Bundles (Products & services) |
| Subtotals | Subtotal |
| Price Levels | Not available in QuickBooks Online |
| Jobs | Sub-customersProjects |
| Unscheduled Payroll | Run PayrollBonus Only |
| Fixed Asset Items | Not available in QuickBooks Online |
| Memorized transactions | Recurring transactions |
| Other Names | Not available in QuickBooks Online |
| Commented reports | Not available in QuickBooks Online |
| Vendor Types(Vendor and Customer Profile Lists) | Not available in QuickBooks Online |
| Customer Messages(vendor and Customer Profile Lists) | Not available in QuickBooks Online |
| Vehicles(Vendor and Customer Profile Lists) | Manage vehicles |
| Add/Edit Multiple List Entries | Not available in QuickBooks Online |
| Employees | Employees |
| Chart of Accounts | Chart of Accounts |
| Terms(Customer & Vendor Profile Lists) | Terms |
| Memorized reports | Custom reports |
| Receipt Management | Receipts |
| Company Snapshot | Business Snapshot |
| Bills | ExpensesBillsVendor Credits |
| Item Receipts | ExpensesBills |
| Credit Memos | Credit MemosRefund ReceiptsDelayed Credits |
| Transfer Funds | Transfer |
| Make General Journal Entries | Journal Entries |
| Invoices | Invoices |
| Statements | Statements |
| Purchase Orders | Purchase Orders |
| Sales Receipts | Sales Receipts |
| Scheduled Payroll | Run Payroll |
| Undeposited Funds | Undeposited FundsPayments to deposit |
| Edit > Preferences | Settings (gear) > Account and Settings (gear) > Payroll settings |
| Weekly Timesheet | Time Entries (If you have the Time tab)Weekly Timesheet (if you don’t have the Time tab) |
| Calendar | Not available in QuickBooks Online |
| To Do List | Tasks (QuickBooks Online Advanced) |
| Letters | Not available in QuickBooks Online |
| Bank Feeds | Online Banking / Bank Transactions |
| Bill Tracker | Vendors window |
| Payment Reminders | Reminders / Automatic invoice reminders |
| Budgets | Budgets |
| Schedule Online Payment | Online Bill Pay |
| Other Charges | Not available in QuickBooks Online |
| Discounts | Not available in QuickBooks Online |
| Assemblies | Bundles (Products & services) |
| Inventory Parts | Inventory |
| Items | Products and services |
| Services | Services |
| Billing Rate Levels | Not available in QuickBooks Online |
| Leads | Not available in QuickBooks Online |
| Customers | Customers |
| Vendors | Vendors (for all Vendors)Contractors (for Vendors tracked for 1099) |
| Sales Reps(Customer & Vendor Profile Lists) | Not available in QuickBooks Online |
| Job Types(Customer & Vendor Profile Lists) | Not available in QuickBooks Online |
| Ship Via(Customer & Vendor Profile Lists) | Not available in QuickBooks Online |
| Templates | Custom Form Styles |
| Scheduled reports | Custom reports |
| Classes | Classes (and Locations) |
| Customer Types(Customer & Vendor Profile Lists) | Customer Types |
| Payment Methods(Customer & Vendor Profile Lists) | Payment Methods |
| Customer Groups | Not available in QuickBooks Online |
| Custom reports | Custom reports (QuickBooks Online Advanced) |
| Credit Card Charges | ExpensesCredit Card Credits |
| Job & Item Estimates vs Actuals | Not available in QuickBooks Online |
| Set Up Users | Manage Users |
| Reminders | Not available in QuickBooks Online |
| My Company | Settings (gear) > Account and settings |
| Time / Enter Single Activity | Time Entries (If you have the Time tab)Single Time Activity (if you don’t have the Time tab) |
| Receive Payments | Receive Payments |
| Use Register(For Banks/Accounts) | View Register |
| Pay Bills | Pay Bills |
| Estimates | Estimates |
| Checks | Checks |
| Make Deposits | Bank Deposits |
| Enter Statement Charges | Not available in QuickBooks Online |
| Batch Invoices | Batch transactions (QuickBooks Online Advanced) |
| Adjust Quantity/Value on Hand | Inventory Quantity Adjustment |
| Sales Orders | Not available in QuickBooks Online |
Import QB Desktop (.qbw file) to QuickBooks Online
Points to remember:
- Keep in mind that you will be able to move company files to QuickBooks Online only within 60 days after signing in.
- If you have already set up payroll in QuickBooks Online, then you should move lists instead of company files.
- You may not be able to convert some of your lists and reports due to the feature difference.
Step 1: Prepare QuickBooks Desktop Company files
- Update your QuickBooks Desktop to the latest version.
- Make sure your company file’s size isn’t too large to export.
Step 2: Import QuickBooks Desktop file to QuickBooks Online
For QuickBooks Desktop Pro and QuickBooks Desktop Premier
- First open QuickBooks Desktop and then log in to the company file as admin that you want to import.
- Then, select the Company option and then click on the Export Company File to QuickBooks Online option.
- After that, select the Start your import option.
- Then, you need to login to your QuickBooks Online as admin.
- If you use inventory tracking in QuickBooks Desktop. Then,
- Select Yes, if you want to bring inventory and select the date as of date.
- Select No, if you want to create a new inventory later in QuickBooks Online.
- From the Choose Online File drop-down menu, select the QuickBooks company file that you want to be replaced by the QBD company file.
- After selecting the file, select Continue.
- Here, in the text field type ‘Agree’ and select Replace.
- At last, click on the Yes, go ahead and replace the data option and select Replace.
NOTE: If you are using an older version than 2017, then you need to use a QuickBooks Desktop Trial version for converting company files.
For QuickBooks Desktop Enterprise
- First, open QuickBooks Desktop Enterprise and log in as admin to the company file you want to import.
- Then, you need to open the product information window. For this, press Ctrl + 1 on your keyboard.
- After that, press Ctrl+ B + Q and then select OK.
- Now, in the export window, select Start your Export.
- Next, you need to log in to your QuickBooks Online Company with administrative credentials.
- If you use inventory tracking in QuickBooks Desktop Enterprise. The,
- Select Yes, if you want to move inventory too.
- Select No, if you want to set up inventory in QuickBooks Online.
- Then, from the Choose Online Company drop-down menu, select the QBO company file you want to be replaced by the QBD file.
- After selecting the company file, select Continue.
- In the text field, type ‘Agree’ and then select the Replace option.
- Finally, click on the Yes go, ahead and replace the data option and then select Replace.
NOTE: If you use QuickBooks Desktop Enterprise advanced features such as advanced reporting or advanced inventory then you may not be able to convert some of your data into QuickBooks Online. Therefore, we recommend you to start from scratch in QBO.
If you still want to continue to use these advanced features then you could try QuickBooks on cloud or QuickBooks Online Advanced, both support these advanced features.
Step: 3 Check whether your books match or not
You can run your financial report or matchbooks between QBO and QBD to make sure that your import was successful.
- Open a report like profit and loss statement on accurial basis in QuickBooks Desktop.
- Then, run the same report in the QuickBooks Online.
Reasons to Convert From QuickBooks Desktop to Online
There are benefits to starting QuickBooks Online from scratch rather than getting your data from QuickBooks Desktop to QuickBooks Online. If you have been in business for at least one year, you will want to have access to the current financial data of your business so that you can run a comparison report. In addition, converting your data preserves your customer and seller transaction history and your item lists.
There are mainly three main reasons to convert QuickBooks Desktop to Online.
1. Get the Facility to Run Comparison Reports
Whether you have been in business for 12 months or a few years, one of the benefits of having access to historical data is that you can run reports to compare previous years with the current year. With this, you can see trends in income and expenses. These trends can help you make decisions that may affect the future of your business.
2. Maintain Vendor & Customer Transactions
Transferring data of QuickBooks desktop to QuickBooks Online maintains all the previous transactions with vendors and customers. If in case, in the future if we need prepayment from customers then you do not have to open your old books on the desktop to find the answer. All your current and past information you can find in one place only.
3. Maintain QuickBooks Items
Being a QuickBooks desktop user you must be friendly with the importance of absolute and exact item lists that are used in payroll, invoicing, purchasing, and other fields. QuickBooks Online uses the same item lists. While converting your existing company, you do not save time to recreate these long lists.
When not to convert QuickBooks Desktop to QuickBooks Online
There are mainly two situations where it highly recommended not to convert QuickBooks Desktop to QuickBooks Online.
- The first situation is when your file contains over 350,000 targets. The most suitable option for these companies is to export desktop lists so that customers, vendors, and items do not have to be recreated.
- The second situation: If your desktop books are messed up, you may not even want to change your data. In that case, you need to start with scratch.
Steps to Transfer Lists From QuickBooks Desktop to QuickBooks Online
When a complete conversion of your QuickBooks desktop data is not possible or appropriate, then you have the best option is to manually transfer individual lists of data by an Excel spreadsheet.
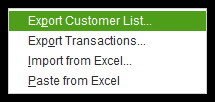
- To export manually a list from QuickBooks Desktop, first display the list and choose the Excel option placed in the toolbar.

- In the drop-down options, click on the Export Customer List.
What transactions can be moved to Quickbooks Online from Desktop and what cannot?
If you move from QuickBooks Desktop to Quickbooks Online then many transactions cannot transfer to QuickBooks Online that are given below:
- Journal entries billable cannot be made or moved to the QuickBooks Online.
- Invoices that are continued cannot shift with their additional field.
- Subtotals of the invoice also can’t shift but they can be added in the Description field.
- While switching to QuickBooks online the connection between the purchase orders and the bills is deleted. Then PO is required for showing the Items received.
- Pending sales can not move to the QuickBooks Online.
- If you want to shift your previous reconciliations reports to QuickBooks online then it can’t be shifted.
Transactions that can be moved to QuickBooks Online
- If you want to move your credit card charge then you can move easily but it changes to Expenses in QuickBooks Online.
- Finance charges can also shift to invoices to QuickBooks online.
- You can run an open invoice report to check the overdue of the customers. You can add finance charges manually on the next invoice.
- You can shift Bills, Bill payments, and Bill Credit. Bill discount shifts to a vendor credit in QuickBooks online.
- Logos will shift to the QuickBooks Online.
- The purchased orders will not show the particulars of items received it is required to connect to the bill to show the item received.
- Item receipts can be shifted to QuickBooks Online it changes to bills.
Things To Do After You Import Data to QuickBooks Online
Before you start working in QuickBooks Online, you must verify that your data was imported successfully. The best method to do this is to run a profit and loss statement and balance sheet report in both QuickBooks Desktop and QuickBooks Online and compare totals.
Note: If you are a cash base business, use the accrual method for these reports
Use the following parameters for both parameters.
- All dates
- Accrual method
Once your company is set up and ready. Then, you can
- Connect Bank account in QuickBooks Online
- Create and send invoices to customers
- Track your expenses in QuickBooks
The more important thing, sometimes after converting QuickBooks Desktop to Online users have no idea what to do next. To know more about what to do after converting QuickBooks Desktop to Online.
Frequently Asked Questions
Now, we are going to discuss some most frequently asked questions by many users. Read the questions and get know more about converting QuickBooks Desktop to Online version.
How long does it take to convert QuickBooks Desktop to QuickBooks Online?
The conversion of QuickBooks Desktop to QuickBooks Online takes about 30 minutes to complete. Keep QuickBooks Desktop running until the conversion is finished.
Can I go back to the QuickBooks Desktop?
You can’t directly switch to QuickBooks Desktop. You need to perform some manual functions to export and convert online data to the desktop version. If you use multicurrency in QuickBooks Online, your data will not export correctly. Make sure to use the latest version of QB Desktop to start.
What data does not convert from QuickBooks Desktop to QuickBooks Online?
While converting to QuickBooks Online, some data doesn’t move. Data that doesn’t move includes, custom templates, audit trails, memorized reports, removes the link between bills and purchase orders, billable journal entries don’t move, and existing users need to be invited from QuickBooks Online to gain access.
What to do after you convert or migrate the Data
1. Compare the reports in QuickBooks Desktop and QuickBooks Online that is Trial balance, Balance sheet, Supplier balance summary, Customer balance summary, and sales tax summary.
2. Confirm company settings like the company’s name address and email.
3. Check your Sales Tax settings but in case your organization is not registered in sales tax then you can skip this step.
4. After moving to QuickBooks online bank and credit card information doesn’t move so you have to connect bank and credit card accounts.
5. After finishing the migration to QuickBooks desktop you need to complete the setup of the payroll
We hope, this article helps you to convert QuickBooks Desktop to Online and also gives you a guideline on things to do after converting. But if you still have any questions or query then feel free to reach us on our 24/7 toll-free support number +1-844-405-0904 and discuss your query with our team of Intuit-certified ProAdvisors and get the immediate solution.