Are you keen to know how to edit and create a journal entry in QuickBooks? Do you know a journal entry can be easily created, edited, reversed, and deleted on your own or with the assistance of your accountant? It will help you to easily analyze and manage your financial data. Here you will learn how to create, edit, export, import, adjust, reverse, and delete journal entries in QuickBooks Online and QuickBooks Desktop. For further assistance, dial our toll-free number +1-844-405-0904.
The accounting transactions that are entered directly into a QuickBooks general ledger are called journal entries. They are used as a last resort to document and record financial transactions when there is no designated form set up for them. They are also used to transfer funds within different accounts in QuickBooks Online and QuickBooks Desktop.
Basically, in accounting, a journal entry has two parts – a debit and a credit. The total of the debit column is always equal to the total of the credit column. QuickBooks Online feed the transactions in the register or account history as journal transactions and journal entry on the report where transactions are listed.
You can use a journal entry if:
- When you have to send money between income and expense accounts.
- When you need to transfer money from an asset, liability, or equity account to an income or expense account.
- You prefer the traditional system of accounting, that is, entering debits and credits in a journal or ledger.
Always remember that you should only use journal entries in QuickBooks when money is being moved between transactions and QB accounts.

How to Create a Journal Entry
Here we have discussed the steps for journal entry creation in QuickBooks Online and QuickBooks Desktop. You should always discuss with an accounting professional for advice If you have no idea which account receives the debit and the credit side of a transaction.
Add a Journal Entry in QuickBooks Online
Now follow the given instructions to create a journal entry in QuickBooks Online:
Now follow the given instructions to create a journal entry in QuickBooks Online:
- On the top, choose the Plus icon (+) New, and then select Journal Entry.
- Now enter the required information in the distributions line.
- First Distribution Line: Go to the ‘Account‘ field, and put the amount in the correct column, according to your debit, and credit account needs. Or choose any accounting chart of accounts.
- Second Distribution Line: Now choose another account, where you are moving money to or from. And if in the first line, you have entered the account of debit or credit then enter the same amount in this column.
- Now you need to check whether both columns are balanced or not. Make sure that, the credit column is on the first line, and the debit column is on the second line. If everything is perfect then accounts are in balance, you need not do anything about it.
- Go to the ‘Credit Memo‘ section, and enter information to make a journal entry.
- Journal Code (France only): Enter the journal code associated with the account. If it’s necessary then you can add a new journal code. You have to use the same journal code which is associated with the transaction for both the debit and credit accounts.
- Debits or Credits: Normally the first line is Debits. You can find these transactions in the recent transactions report. Check if the Debit had changed according to your choice or not After you save the transaction.
- Description (Optional): you can enter the description to see the details of the transaction on reports.
- Name: Select a customer, vendor/supplier, or employee associated with the line, if any.
- At last click the ‘Save and New‘ option or the ‘Save and close‘ option.
Add a Journal Entry in QuickBooks Desktop or QuickBooks Desktop for Mac
These are the steps given for adding a journal entry in QuickBooks Desktop for Windows and QuickBooks Desktop for Mac.
- Open QuickBooks and go to the Company menu.
- Click on the option Make General Journal Entries.
- To create a new journal entry, fill out the required fields. Always ensure that both the debit and credit are equal.
Edit Journal Entries In QuickBooks
Follow the below steps to edit journal entries in different versions of QuickBooks.
Edit journal entries in QuickBooks Online.
Follow the below steps to edit journal entries in QuickBooks Online.
- Go to Gear icon and look for the Chart of Accounts.
- Find the appropriate account for the Transaction.
- Go to the Action column, and click on Account history.
- Click on the journal entry and choose Edit.
- Click on Reverse under the transaction window,
- Select Save and close or Save and new.
Edit journal entries in QuickBooks Desktop.
- Open QuickBooks and go to the Company menu.
- Click on the option Make General Journal Entries.
- Find and click the journal entries
- QuickBooks for Windows users click Find and enter the Name, Date, entry no, and amount. and click Find.
- QuickBooks for Mac users click Journal entry from the list present on the left side of the Make General Journal Entries.
- Select your Journal entry and make changes. When the process gets complete, click Save or Save & Close.
- Save changes by selecting Yes.
Export Journal Entries from QuickBooks
Here’s how you can export journal entries in both editions.
How to Export Journal Entry from QuickBooks Online
There are two scenarios to export journal entries from QuickBooks Online. Here are the scenarios, and the procedures to export journal entries:
Case 1: If There are Existing Journal Entries
Lets us see how you can export journal entry from QuickBooks if there are existing journal entries. Here the steps are given below:
- From the Accountant menu, select Send general journal entries.
- Select one of the following:
- Choose from the dates drop-down
- Enter the appropriate date in the form and to date to filter the list of journal entries.
- Check the box next to the journal entry you want to export.
- You can edit the journal entry before sending although it is optional. Follow the steps to edit a journal entry:
- Select the link in the accountant column.
- Go to the make general entries window and update the entry.
- Select save and close.
- If you want to verify that your recipient imports all the journal entries, uncheck the Allow recipient to select which GJEs to post to the file box.
- Send the journal entries to the recipient:
- Click on the email as an attachment to send the journal entries now.
- Select save as the file to save the journal entries as a . QBJ file that can be attached to an email.
Case 2: If There Are No Existing Journal Entries
Now, look at the second scenario when there are no existing journal entries:
- From the Attachment menu, select Make general journal entries.
- Enter a journal entry then save it.
- Select send GJEs.
- You can edit the journal entry before sending although it is optional. Follow the steps to edit a journal entry:
- Select the link in the accountant column.
- Go to the make general entries window and update the entry.
- Select save and close.
- If you want to verify that your recipient imports all the journal entries, uncheck the Allow recipient to select which GJEs to post to the file box.
- Send the journal entries to the recipient:
- Click on the email as an attachment to send the journal entries now.
- Select save as the file to save the journal entries as a . QBJ file that can be attached to an email or transferred to portable media.
Export Journal Entries in QuickBooks Desktop
Steps are given to export the journal entries in the QuickBooks Desktop using the IIF file. To export, make sure to sign in to the company file as an administrator and that you are on single-user mode.
- Click on the File menu and click Switch to single-user mode.
- Go back to the File menu and click Utilities.
- Select Export and click Lists to IIF Files.
- Choose the files you want to export and click OK.
- Select the IIF file location and enter the file name and click CSV file.
How to Import Journal Entries in QuickBooks
Here’s how you can import journal entries as a CSV file (Comma Separated Values) in QuickBooks Online and an IIF (Intuit Interchange Format) file in QuickBooks Desktop.
Import as CSV File in QuickBooks Online
Note: It is recommended to turn off the account number before importing your journal entries. This will assure a smooth import. The account number can be turned back on the completion of your import.
Step 1: Prepare your Spreadsheet
Make sure everything seems correct in your spreadsheet before you import your journal entries
- Fill in the required columns:
- Journal No
- Journal Date
- Account Name
- Debits
- Credits
- Select date format
- If you have new accounts in your spreadsheet, be sure to add them to your accounts chart before importing.
Step 2: Import your Journal entries
Now begin importing your journal entries,
- First, click on Settings ⚙️, look for Import Data and click on it.
- Click on Journal Entries.
- Now, go to the Download page, and click on Browse. Note: If you want any help with formatting your journal entries, click on Download a sample file.
- Browse and click your CSV or Excel file. Click on Open, and later click on Next.
- Now, you need to map your information. Your Field shows the headers on your spreadsheet. From each small arrow ▼ icon, click on the one that matches a field in QuickBooks Online.
- Click on Next. If there’s an error, edit the file and try again.
- Next, click on Start import.
- Click on Done.
Once you are finished with the above steps, you can use the search function to check and edit the journal entries.
Import as IIF File in QuickBooks Desktop
Before importing files make sure to backup your company file. Here is the process of importing journal entries in QuickBooks Desktop for the QBDT 2020 and higher versions.
- Right-click on the QuickBooks icon and select Run as administrator.
- QBDT should be in Single-user mode.
- Choose the File menu and click Utilities.
- Select Import and then IIF Files.
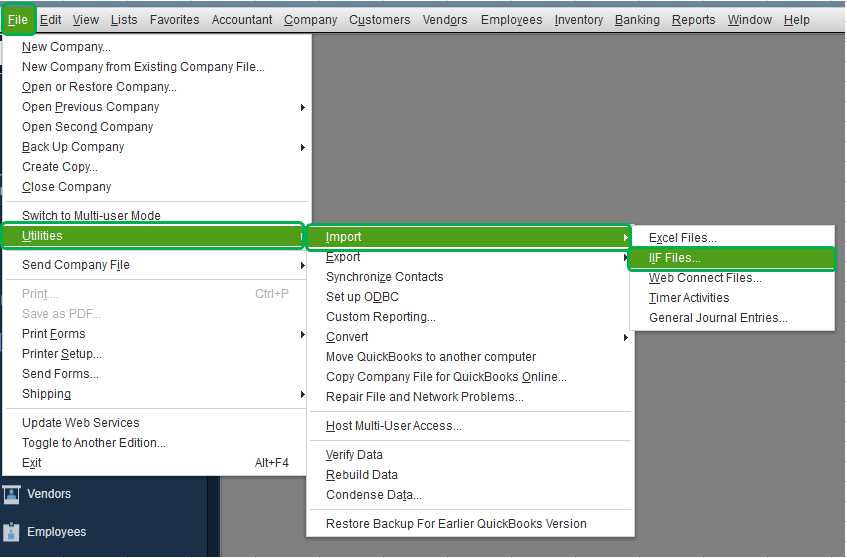
- Choose the file you want to import and click Open.
- Click on the OK button.
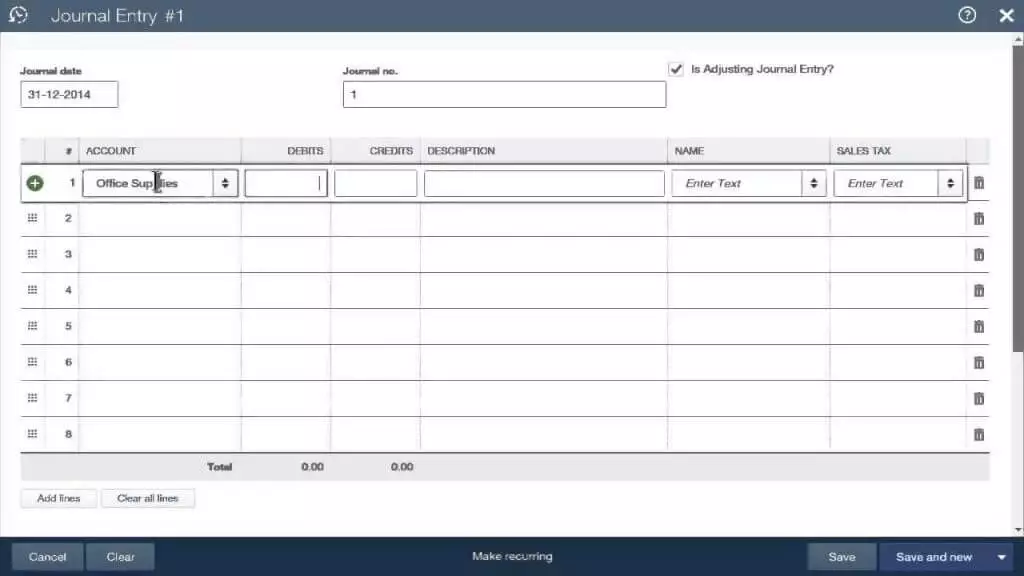
How to Enter an Adjusting Journal Entry
Adjusting journal entries in QuickBooks Online is only applicable only for the client’s QuickBooks Online company file.
- Login to QuickBooks Online Accountant, and select the ‘Go to QuickBooks‘ drop-down menu to select the client’s company.
- Click + New, and select the Journal Entry option.
- After that, checkmark the Is Adjusting journal entry in QuickBooks.
- Now you will be guided by Intuit with the on-screen instruction to record the journal entry. Or if you already know, how to record a journal entry then you can do it on your own.
- At last, save all the changes, and close it. Or click on the Save and Close option.
How to Review the Adjusting Journal Entries
After entering the adjusting entry in QuickBooks Online, you need to review it. For this, you need to run an adjusted trial balance report.
This process, list all of the account balances in the general ledger before, and after making the adjusting journal entries. Apart from that, the total adjusting entries can be listed in this process.
- Visit your QuickBooks Online Accountant account.
- Now in the search bar, enter Adjusted Trial Balance.
- Otherwise, go to the ‘Reports‘ menu, and select the Adjusted Trial Balance report.
- Now adjust the report, by selecting the Customize option.
- Ensure that, the total debit balance is equal to the total credit balance.
Reverse the Journal Entry
If you need to fix a debit or credit error or to allocate a transaction between two accounting periods, follow these steps to reverse the journal entry. It doesn’t delete the original one but reverses the debit and credit.
Reverse a Journal Entry in QuickBooks Online
- Click on the Setting icon and then select Chart of accounts.
- Find the account you created the journal entry for and click View register.
- Find the journal entry in the account register. Journal should be in the Type column or Ref No.
- Expand the view by selecting the journal entry. Click Edit.
- Click Reverse.
- Select Save.
Reverse a Journal Entry in QuickBooks Desktop
- Go to the Company menu and click Make General Journal Entries.
- Find and click on the journal entry you need to reverse:
- QuickBooks for Windows users: Select Find and enter the Name, Date, Entry no., or Amount. After that click Find.
- QuickBooks for Mac users: Find and select the journal entry you want to reverse on the left side of the Make General Journal Entries window.
- Select Reverse and then click Save or Save & Close.
Delete a Journal Entry
If you created a journal entry by mistake, you can delete it permanently. Before deleting, make sure you actually need to delete this entry because it unbalances your accounts.
Delete a Journal Entry in QuickBooks Online
- Go to the Settings icon and select Chart of accounts.
- Search for the account you created the journal entry for and click View register.
- In the account register, find the transaction. Journal should be in the Type column or Ref No.
- Expand the view by selecting the journal entry.
- Select Delete and click Yes to confirm.
Delete a Journal Entry in QuickBooks Desktop
- Select the Company menu and click Make General Journal Entries.
- Find and click on the journal entry you need to delete.
- QuickBooks for Windows users: Select Find and enter the Name, Date, Entry no., or Amount. After that click Find.
- QuickBooks for Mac users: Find and select the journal entry you want to delete from the left side of the Make General Journal Entries window.
- Delete the transaction:
- QuickBooks for Windows: Double-click the journal entry and click Delete or Void and then select OK.
- QuickBooks for Mac: Click Delete General Journal from the Edit menu.
- Select Save & Close.
Frequently Asked Questions
How to Create a Journal Entry after Editing or Deleting the Journal Entry in QBO?
The following are steps given below:
1. Click on the +sign and select the Journal Entry option to create a new one.
2. Fill in all the details correctly, and check if the debit and credit columns are equally balanced.
3. Go to the Credit Memo section and provide the information to create a new Journal Entry.
4. Finally click on Save and Close buttons.
What are the Few Things to Remember about Journal entries while Editing or Deleting in QuickBooks Online?
Here are a few things about journal entries that you have to take care of:
1. Each currency must have its own journal entry because QuickBooks Online does not support multi-currency in a single journal entry. Sometimes multiple currencies do not convert to the correct rates.
2. To show on the sales or expense tab, make sure that the entry has a line for either Account Receivable or Accounts Payable. And also the name of the vendors or customers.
3. You can see the additional columns for location and class If you are using QuickBooks Online Plus. And the feature of Classes and Locations tracking is turned on.
4. If any entry is created by mistake and you need to correct the transaction. You can delete or reverse a journal entry.
It’s all about the journal entries in QuickBooks Online and QuickBooks Desktop. In this article we have learned how to enter, edit, import, export, adjust, reverse, and delete a journal entry. Contact our certified QuickBooks experts through the toll-free number +1-844-405-0904, if you are dealing with any kind of doubts or queries.