Intuit ViewMyPaycheck is the only way for the employees to get, and track their paycheck, pay stubs, and W-2s details. But what, if it will not work? We have all the solutions in this article. So you don’t need to worry if Intuit ViewMyPaycheck not working. In this article, we will show you the common solutions for this issue and some of the scenarios, you may face while using ViewMyPaycheck in QuickBooks Workforce. In the meanwhile, you can contact the QuickBooks ProAdvisor through the toll-free number +1-844-405-0904 for instant troubleshooting solutions.
Intuit comes with some of the top-notch features to add user experience to its applications. QuickBooks ViewMyPaycheck allows uploading paycheck information to Intuit’s servers. This feature is available to all QuickBooks Online users and is part of the payroll subscription cost. It is not that this feature is completely correct.

Solutions to Resolve View My Paycheck Not Working Issue
To solve the ViewMyPaycheck issue, here we have mentioned some of the effective solutions. All of the solutions are given by our certified QuickBooks experts and experienced by our old clients. You can go for the solutions without any hesitation to solve the issue;
Solution 1: Clear Browser Cache & History
Clear browser cache if you are getting an error while sending paystub data to view my paycheck.
For Chrome Users
If you are a Google Chrome user, then follow the steps to clear browser cache and history;
- Open Google Chrome and type; (chrome://settings/clearBrowserData) in the address bar.
- A clear browsing box will appear on your screen. You will get the browsing data in 2 different sections; Basic, and Advanced.
- In Basic, checkmark on the ‘Browsing History, Cookies and other site data, Chaced images and files’.
- Then click on the ‘Clear Data’ to clear all of the basic browser histories.
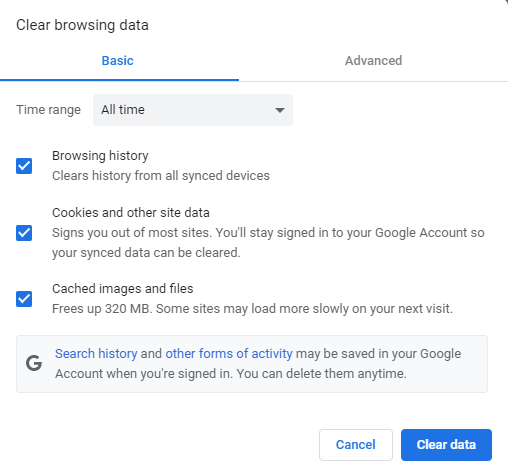
- In Advance, checkmark on the options, you to clear. This includes Browsing history, Download history, Cookies, and other site data, Cached images and files, Password and other sign-in data, Autofill form data, Site settings, and Hosted app data.
- Click the ‘Clear Data’ option.
- You can also adjust the time range, according to your need.
- After deleting all of the data from the browser, close the chrome, and reopen it.
For Firefox User
If Firefox is your default browser then follow these steps to clear cookies and temporary files. Here we have two methods to clear up the cache, and cookies; Automatically, and manually. Choose any one of the methods to clear the cache.
- Auto Clear of Cache
- Open the Mozilla Firefox browser.
- Click on the ‘Menu button’, and select the ‘Settings’ option from the list.
- After that, click on the ‘Privacy & Security’ option from the list.
- And then, visit the ‘History’ section.
- Select the ‘Use Custom Settings for History’ option from the ‘FireFox will’ drop-down menu.
- Tick mark on the ‘Clear history when Firefox closes’ box.
- Then, click on the ‘Settings’ option then checkmark on the ‘Cache’ option.
- At last, click the ‘Ok’ option.
- Initiate a Firefox browser.
- Look for the Settings icon to the top right, and click on it.
- Choose Privacy and General.
- Scroll down and look for the Cookies and Site Data.
- Tap on Clear Data and check-mark, cookies and Sites, and Cached Web Content.
- Lastly, choose Clear.
- Manual Method
- Click on the ‘Menu’ button, and select the ‘Settings’ option.
- Visit the ‘Cookies and Site Data’ section to choose the ‘Clear Data’ option.
- Uncheck mark on the ‘Cookies and Site Data’ box.
- Click on the ‘Clear’ option.
- Now, you can see that all of the cache and cookies are deleted.
For Internet Explorer
If you are an Internet Explorer user, then you can follow the steps to clear cache, and history from the browser.
- First, open Internet Explorer.
- Go to the top-right corner of the menu, and click on the ‘Settings’ option.
- Select the ‘Saftey’ option from the drop-down menu.
- Then, you can see a dialogue box, titled ‘Delete Browsing History’.
- Checkmark on the ‘Temporary Internet files and website files’ box.
- You can also select the other data if you need to clear them.
- Then, click the ‘Delete’ option on the dialogue box.
- Internet Explorer will confirm with a message that, all of your data is cleared now.
For Safari Users
Follow the procedure, if you are a Safari user;
- If you have Safari 6 and 7:
- First of all, open Safari browser on your Mac system.
- Click on the ‘Mac menu bar’ to select the ‘Safari’ option then the ‘Preferences’ option.
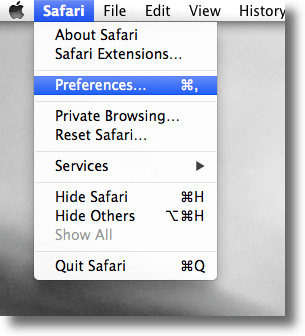
- Then click on the ‘Privacy’ tab for the ‘Remove All Website Data’ option.
- After that, select the ‘Remove Now’ option.
- Visit the ‘Advanced’ tab, and tick mark on the ‘Show Develop menu in menu bar’ box.
- After that, click on the ‘Develop’ tab from the ‘Safari’s menu bar’.
- Choose the ‘Empty Cashes’ option.
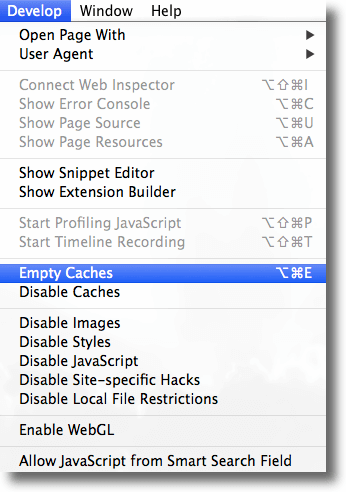
- All of the cache are cleared now.
Alternative Method:
- Click on the ‘Safari’ tab, and select the ‘Reset Safari’ option.
- Checkmark on the ‘Clear History’ box, and then the ‘Remove all website data’.
- After that, click the ‘Reset’ option.
- If you have the Safari 8:
- First, go to History, choose the ‘Clear History & website data’ option.
- Choose the time frame of all history on the drop-down menu.
- This step will clear all history, cookies, and other website data.
- Shut down all the open Safari windows and restart the browser.
Solution 2: Use Private Browser Window for ViewMyPaycheck
Use private windows of your browser to log in to the QuickBooks Workforce. Here we have given some of the keyboard shortcuts to open the windows. Have a look;
- Google Chrome: Press Ctrl+Shift+N for Incognito Window
- Internet Explorer: Press Ctrl+Shift+P for private Window
- Safari: Press Command+Shift+N to open the private window
Types of Scenarios & Its Solutions in View My Paycheck
While working on QuickBooks Workforce, you may face different types of scenarios. In this section, we will discuss that, and also its solutions.
Scenario 1: If, You are Unable to See anything in ViewMyPaycheck
Follow the procedure carefully, and solve the issue, if you are unable to see anything in the ViewMyPaycheck.
Step 1: Adjust Printing Preferences
Follow the steps to adjust the printing preferences;
- Go to the Settings symbol and choose Payroll Settings.
- Click on Paycheck Printing from the Preferences section.
- Choose the Plain paper stubs and hit OK.
Step 2: Print Paycheck
Follow the steps to print paychecks;
- First, go to the Workers to print pay stubs.
- Choose Employees and from the My Payroll section, select Paycheck List.
- After that, select the paychecks.
- Then, click on the ‘Print’ option.
Scenario 2: “Something Is Not Quite Right” Error Message
If you find the error message that, ‘Something is not quite right’, then you should follow the above common solutions to solve the issue.
Clear all of the cache, browser history, and temporary files. After that restart your system. If still, the error message creates problems to use the QuickBooks Workforce, drop a call to us on the toll-free number +1-844-405-0904. Our experts will assist you to solve the issue immediately.
Scenario 3: “View my paycheck can’t see what was accrued each check” Issue
Read following are the ways to view the accrued hours per paycheck. Use these steps, if you can’t see what was accrued under every check-in view my paycheck.
- At first, open the ‘ViewMypaycheck’, and select the ‘Paychecks’ option.
- Open anyone of the paycheck, and click the ‘View Details’ option.
- At last, click on the ‘Download’ option.
How to Invite Employee into Intuit ViewMyPaycheck
If you want to invite an employee to the Intuit ViewMyPaycheck program for the first time, you can follow the below procedure;
- At first, log in to QuickBooks, by using your Intuit credential.
- Click on the ‘Employee’ option from the ‘Payroll’ tab.
- After that, click on the ‘Add an employee’ option.
- Add the employee detail, with the email address.
- Intuit will send an invitation to the employee. The employee can see their pay stubs and W-2s easily.
- The employee will get an instruction email to set up the workforce account.
- Click on the ‘Ask this employee to enter their personal, tax, and banking info with QuickBooks Workforce’ box, if you want your employee to add their details.
- After that, click the ‘Done’ option.
Note: The procedure was only for QuickBooks Online Payroll users.
Frequently Asked Questions (FAQs)
What is Workforce QuickBooks?
QuickBooks Workforce is a program by which the employees can view, and print their pay stubs and W-2’s. They will get the message through mail when the admin will make changes in the employee pay stubs or W-2’s.
How do I activate ViewMyPaycheck in QuickBooks?
Login to QuickBooks, and select the employee, you need to activate his/her ViewMyPaycheck.
After that, select the services to manage the payroll cloud.
Checkmark the View My Paycheck labeled.
Create a payroll service PIN.
Re-enter the PIn to confirm it.
It was everything about the Intuit ViewMypaycheck issue. Hopefully, you can fix the issue easily. Still, if you have any doubts related to the issue, you can contact us through the toll-free number +1-844-405-0904. The experts will be there for you to provide the best QuickBooks support.